Creating your own federated microblog
In this tutorial, we will build a small microblog that implements the ActivityPub protocol, similar to Mastodon or Misskey, using Fedify, an ActivityPub server framework. This tutorial will focus more on how to use Fedify rather than understanding its underlying operating principles.
If you have any questions, suggestions, or feedback, please feel free to join our Matrix chat space or GitHub Discussions.
Target audience
This tutorial is aimed at those who want to learn Fedify and create ActivityPub server software.
We assume that you have experience in creating web applications using HTML and HTTP, and that you understand command-line interfaces, SQL, JSON, and basic JavaScript. However, you don't need to know TypeScript, JSX, ActivityPub, or Fedify—we'll teach you what you need to know about these as we go along.
You don't need experience in creating ActivityPub software, but we do assume that you've used at least one ActivityPub software like Mastodon or Misskey. This is so you have an idea of what we're trying to build.
Goals
In this tutorial, we'll use Fedify to create a single-user microblog that can communicate with other federated software and services via ActivityPub. This software will include the following features:
- Only one account can be created.
- Other accounts in the fediverse can follow the user.
- Followers can unfollow the user.
- The user can view their list of followers.
- The user can create posts.
- The user's posts are visible to followers in the fediverse.
- The user can follow other accounts in the fediverse.
- The user can view a list of accounts they are following.
- The user can view a chronological list of posts from accounts they follow.
To simplify the tutorial, we'll impose the following feature constraints:
- Account profiles (bio, photos, etc.) cannot be set.
- Once created, an account cannot be deleted.
- Once posted, a post cannot be edited or deleted.
- Once followed, another account cannot be unfollowed.
- There are no likes, shares, or comments.
- There is no search functionality.
- There are no security features such as authentication or permission checks.
Of course, after completing the tutorial, you're welcome to add these features—it would be good practice!
The complete source code is available in the GitHub repository, with commits separated according to each implementation step for your reference.
Setting up the development environment
Installing Node.js
Fedify supports three JavaScript runtimes: Deno, Bun, and Node.js. Among these, Node.js is the most widely used, so we'll use Node.js as the basis for this tutorial.
TIP
A JavaScript runtime is a platform that executes JavaScript code. Web browsers are one type of JavaScript runtime, and for command-line or server use, Node.js is widely used. Recently, cloud edge functions like Cloudflare Workers have also gained popularity as JavaScript runtimes.
To use Fedify, you need Node.js version 22.0.0 or higher. There are various installation methods—choose the one that suits you best.
Once Node.js is installed, you'll have access to the node and npm commands:
node --version
npm --version
Installing the fedify command
To set up a Fedify project, you need to install the fedify command on your system. There are several installation methods, but using the npm command is the simplest:
npm install -g @fedify/cliAfter installation, check if you can use the fedify command. You can check the version of the fedify command with this command:
fedify --versionMake sure the version number is 1.0.0 or higher. If it's an older version, you won't be able to properly follow this tutorial.
fedify init to initialize the project
To start a new Fedify project, let's decide on a directory path to work in. In this tutorial, we'll name it microblog. Run the fedify init command followed by the directory path (it's okay if the directory doesn't exist yet):
fedify init microblogWhen you run the fedify init command, you'll see a series of prompts. Select Hono, npm, in-process, and in-memory in order:
             ___      _____        _ _  __
            /'_')    |  ___|__  __| (_)/ _|_   _
     .-^^^-/  /      | |_ / _ \/ _` | | |_| | | |
   __/       /       |  _|  __/ (_| | |  _| |_| |
  <__.|_|-|_|        |_|  \___|\__,_|_|_|  \__, |
                                           |___/
? Choose the web framework to use
  Bare-bones
❯ Hono
  Nitro
  Next.js
  ElysiaJS
  Astro
  Express
  Nuxt
  SolidStart


? Choose the package manager to use
  deno
  pnpm
  bun
  yarn
❯ npm

? Choose the message queue to use
❯ in-process
  redis
  postgres
  mysql
  amqp
- denokv (not supported with npm) (disabled)

? Choose the key-value store to use
❯ in-memory
  redis
  postgres
  mysql
- denokv (not supported with npm) (disabled)
NOTE
Fedify is not a full-stack framework, but rather a framework specialized for implementing ActivityPub servers. Therefore, it's designed to be used alongside other web frameworks. In this tutorial, we'll adopt Hono as our web framework to use with Fedify.
After a moment, you'll see files created in your working directory with the following structure:
- .vscode/ — Visual Studio Code related settings
- extensions.json — Recommended extensions for Visual Studio Code
- settings.json — Visual Studio Code settings
- node_modules/ — Directory where dependent packages are installed (contents omitted)
- src/ — Source code
- app.tsx — Server unrelated to ActivityPub
- federation.ts — ActivityPub server
- index.ts — Entry point
- logging.ts — Logging configuration
- .oxfmtrc.json — Formatter settings
- .oxlintrc.json — Linter settings
- package.json — Package metadata
- tsconfig.json — TypeScript settings
As you might guess, we're using TypeScript instead of JavaScript, which is why we have .ts and .tsx files instead of .js files.
The generated source code is a working demo. Let's first check if it runs properly:
npm run devThis command will keep the server running until you press Ctrl+C:
Server started at http://0.0.0.0:8000With the server running, open a new terminal tab and run the following command:
fedify lookup http://localhost:8000/users/johnThis command queries an actor (actor) on the ActivityPub server we've set up locally. In ActivityPub, an actor can be thought of as an account that's accessible across various ActivityPub servers.
If you see output like this, it's working correctly:
✔ Looking up the object...
Person {
  id: URL "http://localhost:8000/users/john",
  name: "john",
  preferredUsername: "john"
}
This result tells us that there's an actor object located at the /users/john path, it's of type Person, its ID is http://localhost:8000/users/john, its name is john, and its username is also john.
TIP
fedify lookup is a command to query ActivityPub objects. This is equivalent to searching with the corresponding URI on Mastodon. (Of course, since your server is only accessible locally at the moment, searching on Mastodon won't yield any results yet.)
If you prefer curl over the fedify lookup command, you can also query the actor with this command (note that we're sending the Accept header with the -H option):
curl -H"Accept: application/activity+json" http://localhost:8000/users/johnHowever, if you query like this, the result will be in JSON format, which is difficult to read with the naked eye. If you also have the jq command installed on your system, you can use curl and jq together:
curl -H"Accept: application/activity+json" http://localhost:8000/users/john | jq .Visual Studio Code
Visual Studio Code might not be your favorite editor. However, we recommend using Visual Studio Code while following this tutorial. This is because we need to use TypeScript, and Visual Studio Code is currently the most convenient and excellent TypeScript IDE. Also, the generated project setup already includes Visual Studio Code settings, so you don't have to wrestle with formatters or linters.
WARNING
Don't confuse this with Visual Studio. Visual Studio Code and Visual Studio only share a brand name; they are completely different software.
After installing Visual Studio Code, open the working directory by selecting File → Open Folder… from the menu.
If you see a popup in the bottom right asking you to install the recommended Oxc extension for this repository, click the Install button to install the extension. Installing this extension will automatically format your TypeScript code, so you don't have to wrestle with code styles like indentation or spacing when writing TypeScript code.
TIP
If you're a loyal Emacs or Vim user, we won't discourage you from using your favorite editor. However, we recommend setting up TypeScript LSP. The difference in productivity depending on whether TypeScript LSP is set up or not is significant.
Prerequisites
TypeScript
Before we start modifying code, let's briefly go over TypeScript. If you're already familiar with TypeScript, you can skip this section.
TypeScript adds static type checking to JavaScript. The TypeScript syntax is almost the same as JavaScript, but the main difference is that you can specify types for variables and functions. Types are specified by adding a colon (:) after the variable or parameter.
For example, the following code indicates that the foo variable is a string:
let foo: string;If you try to assign a value of a different type to a variable declared like this, Visual Studio Code will show a red underline before you even run it and display a type error:
foo = 123;When coding, don't ignore red underlines. If you ignore them and run the program, it's likely that an error will actually occur at that part.
The most common type of error you'll encounter when coding in TypeScript is the null possibility error. For example, in the following code, the bar variable can be either a string or null (string | null):
const bar: string | null = someFunction();What happens if you try to get the first character of this variable's content like this?
const firstChar = bar.charAt(0);You'll get a type error like above. It's saying that bar might sometimes be null, and in that case, calling null.charAt(0) would cause an error, so you need to fix the code. In such cases, you need to add handling for the null case like this:
const firstChar = bar === null ? "" : bar.charAt(0);In this way, TypeScript helps prevent bugs by making you think of cases you might not have considered when coding.
Another incidental advantage of TypeScript is that it enables auto-completion. For example, if you type foo., a list of methods available for string objects will appear, allowing you to choose from them. This allows for faster coding without having to check documentation each time.
We hope you'll feel the charm of TypeScript as you follow this tutorial. Above all, Fedify provides the best experience when used with TypeScript.
TIP
If you want to learn TypeScript properly and thoroughly, we recommend reading The TypeScript Handbook. It takes about 30 minutes to read it all.
JSX
JSX is a syntax extension of JavaScript that allows you to insert XML or HTML into JavaScript code. It can also be used in TypeScript, in which case it's sometimes called TSX. In this tutorial, we'll write all HTML within JavaScript code using JSX syntax. Those who are already familiar with JSX can skip this section.
For example, the following code assigns an HTML tree with a <div> element at the top to the html variable:
const html = <div>
  <p id="greet">Hello, <strong>JSX</strong>!</p>
</div>;
You can also insert JavaScript expressions using curly braces (the following code assumes, of course, that there's a getName() function):
const html = <div title={"Hello, " + getName() + "!"}>
  <p id="greet">Hello, <strong>{getName()}</strong>!</p>
</div>;
One of the features of JSX is that you can define your own tags called components. Components can be defined as ordinary JavaScript functions. For example, the following code defines and uses a <Container> component (component names typically follow PascalCase style):
import type { Child, FC } from "hono/jsx";

function getName() {
  return "JSX";
}

interface ContainerProps {
  name: string;
  children: Child;
}

const Container: FC<ContainerProps> = (props) => {
  return <div title={"Hello, " + props.name + "!"}>{props.children}</div>;
};

const html = <Container name={getName()}>
  <p id="greet">Hello, <strong>{getName()}</strong>!</p>
</Container>;
In the above code, FC is provided by Hono, the web framework we'll use, and it helps define the type of the component. FC is a generic type, and the types that go inside the angle brackets after FC are type arguments. Here, we specify the props type as the type argument. Props refer to the parameters passed to the component. In the above code, we declared and used the ContainerProps interface as the props type for the <Container> component.
TIP
Type arguments for generic types can be multiple, separated by commas. For example, Foo<A, B> applies type arguments A and B to the generic type Foo.
There are also generic functions, which are written as someFunction<A, B>(foo, bar).
When there's only one type argument, the angle brackets enclosing the type argument may look like XML/HTML tags, but they have nothing to do with JSX functionality.
FC<ContainerProps>- Applies the type argument
ContainerPropsto the generic typeFC. <Container>- Opens a component tag named
<Container>. Must be closed with</Container>.
Among the things passed as props, children is worth noting specifically. This is because the child elements of the component are passed as the children prop. As a result, in the above code, the html variable is assigned the HTML tree <div title="Hello, JSX!"><p id="greet">Hello, <strong>JSX</strong>!</p></div>.
TIP
JSX was invented in the React project and started to be widely used. If you want to know more about JSX, read the Writing Markup with JSX and JavaScript in JSX with Curly Braces sections of the React documentation.
Account creation page
The first thing we'll create is the account creation page. We need to create an account before we can post or follow other accounts. Let's start by building the visible part.
First, let's create a file named src/views.tsx. Inside this file, we'll define a <Layout> component using JSX:
import type { FC } from "hono/jsx";

export const Layout: FC = (props) => (
  <html lang="en">
    <head>
      <meta charset="utf-8" />
      <meta name="viewport" content="width=device-width, initial-scale=1" />
      <meta name="color-scheme" content="light dark" />
      <title>Microblog</title>
      <link
        rel="stylesheet"
        href="https://cdn.jsdelivr.net/npm/@picocss/pico@2/css/pico.min.css"
      />
    </head>
    <body>
      <main class="container">{props.children}</main>
    </body>
  </html>
);
To avoid spending too much time on design, we'll use a CSS framework called Pico CSS.
TIP
When the type of a variable or parameter can be inferred by TypeScript's type checker, like props above, it's fine to omit the type annotation. Even when the type annotation is omitted in such cases, you can check the type of a variable by hovering your mouse cursor over the variable name in Visual Studio Code.
Next, in the same file, let's define a <SetupForm> component that will go inside the layout:
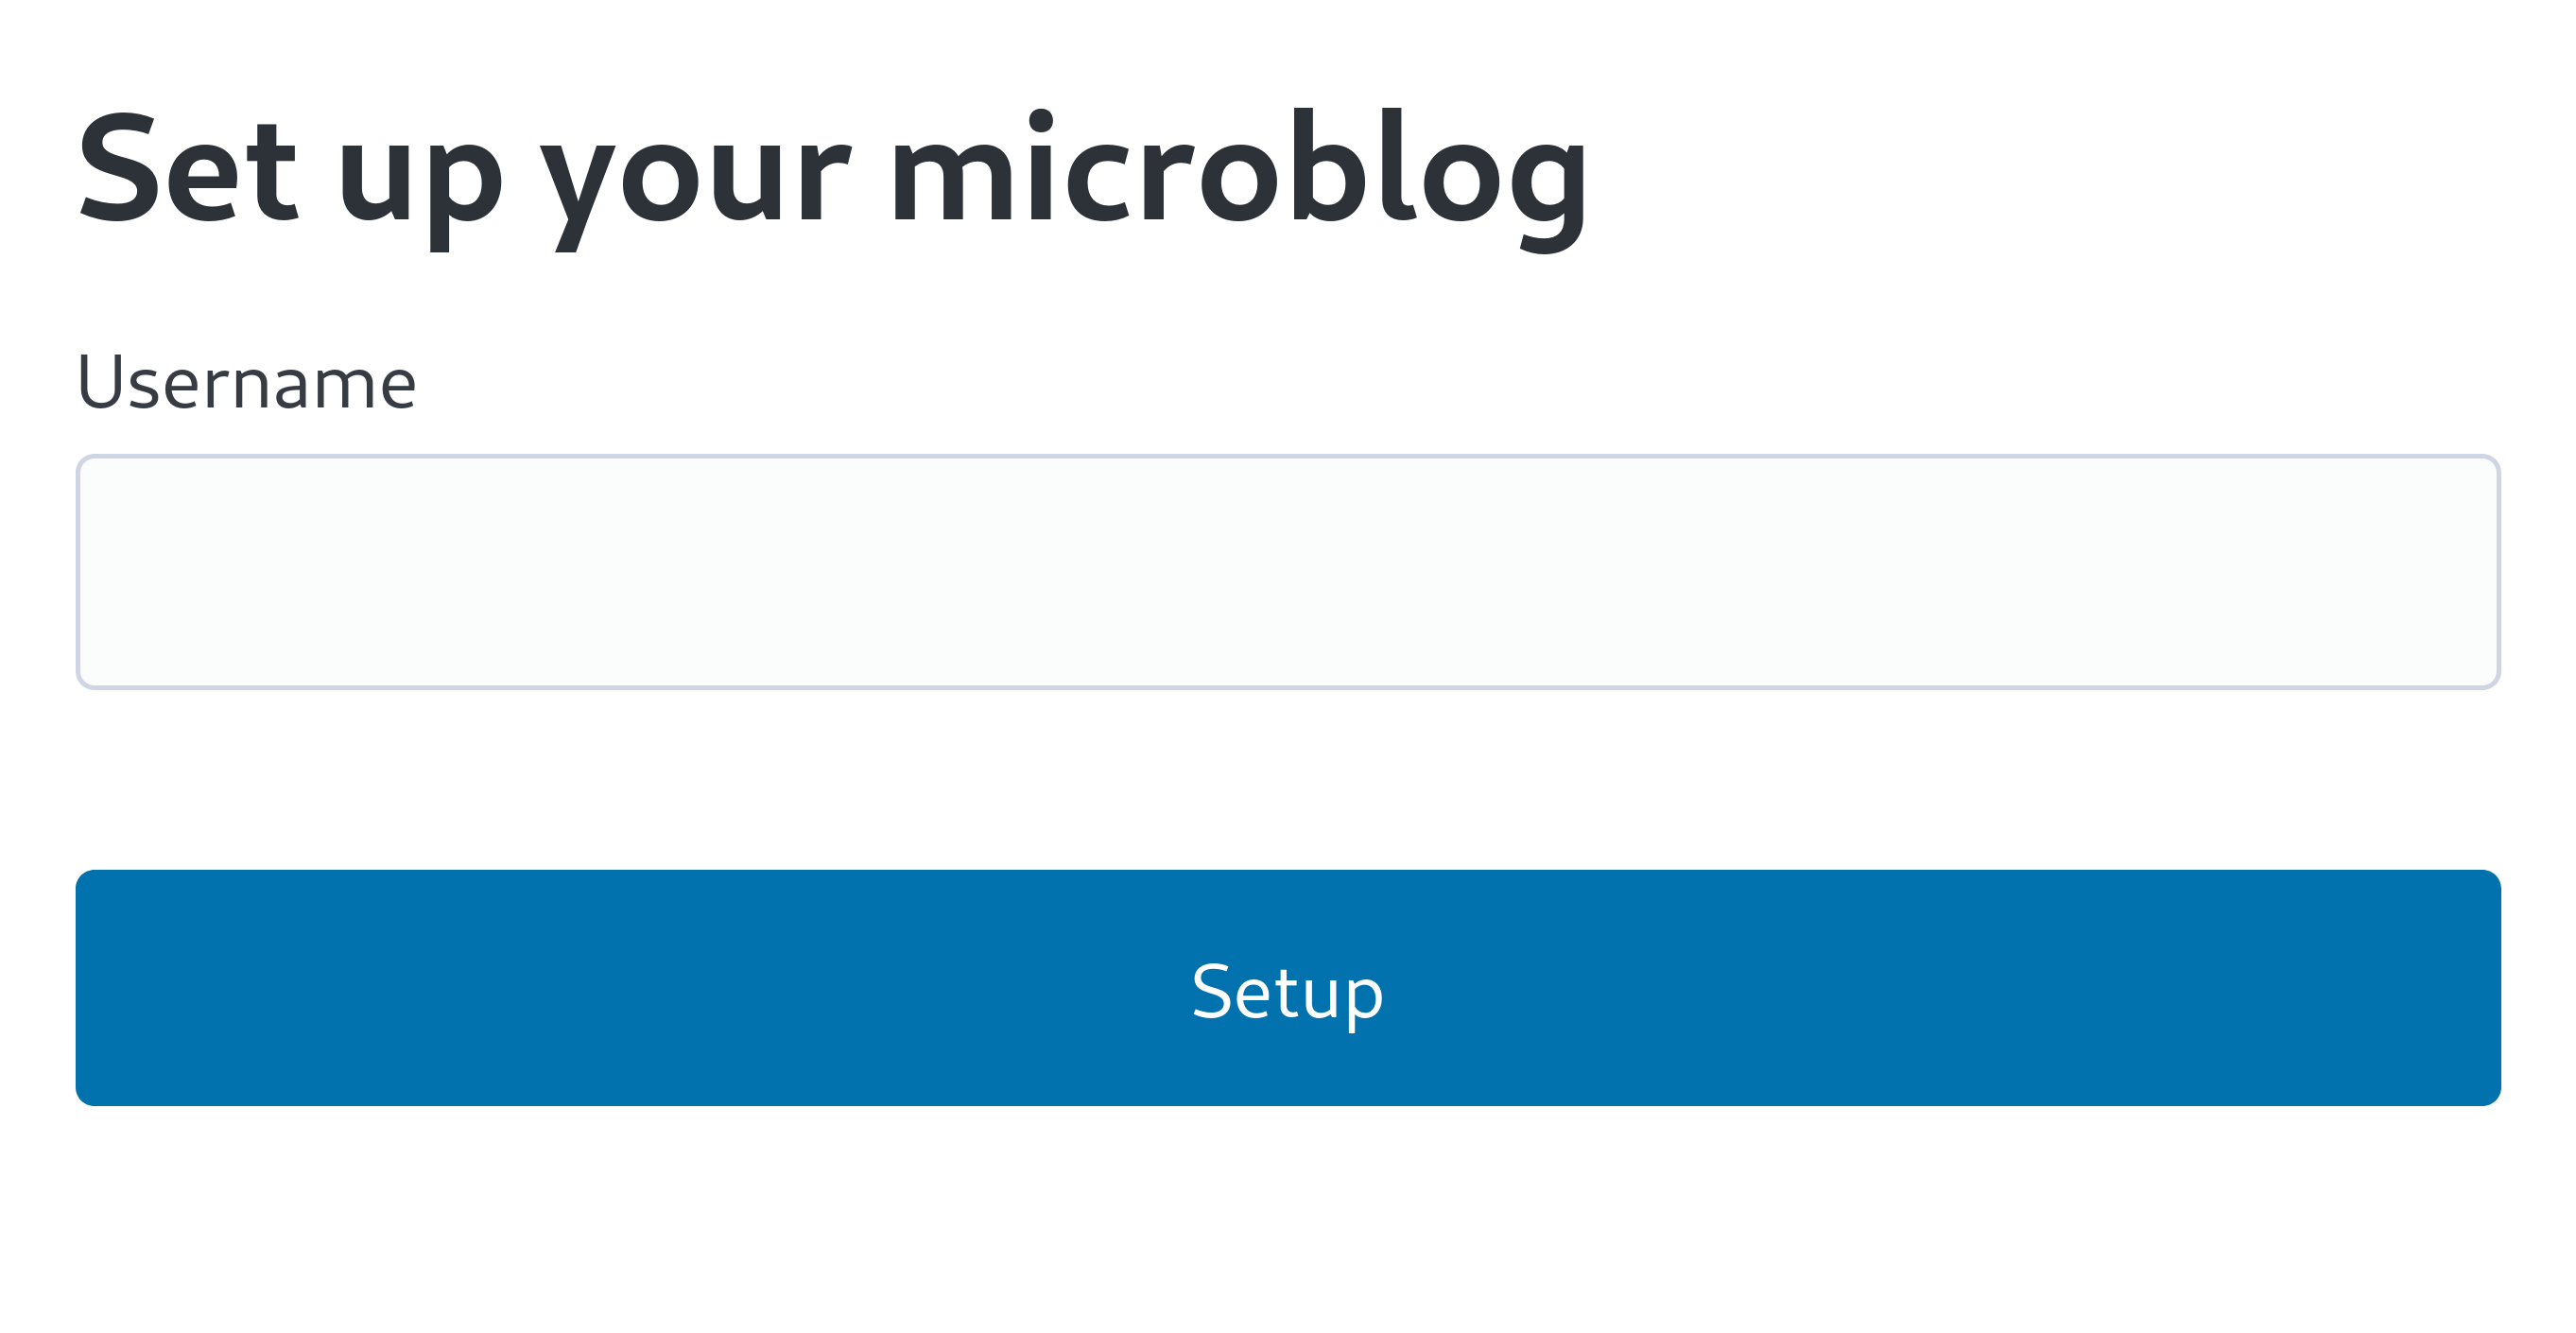
export const SetupForm: FC = () => (
  <>
    <h1>Set up your microblog</h1>
    <form method="post" action="/setup">
      <fieldset>
        <label>
          Username{" "}
          <input
            type="text"
            name="username"
            required
            maxlength={50}
            pattern="^[a-z0-9_\-]+$"
          />
        </label>
      </fieldset>
      <input type="submit" value="Setup" />
    </form>
  </>
);
In JSX, you can only have one top-level element, but the <SetupForm> component has two top-level elements: <h1> and <form>. That's why we've wrapped them with <> and </>. This is called a fragment.
Now it's time to use the components we've defined. Open the src/app.tsx file and import the two components we just defined:
import { Layout, SetupForm } from "./views.tsx";Then, display the account creation form we just made on the /setup page:
app.get("/setup", (c) =>
  c.html(
    <Layout>
      <SetupForm />
    </Layout>,
  ),
);
Now, let's open the http://localhost:8000/setup page in a web browser. If you see a screen like this, it's working correctly:
NOTE
To use JSX, the source file extension must be .jsx or .tsx. Note that both files we edited in this section have the .tsx extension.
Database setup
Now that we've implemented the visible part, it's time to implement the functionality. We need a place to store account information, so let's use SQLite. SQLite is a relational database suitable for small-scale applications.
First, let's declare a table to hold account information. From now on, we'll write all table declarations in the src/schema.sql file. We'll store account information in the users table:
CREATE TABLE IF NOT EXISTS users (
  id       INTEGER NOT NULL PRIMARY KEY CHECK (id = 1),
  username TEXT    NOT NULL UNIQUE      CHECK (trim(lower(username)) = username
                                               AND username <> ''
                                               AND length(username) <= 50)
);
Since the microblog we're creating can only have one account, we've put a constraint on the id column, which is the primary key, to not allow values other than 1. This ensures that the users table can't contain more than one record. We've also put constraints on the username column to not allow empty strings or strings that are too long.
Now we need to run the src/schema.sql file to create the users table. For this, we need the sqlite3 command, which you can get from the SQLite website or install from your platform's package manager. For macOS, you don't need to get it separately as it is built into the system. If you get it directly, you can get the sqlite-tools-*.zip file for your OS and unzip it. If you use a package manager, you can also install it with the following command:
sudo apt install sqlite3sudo dnf install sqlitechoco install sqlitescoop install sqlitewinget install SQLite.SQLiteOkay, now that we have the sqlite3 command, let's use it to create a database file:
sqlite3 microblog.sqlite3 < src/schema.sqlThe above command will create a microblog.sqlite3 file, which will store your SQLite data.
Connecting to the database in the app
Now we need to use the SQLite database in our app. To use SQLite database in Node.js, we need a SQLite driver library, and we'll use the better-sqlite3 package. You can easily install the package with the npm command:
npm add better-sqlite3
npm add --save-dev @types/better-sqlite3
TIP
The @types/better-sqlite3 package contains type information about the better-sqlite3 package's API for TypeScript. You need to install this package to enable auto-completion and type checking when editing in Visual Studio Code.
Packages like this in the @types/ scope are called Definitely Typed packages. When a library is not written in TypeScript, the community adds type information and makes it into a package.
Now that we've installed the package, let's write code to connect to the database using this package. Create a new file named src/db.ts and code it as follows:
import Database from "better-sqlite3";

const db = new Database("microblog.sqlite3");
db.pragma("journal_mode = WAL");
db.pragma("foreign_keys = ON");

export default db;
TIP
The settings made through the db.pragma() function have the following effects:
journal_mode = WAL- Adopts Write-Ahead Logging mode as a way to implement atomic commits and rollbacks in SQLite. This mode is generally more performant than the default rollback journal mode.
foreign_keys = ON- By default, SQLite does not check foreign key constraints. Turning on this setting makes it check foreign key constraints, which helps maintain data integrity.
Now let's declare a type in JavaScript to represent the record stored in the users table. Create a src/schema.ts file and define the User type as follows:
export interface User {
  id: number;
  username: string;
}
Record insertion
Now that we've connected to the database, it's time to write code to insert records.
Open the src/app.tsx file and import the db object and User type that will be used for record insertion:
import db from "./db.ts";
import type { User } from "./schema.ts";
Implement the POST /setup handler:
app.post("/setup", async (c) => {
  // Check if an account already exists
  const user = db.prepare<unknown[], User>("SELECT * FROM users LIMIT 1").get();
  if (user != null) return c.redirect("/");

  const form = await c.req.formData();
  const username = form.get("username");
  if (typeof username !== "string" || !username.match(/^[a-z0-9_-]{1,50}$/)) {
    return c.redirect("/setup");
  }
  db.prepare("INSERT INTO users (username) VALUES (?)").run(username);
  return c.redirect("/");
});
Add code to check if an account already exists to the GET /setup handler we created earlier:
app.get("/setup", (c) => {
  // Check if an account already exists
  const user = db.prepare<unknown[], User>("SELECT * FROM users LIMIT 1").get();
  if (user != null) return c.redirect("/");

  return c.html(
    <Layout>
      <SetupForm />
    </Layout>,
  );
});
Testing
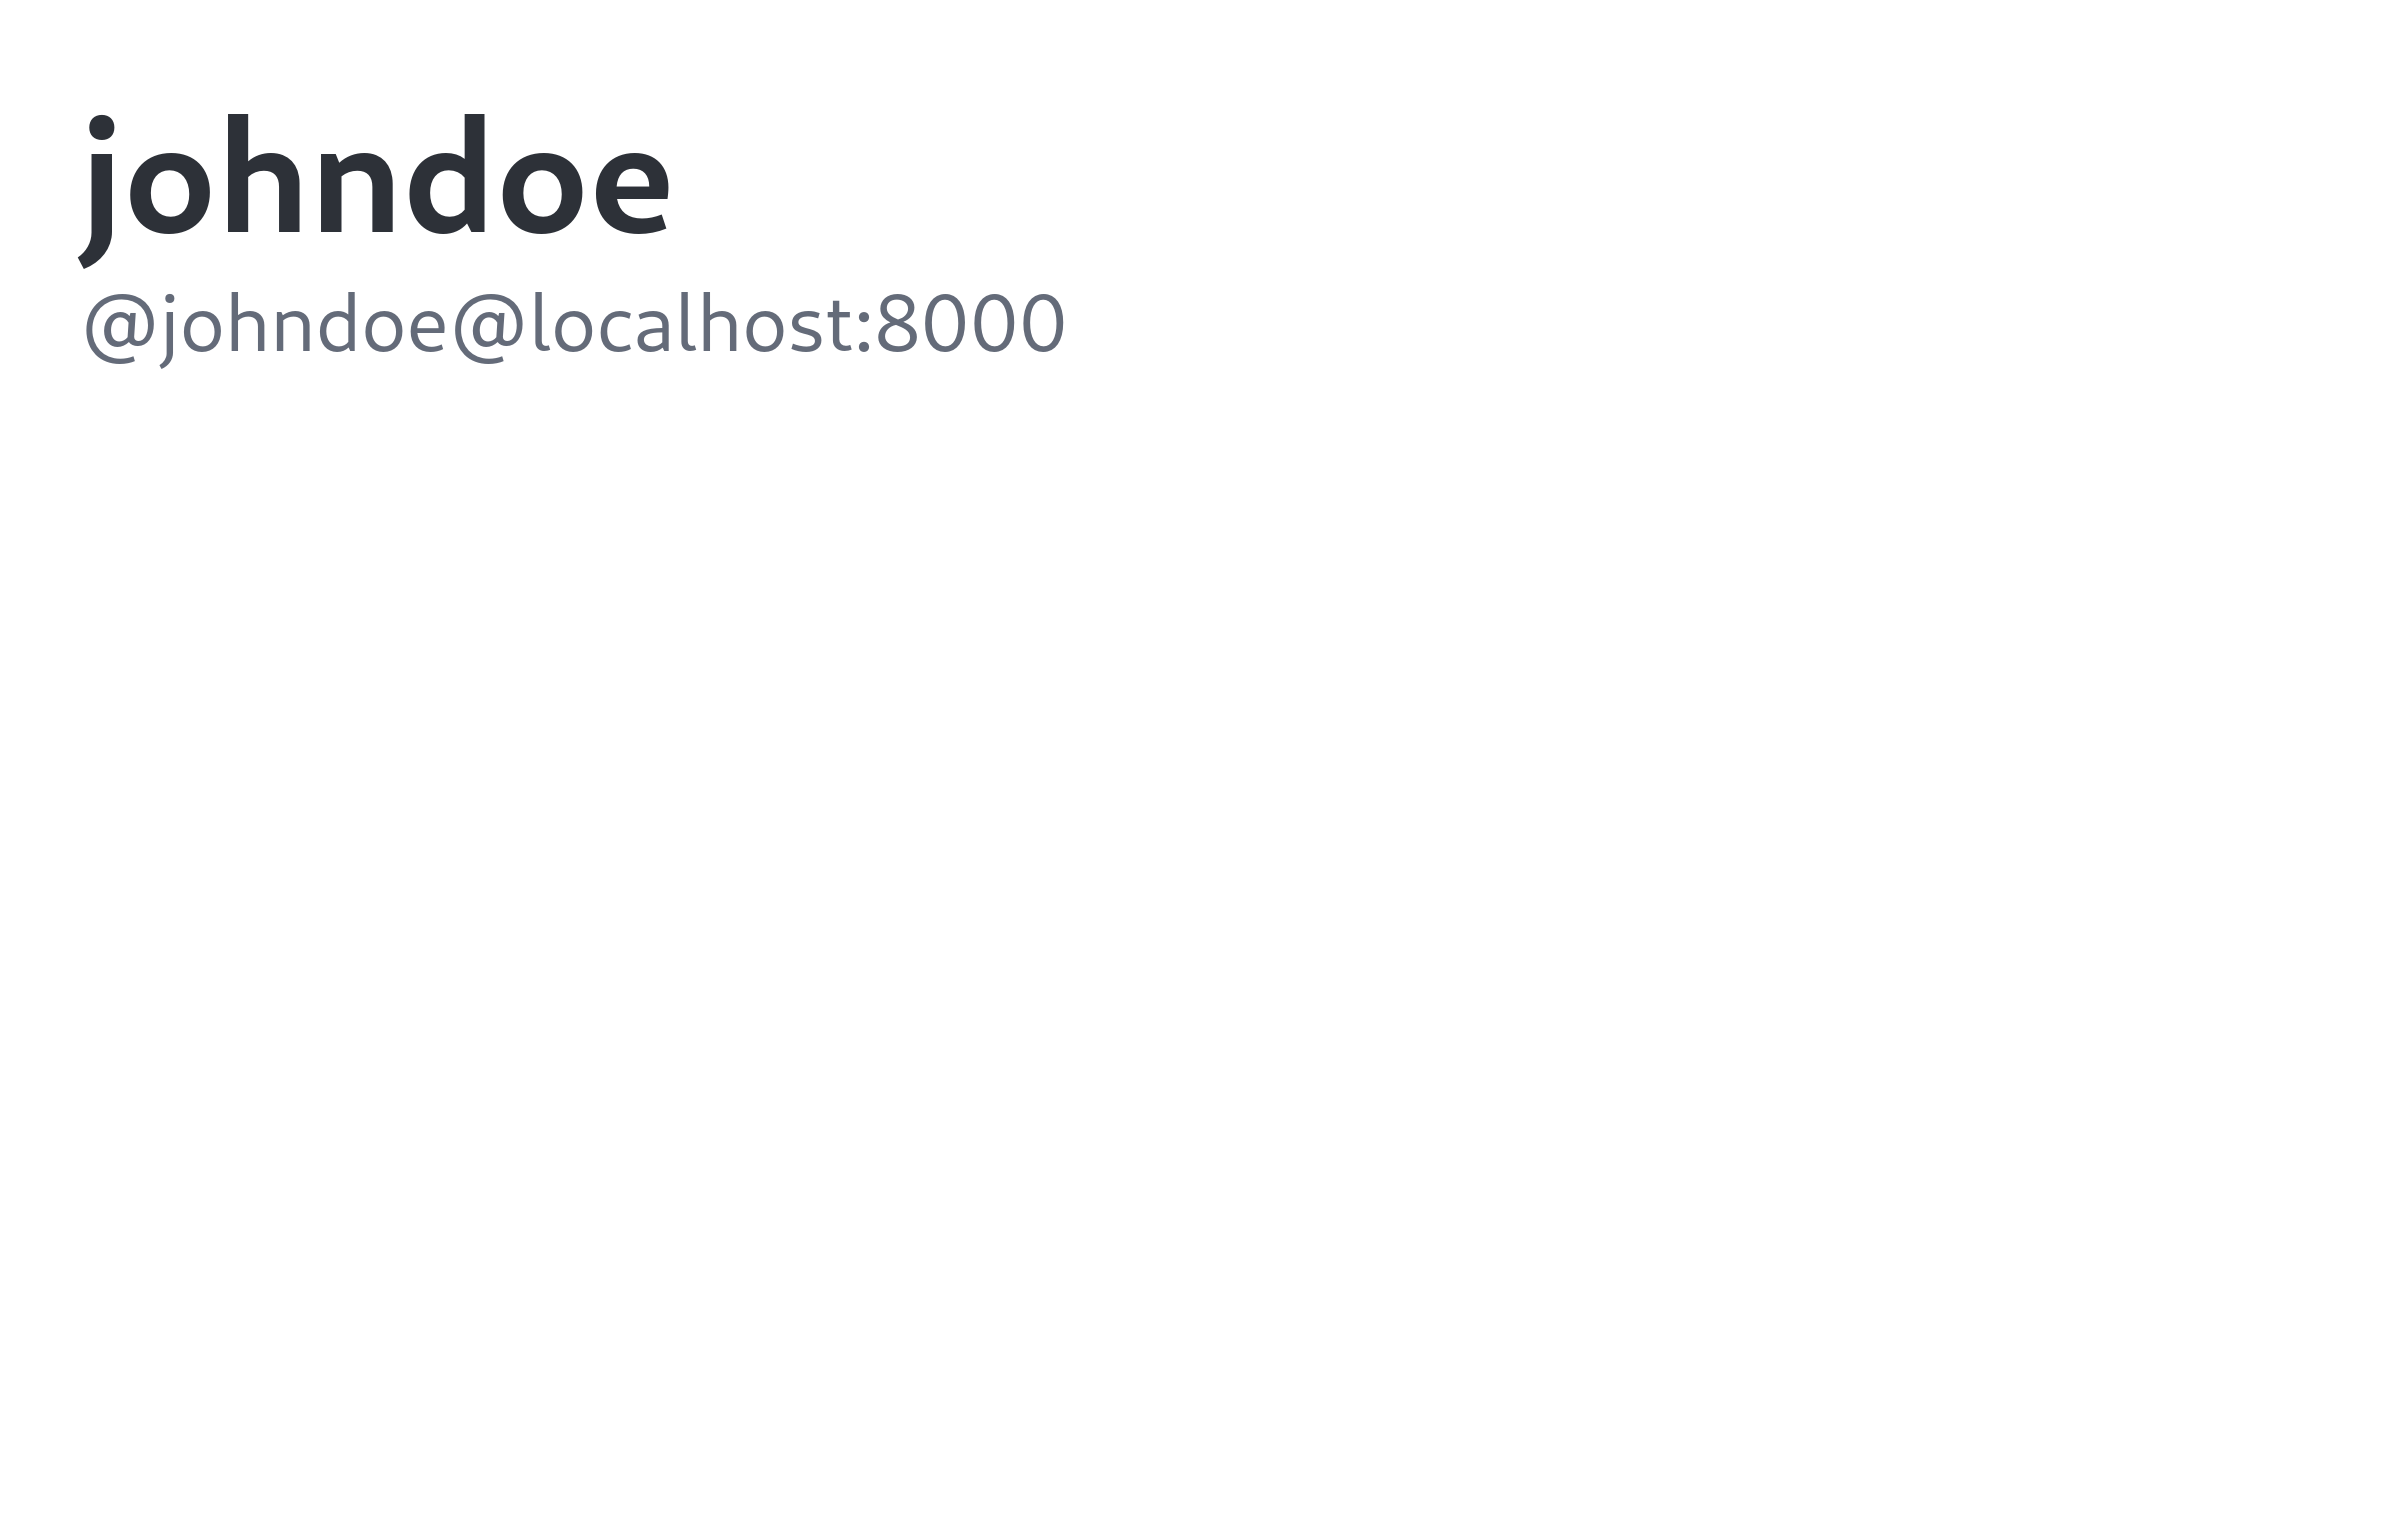
Now that we've roughly implemented the account creation feature, let's try it out. Open the http://localhost:8000/setup page in a web browser and create an account. In this tutorial, we'll assume that we used johndoe as the username. If it's created, let's also check if the record was properly inserted into the SQLite database:
echo "SELECT * FROM users;" | sqlite3 -table microblog.sqlite3If the record was properly inserted, you should see output like this (of course, johndoe will be whatever username you entered):
id | username |
|---|---|
1 | johndoe |
Profile page
Now that we've created an account, let's implement a profile page to display the account information. Although we don't have much information to show yet.
Let's start with the visible part again. Open the src/views.tsx file and define a <Profile> component:
export interface ProfileProps {
  name: string;
  handle: string;
}

export const Profile: FC<ProfileProps> = ({ name, handle }) => (
  <>
    <hgroup>
      <h1>{name}</h1>
      <p style="user-select: all;">{handle}</p>
    </hgroup>
  </>
);
Then, open the src/app.tsx file and import the component we just defined:
import { Layout, Profile, SetupForm } from "./views.tsx";And add a GET /users/{username} request handler that displays the <Profile> component:
app.get("/users/:username", async (c) => {
const user = db
.prepare<unknown[], User>("SELECT * FROM users WHERE username = ?")
.get(c.req.param("username"));
if (user == null) return c.notFound();
const url = new URL(c.req.url);
const handle = `@${user.username}@${url.host}`;
return c.html(
<Layout>
<Profile name={user.username} handle={handle} />
</Layout>,
);
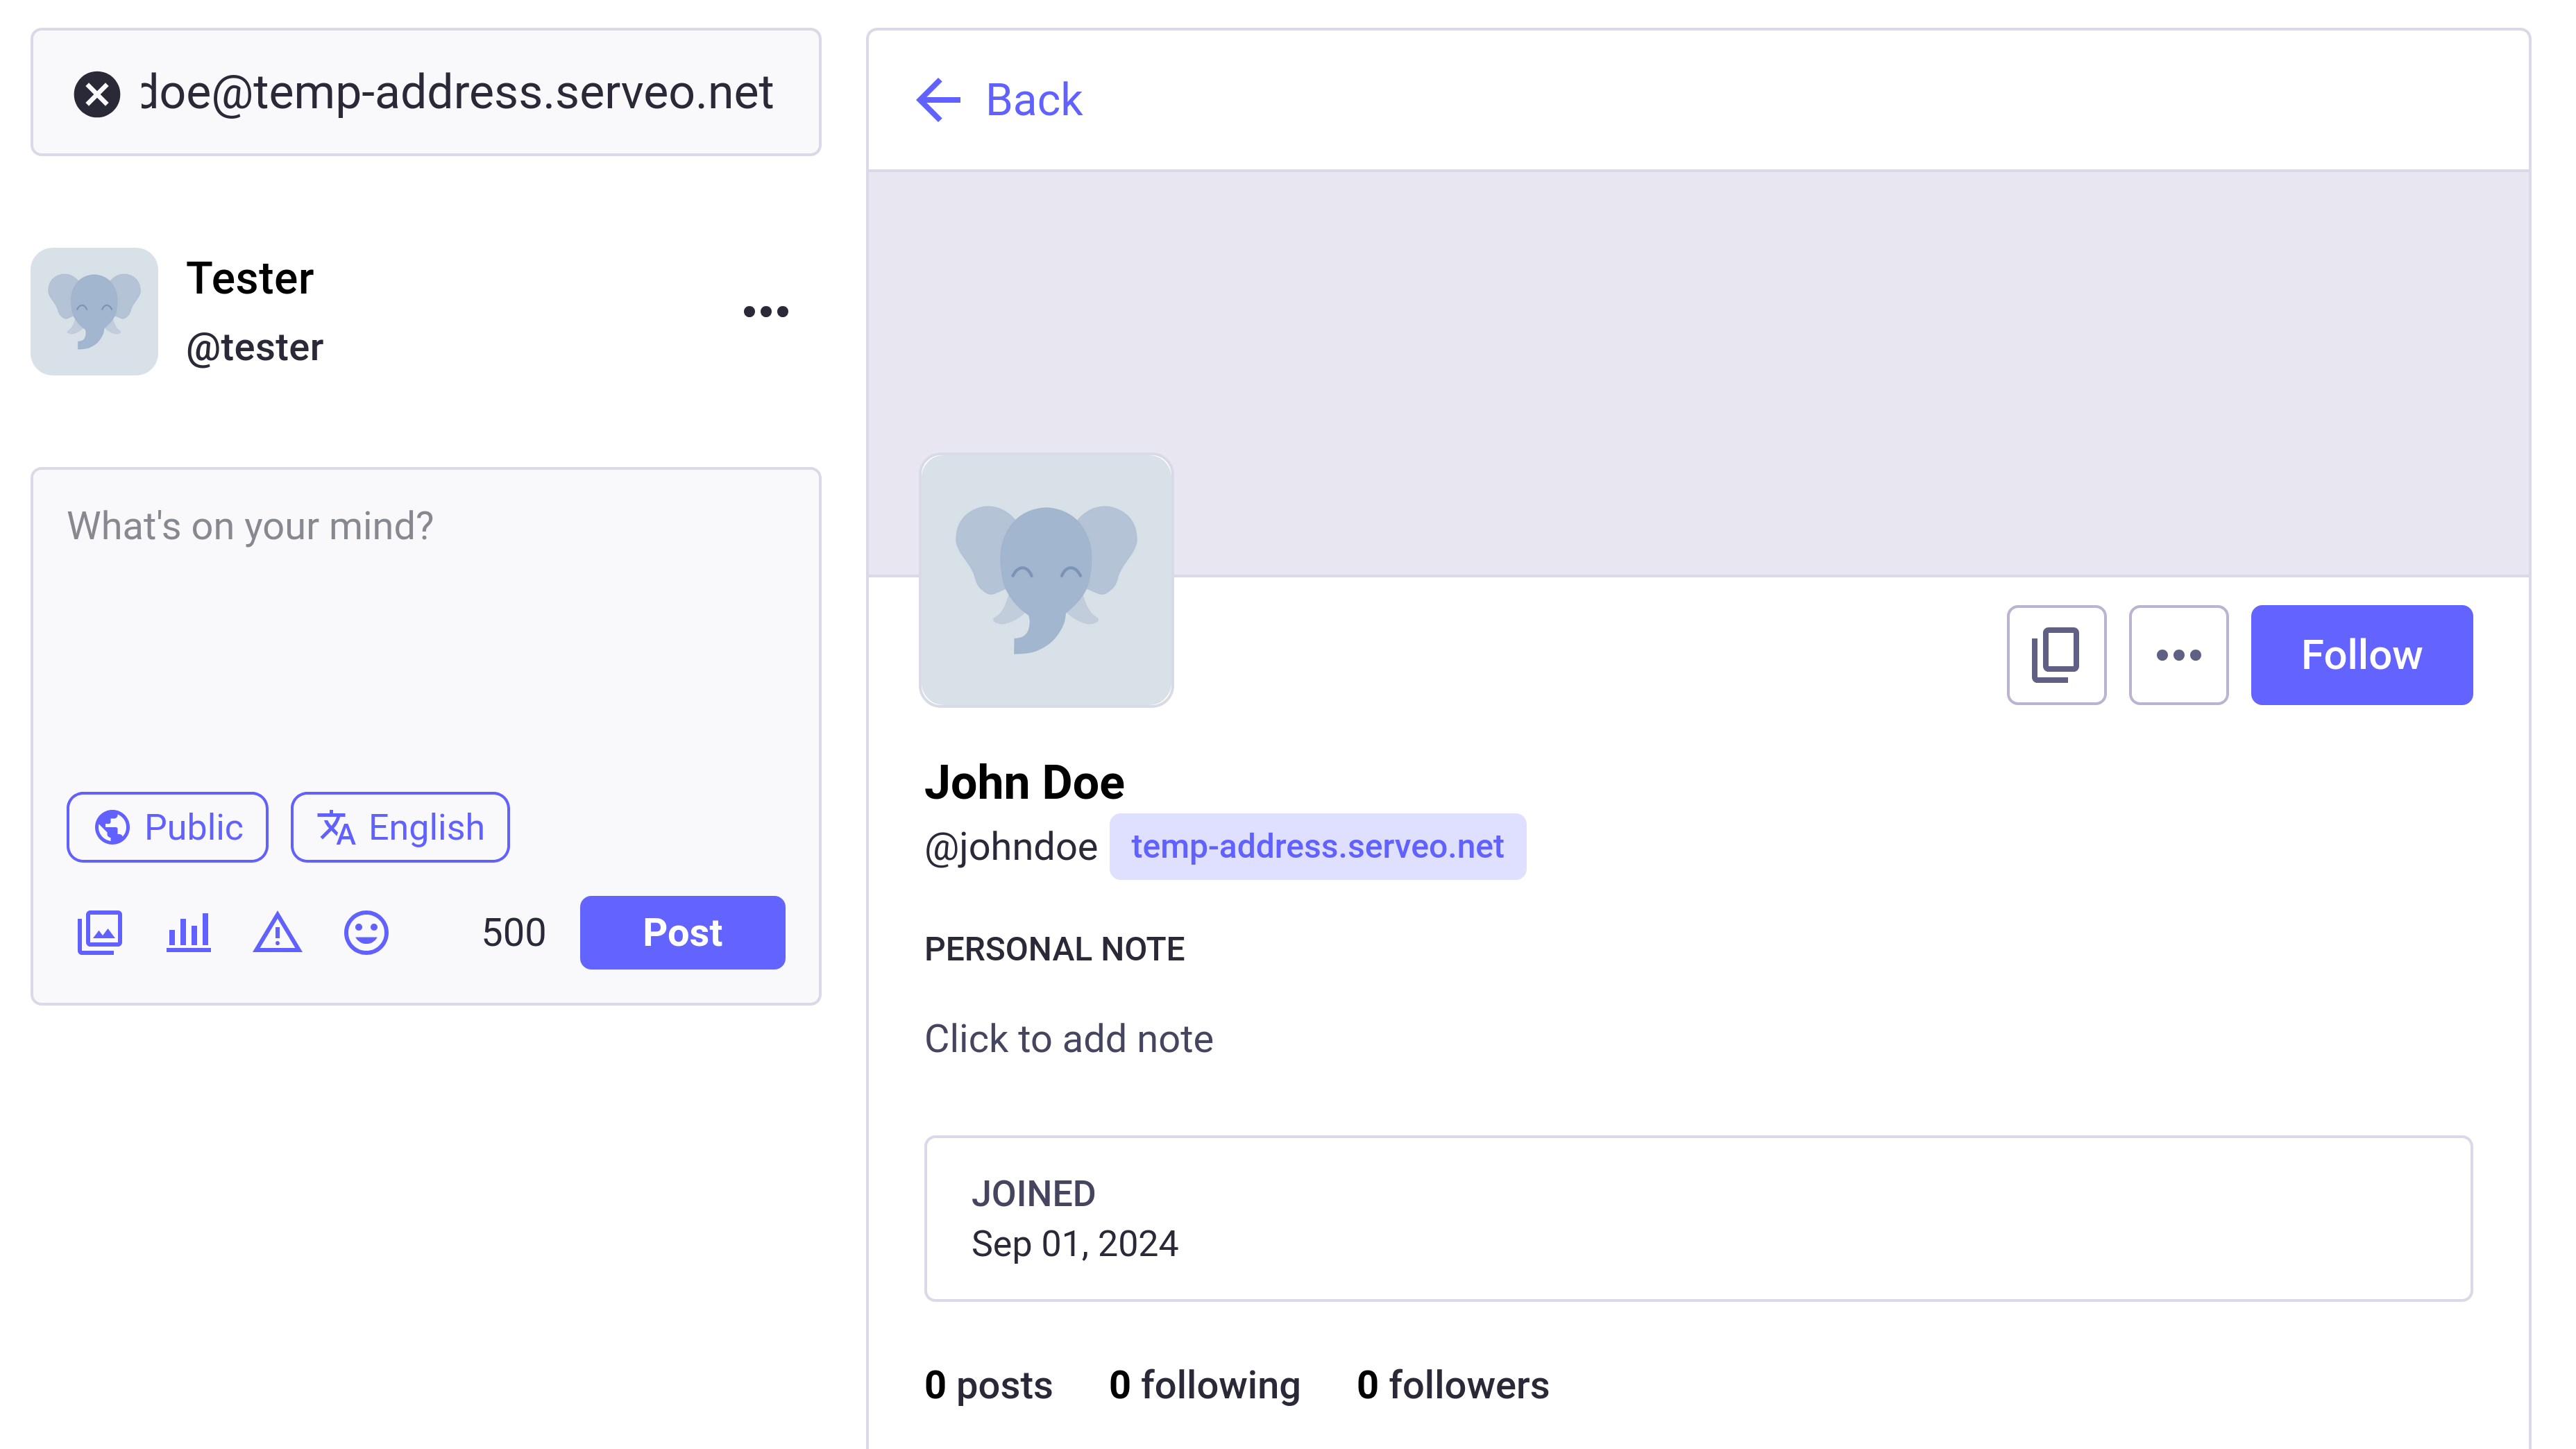
});Now let's test if it displays correctly. Open the http://localhost:8000/users/johndoe page in your web browser (if you created an account with a username other than johndoe, change the URL accordingly). You should see a screen like this:
TIP
A fediverse handle, or simply handle, is a unique address that identifies an account in the fediverse. For example, it looks like @hongminhee@fosstodon.org. It's similar to an email address, and its structure is also similar to an email address. It starts with @, followed by a name, then another @, and finally the domain name of the server the account belongs to. Sometimes the initial @ is omitted.
Technically, handles are implemented using two standards: WebFinger and the acct: URI scheme. Thanks to Fedify implementing these, you don't need to know the implementation details while following this tutorial.
Implementing the actor
As the name suggests, ActivityPub is a protocol for exchanging activities. Writing a post, editing a post, deleting a post, liking a post, commenting, editing a profile… All actions that happen in social media are expressed as activities.
And all activities are transmitted from actor to actor. For example, when John Doe writes a post, a writing
(Create(Note)) activity is sent from Joh Doe to John Doe's followers. If Jane Doe likes that post, a liking
(Like) activity is sent from Jane Doe to John Doe.
Therefore, the first step in implementing ActivityPub is to implement the actor.
The demo app generated by the fedify init command already has a very simple actor implemented, but to communicate with actual software like Mastodon or Misskey, we need to implement the actor more properly.
First, let's take a look at the current implementation. Open the src/federation.ts file:
import { createFederation, InProcessMessageQueue, MemoryKvStore } from "@fedify/fedify";
import { Person } from "@fedify/vocab";
import { getLogger } from "@logtape/logtape";

const logger = getLogger("microblog");

const federation = createFederation({
  kv: new MemoryKvStore(),
  queue: new InProcessMessageQueue(),
});

federation.setActorDispatcher("/users/{identifier}", async (ctx, identifier) => {
  return new Person({
    id: ctx.getActorUri(identifier),
    preferredUsername: identifier,
    name: identifier,
  });
});

export default federation;
The part we should focus on is the setActorDispatcher() method. This method defines the URL and behavior that other ActivityPub software will use when querying an actor on our server. For example, if we query /users/johndoe as we did earlier, the identifier parameter of the callback function will receive the string value "johndoe". And the callback function returns an instance of the Person class to convey the information of the queried actor.
The ctx parameter receives a Context object, which contains various functions related to the ActivityPub protocol. For example, the getActorUri() method used in the above code returns the unique URI of the actor with the identifier passed as a parameter. This URI is being used as the unique identifier of the Person object.
As you can see from the implementation code, currently it's making up actor information and returning it for any identifier that comes after the /users/ path. But what we want is to only allow queries for accounts that are actually registered. Let's modify this part to only return for accounts in the database.
Table creation
We need to create an actors table. Unlike the users table which only contains accounts on the current instance server, this table will also include remote actors belonging to federated servers. The table looks like this. Add the following SQL to the src/schema.sql file:
CREATE TABLE IF NOT EXISTS actors (
  id               INTEGER NOT NULL PRIMARY KEY,
  user_id          INTEGER          REFERENCES users (id),
  uri              TEXT    NOT NULL UNIQUE CHECK (uri <> ''),
  handle           TEXT    NOT NULL UNIQUE CHECK (handle <> ''),
  name             TEXT,
  inbox_url        TEXT    NOT NULL UNIQUE CHECK (inbox_url LIKE 'https://%'
                                                  OR inbox_url LIKE 'http://%'),
  shared_inbox_url TEXT                    CHECK (shared_inbox_url
                                                  LIKE 'https://%'
                                                  OR shared_inbox_url
                                                  LIKE 'http://%'),
  url              TEXT                    CHECK (url LIKE 'https://%'
                                                  OR url LIKE 'http://%'),
  created          TEXT    NOT NULL DEFAULT (CURRENT_TIMESTAMP)
                                           CHECK (created <> '')
);
The
user_idcolumn is a foreign key to connect with theuserscolumn. If the record represents a remote actor, it will beNULL, but if it's an account on the current instance server, it will contain theusers.idvalue of that account.The
uricolumn contains the unique URI of the actor, also called the actor ID. All ActivityPub objects, including actors, have a unique ID in URI form. Therefore, it cannot be empty and cannot be duplicated.The
handlecolumn contains the fediverse handle in the form of@johndoe@example.com. Likewise, it cannot be empty and cannot be duplicated.The
namecolumn contains the name displayed in the UI. It usually contains a full name or nickname. However, according to the ActivityPub specification, this column can be empty.The
inbox_urlcolumn contains the URL of the actor's inbox. We'll explain in detail what an inbox is below, but for now, just know that it must exist for the actor. This column also cannot be empty or duplicated.The
shared_inbox_urlcolumn contains the URL of the actor's shared inbox, which we'll also explain below. It's not mandatory, so it can be empty, and as the column name suggests, it can share the same shared inbox URL with other actors.The
urlcolumn contains the profile URL of the actor. A profile URL means the URL of the profile page that can be opened in a web browser. Sometimes the actor's ID and profile URL are the same, but they can be different depending on the service, so in that case, the profile URL is stored in this column. It can be empty.The
createdcolumn records when the record was created. It cannot be empty, and by default, the insertion time is recorded.
Now, let's apply the src/schema.sql file to the microblog.sqlite3 database file:
sqlite3 microblog.sqlite3 < src/schema.sqlAnd let's define a type in src/schema.ts to represent records stored in the actors table in JavaScript:
export interface Actor {
  id: number;
  user_id: number | null;
  uri: string;
  handle: string;
  name: string | null;
  inbox_url: string;
  shared_inbox_url: string | null;
  url: string | null;
  created: string;
}
Actor record
Although we currently have one record in the users table, there's no corresponding record in the actors table. This is because we didn't add a record to the actors table when creating the account. We need to modify the account creation code to add records to both users and actors.
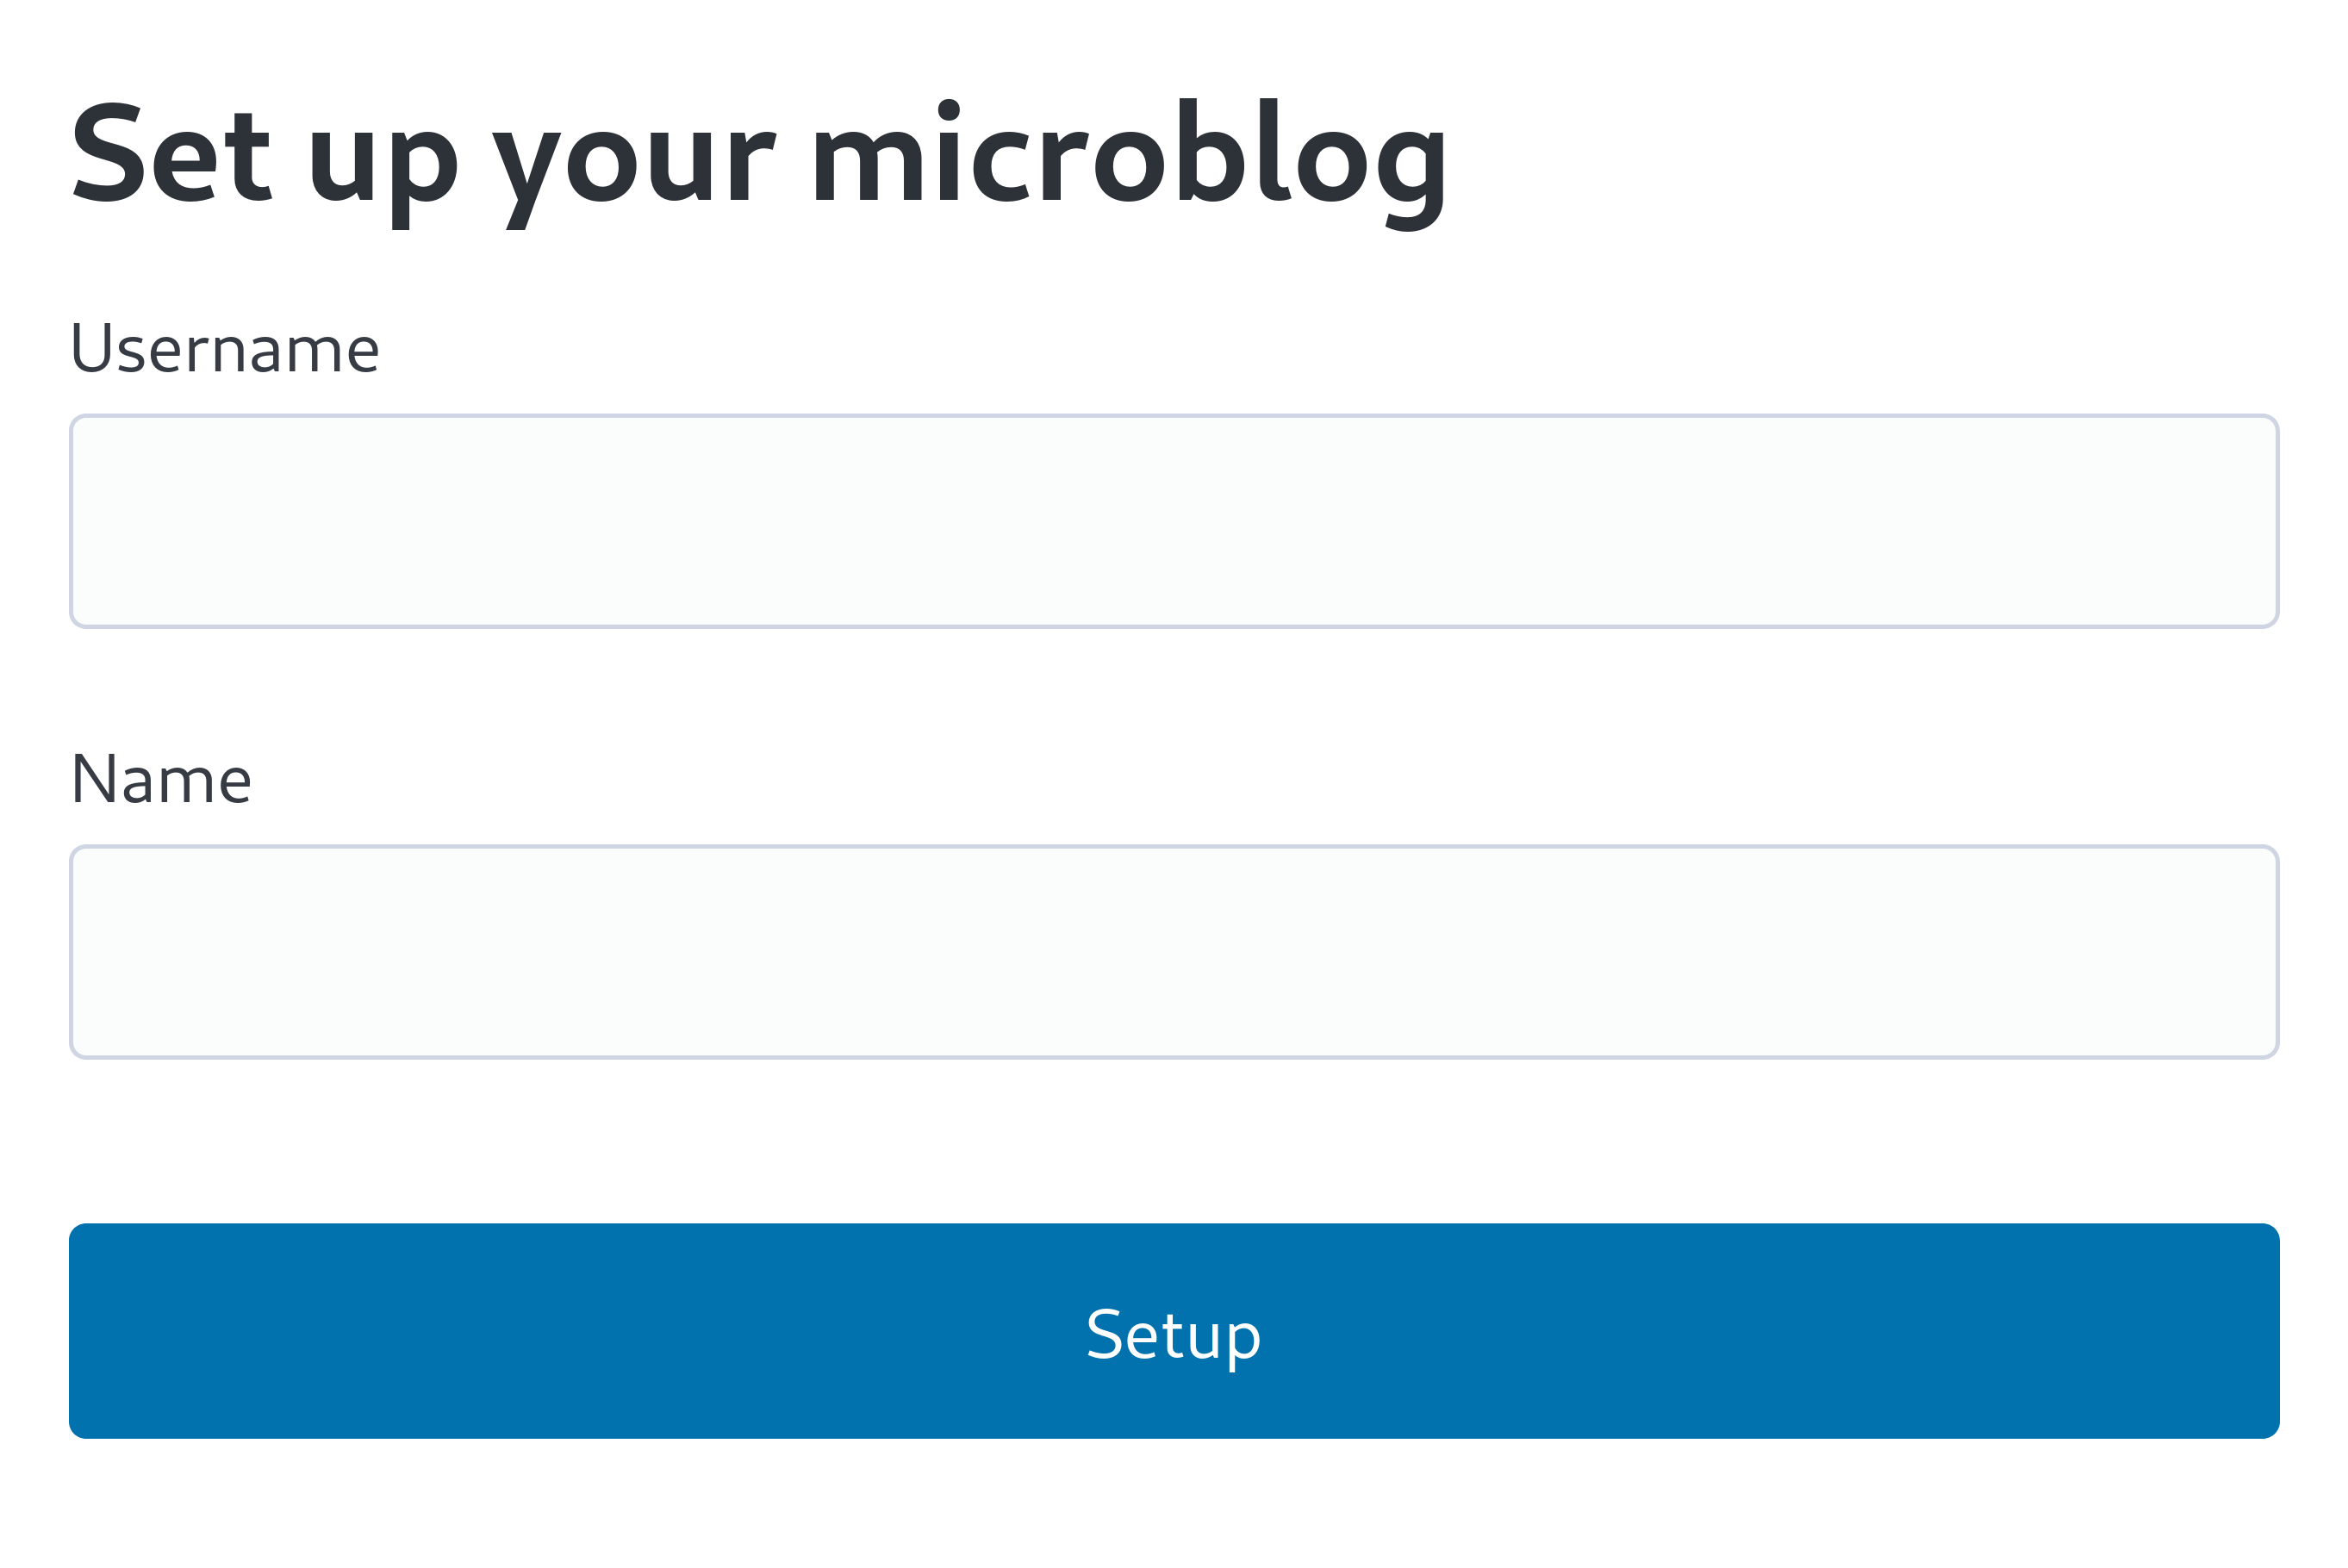
First, let's modify the SetupForm in src/views.tsx to also input a name that will go into the actors.name column along with the username:
export const SetupForm: FC = () => (
  <>
    <h1>Set up your microblog</h1>
    <form method="post" action="/setup">
      <fieldset>
        <label>
          Username{" "}
          <input
            type="text"
            name="username"
            required
            maxlength={50}
            pattern="^[a-z0-9_\-]+$"
          />
        </label>
        <label>
          Name <input type="text" name="name" required />
        </label>
      </fieldset>
      <input type="submit" value="Setup" />
    </form>
  </>
);
Now import the Actor type we defined earlier in src/app.tsx:
import type { Actor, User } from "./schema.ts";Now let's add code to the POST /setup handler to create a record in the actors table with the input name and other necessary information:
app.post("/setup", async (c) => {
  // Check if an account already exists
  const user = db
    .prepare<unknown[], User>(
      `
      SELECT * FROM users
      JOIN actors ON (users.id = actors.user_id)
      LIMIT 1
      `,
    )
    .get();
  if (user != null) return c.redirect("/");

  const form = await c.req.formData();
  const username = form.get("username");
  if (typeof username !== "string" || !username.match(/^[a-z0-9_-]{1,50}$/)) {
    return c.redirect("/setup");
  }
  const name = form.get("name");
  if (typeof name !== "string" || name.trim() === "") {
    return c.redirect("/setup");
  }
  const url = new URL(c.req.url);
  const handle = `@${username}@${url.host}`;
  const ctx = fedi.createContext(c.req.raw, undefined);
  db.transaction(() => {
    db.prepare("INSERT OR REPLACE INTO users (id, username) VALUES (1, ?)").run(
      username,
    );
    db.prepare(
      `
      INSERT OR REPLACE INTO actors
        (user_id, uri, handle, name, inbox_url, shared_inbox_url, url)
      VALUES (1, ?, ?, ?, ?, ?, ?)
    `,
    ).run(
      ctx.getActorUri(username).href,
      handle,
      name,
      ctx.getInboxUri(username).href,
      ctx.getInboxUri().href,
      ctx.getActorUri(username).href,
    );
  })();
  return c.redirect("/");
});
When checking if an account already exists, we modified it to determine that there's no account yet not only when there's no record in the users table, but also when there's no matching record in the actors table. Apply the same condition to the GET /setup handler and the GET /users/{username} handler:
app.get("/setup", (c) => {
  // Check if the user already exists
  const user = db
    .prepare<unknown[], User>(
      `
      SELECT * FROM users
      JOIN actors ON (users.id = actors.user_id)
      LIMIT 1
      `,
    )
    .get();
  if (user != null) return c.redirect("/");

  return c.html(
    <Layout>
      <SetupForm />
    </Layout>,
  );
});app.get("/users/:username", async (c) => {
const user = db
.prepare<unknown[], User & Actor>(
`
SELECT * FROM users
JOIN actors ON (users.id = actors.user_id)
WHERE username = ?
`,
)
.get(c.req.param("username"));
if (user == null) return c.notFound();
const url = new URL(c.req.url);
const handle = `@${user.username}@${url.host}`;
return c.html(
<Layout>
<Profile name={user.name ?? user.username} handle={handle} />
</Layout>,
);
});TIP
In TypeScript, A & B means an object that is both type A and type B. For example, given the type { a: number } & { b: string }, { a: 123 } or { b: "foo" } do not satisfy this type, but { a: 123, b: "foo" } does satisfy this type.
Finally, open the src/federation.ts file and add the following code below the actor dispatcher:
federation.setInboxListeners("/users/{identifier}/inbox", "/inbox");Don't worry about the setInboxListeners() method for now. We'll cover this when we explain about the inbox. Just note that the getInboxUri() method used in the account creation code needs the above code to work properly.
If you've modified all the code, open the http://localhost:8000/setup page in your browser and create an account again:
Actor dispatcher
Now that we've created the actors table and filled in a record, let's modify src/federation.ts again. First, import the db object, and Endpoints and Actor types:
import { createFederation } from "@fedify/fedify";
import { Endpoints, Person } from "@fedify/vocab";
import db from "./db.ts";
import type { Actor, User } from "./schema.ts";
Now that we've imported what we need, let's modify the setActorDispatcher() method:
federation.setActorDispatcher("/users/{identifier}", async (ctx, identifier) => {
  const user = db
    .prepare<unknown[], User & Actor>(
      `
      SELECT * FROM users
      JOIN actors ON (users.id = actors.user_id)
      WHERE users.username = ?
      `,
    )
    .get(identifier);
  if (user == null) return null;

  return new Person({
    id: ctx.getActorUri(identifier),
    preferredUsername: identifier,
    name: user.name,
    inbox: ctx.getInboxUri(identifier),
    endpoints: new Endpoints({
      sharedInbox: ctx.getInboxUri(),
    }),
    url: ctx.getActorUri(identifier),
  });
});
In the changed code, we now query the users table in the database and return null if it's not an account on the current server. In other words, it will respond with a proper Person object with 200 OK for a GET /users/johndoe request (assuming the account was created with the username johndoe), and respond with 404 Not Found for other requests.
Let's look at how the part creating the Person object has changed. First, a name property has been added. This property uses the value from the actors.name column. We'll cover the inbox and endpoints properties when we explain about the inbox. The url property contains the profile URL of this account, and in this tutorial, we'll make the actor ID and the actor's profile URL match.
TIP
Sharp-eyed readers may have noticed that we're defining overlapping handlers for GET /users/{identifier} on both Hono and Fedify sides. So what happens when an actual request is sent to this path? The answer is that it depends on the Accept header of the request. If a request is sent with the Accept: text/html header, the request handler on the Hono side responds. If a request is sent with the Accept: application/activity+json header, the request handler on the Fedify side responds.
This way of giving different responses according to the Accept header of the request is called HTTP content negotiation, and Fedify itself implements content negotiation. More specifically, all requests go through Fedify once, and if it's not an ActivityPub-related request, it's passed on to the integrated framework, which in this tutorial is Hono.
TIP
In Fedify, all URIs and URLs are represented as URL instances.
Testing
Now, let's test if the actor dispatcher is working well.
With the server running, open a new terminal tab and enter the following command:
fedify lookup http://localhost:8000/users/aliceSince there's no account named alice, you'll get an error like this, unlike before:
✔ Looking up the object...
Failed to fetch the object.
It may be a private object.  Try with -a/--authorized-fetch.
Now let's look up the johndoe account:
fedify lookup http://localhost:8000/users/johndoeNow you get a good result:
✔ Looking up the object...
Person {
  id: URL "http://localhost:8000/users/johndoe",
  name: "John Doe",
  url: URL "http://localhost:8000/users/johndoe",
  preferredUsername: "johndoe",
  inbox: URL "http://localhost:8000/users/johndoe/inbox",
  endpoints: Endpoints { sharedInbox: URL "http://localhost:8000/inbox" }
}
Cryptographic key pairs
The next thing we'll implement is the actor's cryptographic keys for signing. In ActivityPub, when an actor creates and sends an activity, it uses a digital signature to prove that the activity was really created by that actor. For this, each actor creates and holds their own matching private key (secret key) and public key pair, and makes the public key visible to other actors. When actors receive an activity, they compare the sender's public key with the activity's signature to verify that the activity was indeed created by the sender. Fedify handles the signing and signature verification automatically, but you need to implement the generation and preservation of the key pairs yourself.
WARNING
As the name suggests, the private key (secret key) should not be accessible to anyone other than the signing subject. On the other hand, the public key's purpose is to be public, so it's fine for anyone to access it.
Table creation
Let's define a keys table in src/schema.sql to store the private and public key pairs:
CREATE TABLE IF NOT EXISTS keys (
  user_id     INTEGER NOT NULL REFERENCES users (id),
  type        TEXT    NOT NULL CHECK (type IN ('RSASSA-PKCS1-v1_5', 'Ed25519')),
  private_key TEXT    NOT NULL CHECK (private_key <> ''),
  public_key  TEXT    NOT NULL CHECK (public_key <> ''),
  created     TEXT    NOT NULL DEFAULT (CURRENT_TIMESTAMP) CHECK (created <> ''),
  PRIMARY KEY (user_id, type)
);
If you look closely at the table, you can see that the type column only allows two types of values. One is the RSA-PKCS#1-v1.5 type and the other is the Ed25519 type. (What each of these means is not important for this tutorial.) Since the primary key is on (user_id, type), there can be a maximum of two key pairs for one user.
TIP
We can't go into detail in this tutorial, but as of November 2024, the ActivityPub network is in the process of transitioning from the RSA-PKCS#1-v1.5 type to the Ed25519 type. Some software only accepts the RSA-PKCS#1-v1.5 type, while some software accepts the Ed25519 type. Therefore, to communicate with both sides, both pairs of keys are needed.
The private_key and public_key columns can receive strings, and we'll put JSON data in them. We'll cover how to encode private and public keys as JSON later.
Now let's create the keys table:
sqlite3 microblog.sqlite3 < src/schema.sqlLet's also define a Key type in the src/schema.ts file to represent records stored in the keys table in JavaScript:
export interface Key {
  user_id: number;
  type: "RSASSA-PKCS1-v1_5" | "Ed25519";
  private_key: string;
  public_key: string;
  created: string;
}
Key pairs dispatcher
Now we need to write code to generate and load key pairs.
Open the src/federation.ts file and import the exportJwk(), generateCryptoKeyPair(), importJwk() functions provided by Fedify and the Key type we defined earlier:
import {
  createFederation,
  exportJwk,
  generateCryptoKeyPair,
  importJwk,
} from "@fedify/fedify";
import { Endpoints, Person } from "@fedify/vocab";
import type { Actor, Key, User } from "./schema.ts";
Now let's modify the actor dispatcher part as follows:
federation
  .setActorDispatcher("/users/{identifier}", async (ctx, identifier) => {
    const user = db
      .prepare<unknown[], User & Actor>(
        `
        SELECT * FROM users
        JOIN actors ON (users.id = actors.user_id)
        WHERE users.username = ?
        `,
      )
      .get(identifier);
    if (user == null) return null;

    const keys = await ctx.getActorKeyPairs(identifier);
    return new Person({
      id: ctx.getActorUri(identifier),
      preferredUsername: identifier,
      name: user.name,
      inbox: ctx.getInboxUri(identifier),
      endpoints: new Endpoints({
        sharedInbox: ctx.getInboxUri(),
      }),
      url: ctx.getActorUri(identifier),
      publicKey: keys[0].cryptographicKey,
      assertionMethods: keys.map((k) => k.multikey),
    });
  })
  .setKeyPairsDispatcher(async (ctx, identifier) => {
    const user = db
      .prepare<unknown[], User>("SELECT * FROM users WHERE username = ?")
      .get(identifier);
    if (user == null) return [];
    const rows = db
      .prepare<unknown[], Key>("SELECT * FROM keys WHERE keys.user_id = ?")
      .all(user.id);
    const keys = Object.fromEntries(
      rows.map((row) => [row.type, row]),
    ) as Record<Key["type"], Key>;
    const pairs: CryptoKeyPair[] = [];
    // For each of the two key formats (RSASSA-PKCS1-v1_5 and Ed25519) that
    // the actor supports, check if they have a key pair, and if not,
    // generate one and store it in the database:
    for (const keyType of ["RSASSA-PKCS1-v1_5", "Ed25519"] as const) {
      if (keys[keyType] == null) {
        logger.debug(
          "The user {identifier} does not have an {keyType} key; creating one...",
          { identifier, keyType },
        );
        const { privateKey, publicKey } = await generateCryptoKeyPair(keyType);
        db.prepare(
          `
          INSERT INTO keys (user_id, type, private_key, public_key)
          VALUES (?, ?, ?, ?)
          `,
        ).run(
          user.id,
          keyType,
          JSON.stringify(await exportJwk(privateKey)),
          JSON.stringify(await exportJwk(publicKey)),
        );
        pairs.push({ privateKey, publicKey });
      } else {
        pairs.push({
          privateKey: await importJwk(
            JSON.parse(keys[keyType].private_key),
            "private",
          ),
          publicKey: await importJwk(
            JSON.parse(keys[keyType].public_key),
            "public",
          ),
        });
      }
    }
    return pairs;
  });
First of all, we should pay attention to the setKeyPairsDispatcher() method called in succession after the setActorDispatcher() method. This method connects the key pairs returned by the callback function to the account. By connecting the key pairs in this way, Fedify automatically adds digital signatures with the registered private keys when sending activities.
The generateCryptoKeyPair() function generates a new private key and public key pair and returns it as a CryptoKeyPair object. For your reference, the CryptoKeyPair type has the type { privateKey: CryptoKey; publicKey: CryptoKey; }.
The exportJwk() function returns an object representing the CryptoKey object in JWK format. You don't need to know what the JWK format is. Just understand that it's a standard format for representing cryptographic keys in JSON. CryptoKey is a web standard type for representing cryptographic keys as JavaScript objects.
The importJwk() function converts a key represented in JWK format to a CryptoKey object. You can understand it as the opposite of the exportJwk() function.
Now, let's turn our attention back to the setActorDispatcher() method. We're using a method called getActorKeyPairs(), which, as the name suggests, returns the key pairs of the actor. The actor's key pairs are those very key pairs we just loaded with the setKeyPairsDispatcher() method. We loaded two pairs of keys in RSA-PKCS#1-v1.5 and Ed25519 formats, so the getActorKeyPairs() method returns an array of two key pairs. Each element of the array is an object representing the key pair in various formats, which looks like this:
interface ActorKeyPair {
  privateKey: CryptoKey;              // Private key
  publicKey: CryptoKey;               // Public key
  keyId: URL;                         // Unique identification URI of the key
  cryptographicKey: CryptographicKey; // Another format of the public key
  multikey: Multikey;                 // Yet another format of the public key
}
It's complex to explain here how CryptoKey, CryptographicKey, and Multikey differ, and why there need to be so many formats. For now, let's just note that when initializing the Person object, the publicKey property accepts the CryptographicKey type and the assertionMethods property accepts the MultiKey[] (TypeScript notation for an array of Multikey) type.
By the way, why are there two properties in the Person object that hold public keys, publicKey and assertionMethods? Originally in ActivityPub, there was only the publicKey property, but later the assertionMethods property was added to allow registration of multiple keys. Similar to how we generated both RSA-PKCS#1-v1.5 and Ed25519 keys earlier, we're setting both properties for compatibility with various software. If you look closely, you can see that we're only registering the RSA-PKCS#1-v1.5 key to the legacy publicKey property (the first item in the array is the RSA-PKCS#1-v1.5 key pair, and the second item is the Ed25519 key pair).
TIP
Actually, the publicKey property can contain multiple keys too. However, many software are already implemented under the assumption that the publicKey property will only contain one key, so they often malfunction. The assertionMethods property was proposed to avoid this.
For those interested in this, refer to the FEP-521a document.
Testing
Now that we've registered the cryptographic keys to the actor object, let's check if it's working well. Query the actor with the following command:
fedify lookup http://localhost:8000/users/johndoeIf it's working correctly, you should see output like this:
✔ Looking up the object...
Person {
  id: URL "http://localhost:8000/users/johndoe",
  name: "John Doe",
  url: URL "http://localhost:8000/users/johndoe",
  preferredUsername: "johndoe",
  publicKey: CryptographicKey {
    id: URL "http://localhost:8000/users/johndoe#main-key",
    owner: URL "http://localhost:8000/users/johndoe",
    publicKey: CryptoKey {
      type: "public",
      extractable: true,
      algorithm: {
        name: "RSASSA-PKCS1-v1_5",
        modulusLength: 4096,
        publicExponent: Uint8Array(3) [ 1, 0, 1 ],
        hash: { name: "SHA-256" }
      },
      usages: [ "verify" ]
    }
  },
  assertionMethods: [
    Multikey {
      id: URL "http://localhost:8000/users/johndoe#main-key",
      controller: URL "http://localhost:8000/users/johndoe",
      publicKey: CryptoKey {
        type: "public",
        extractable: true,
        algorithm: {
          name: "RSASSA-PKCS1-v1_5",
          modulusLength: 4096,
          publicExponent: Uint8Array(3) [ 1, 0, 1 ],
          hash: { name: "SHA-256" }
        },
        usages: [ "verify" ]
      }
    },
    Multikey {
      id: URL "http://localhost:8000/users/johndoe#key-2",
      controller: URL "http://localhost:8000/users/johndoe",
      publicKey: CryptoKey {
        type: "public",
        extractable: true,
        algorithm: { name: "Ed25519" },
        usages: [ "verify" ]
      }
    }
  ],
  inbox: URL "http://localhost:8000/users/johndoe/inbox",
  endpoints: Endpoints { sharedInbox: URL "http://localhost:8000/inbox" }
}
You can see that the Person object's publicKey property contains one CryptographicKey object in RSA-PKCS#1-v1.5 type, and the assertionMethods property contains two Multikey objects in RSA-PKCS#1-v1.5 and Ed25519 formats.
Interoperating with Mastodon
Now let's check if we can actually view the actor we've created in Mastodon.
Exposing to the public internet
Unfortunately, the current server is only accessible locally. However, it would be inconvenient to deploy somewhere every time we modify the code for testing. Wouldn't it be great if we could expose our local server to the internet without deployment for immediate testing?
Here's where the fedify tunnel command comes in handy. In a terminal, open a new tab and enter this command followed by the port number of your local server:
fedify tunnel 8000This creates a disposable domain name and relays to your local server. It will output a URL that's accessible from the outside:
✔ Your local server at 8000 is now publicly accessible:

https://temp-address.serveo.net/

Press ^C to close the tunnel.
Of course, you'll see your own unique URL different from the one above. You can check if it's connecting well by opening https://temp-address.serveo.net/users/johndoe in your web browser (replace with your unique temporary domain):

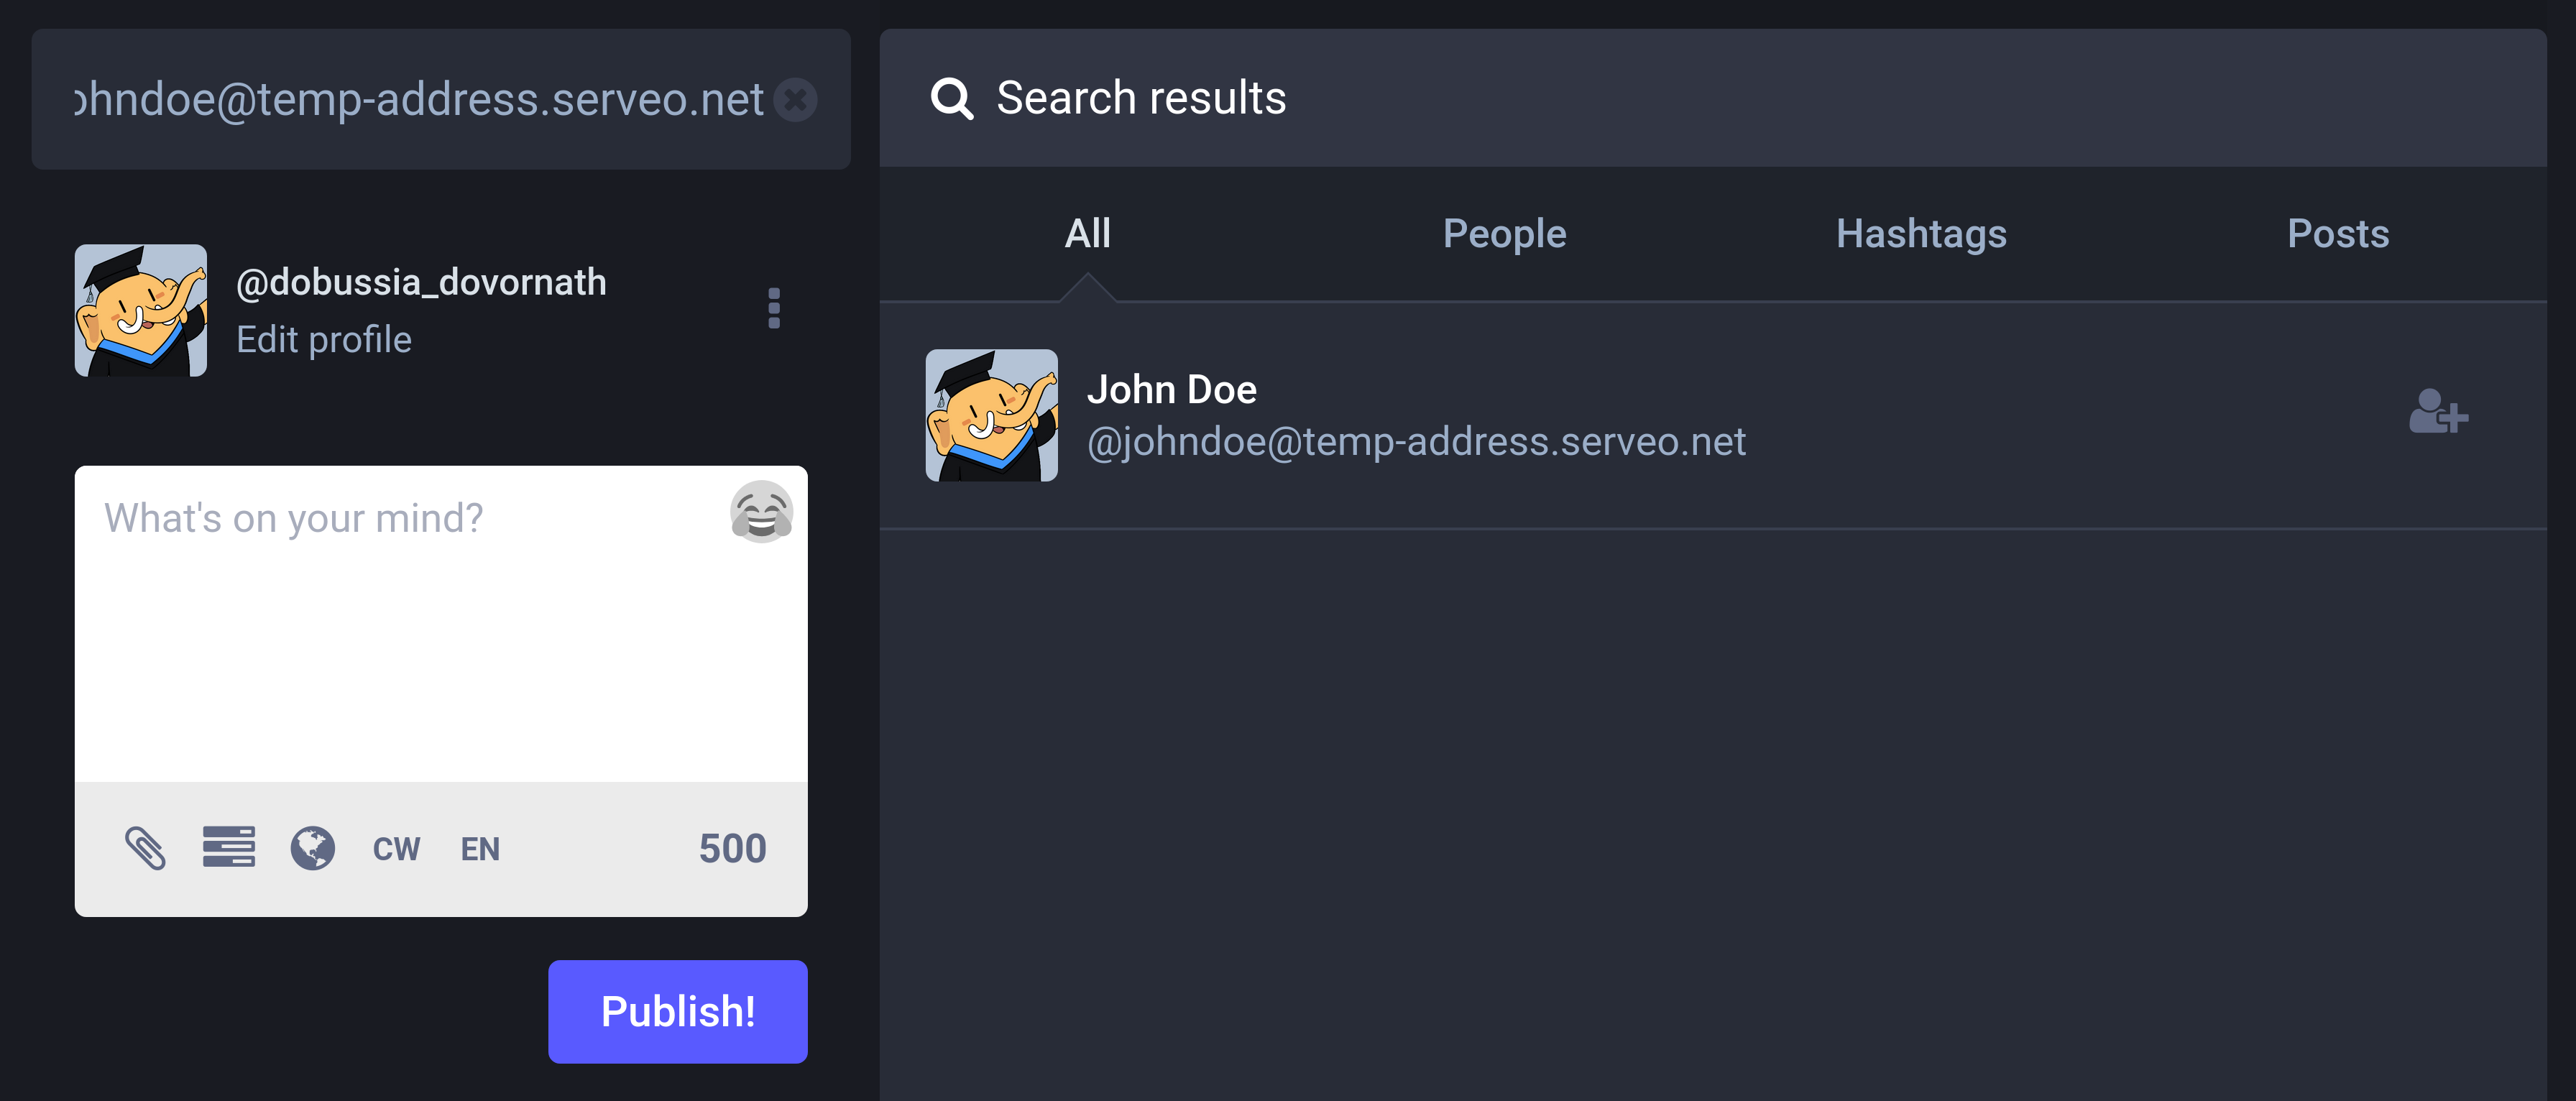
Copy your fediverse handle shown on the above web page, then go into Mastodon and paste it into the search box in the upper left corner:
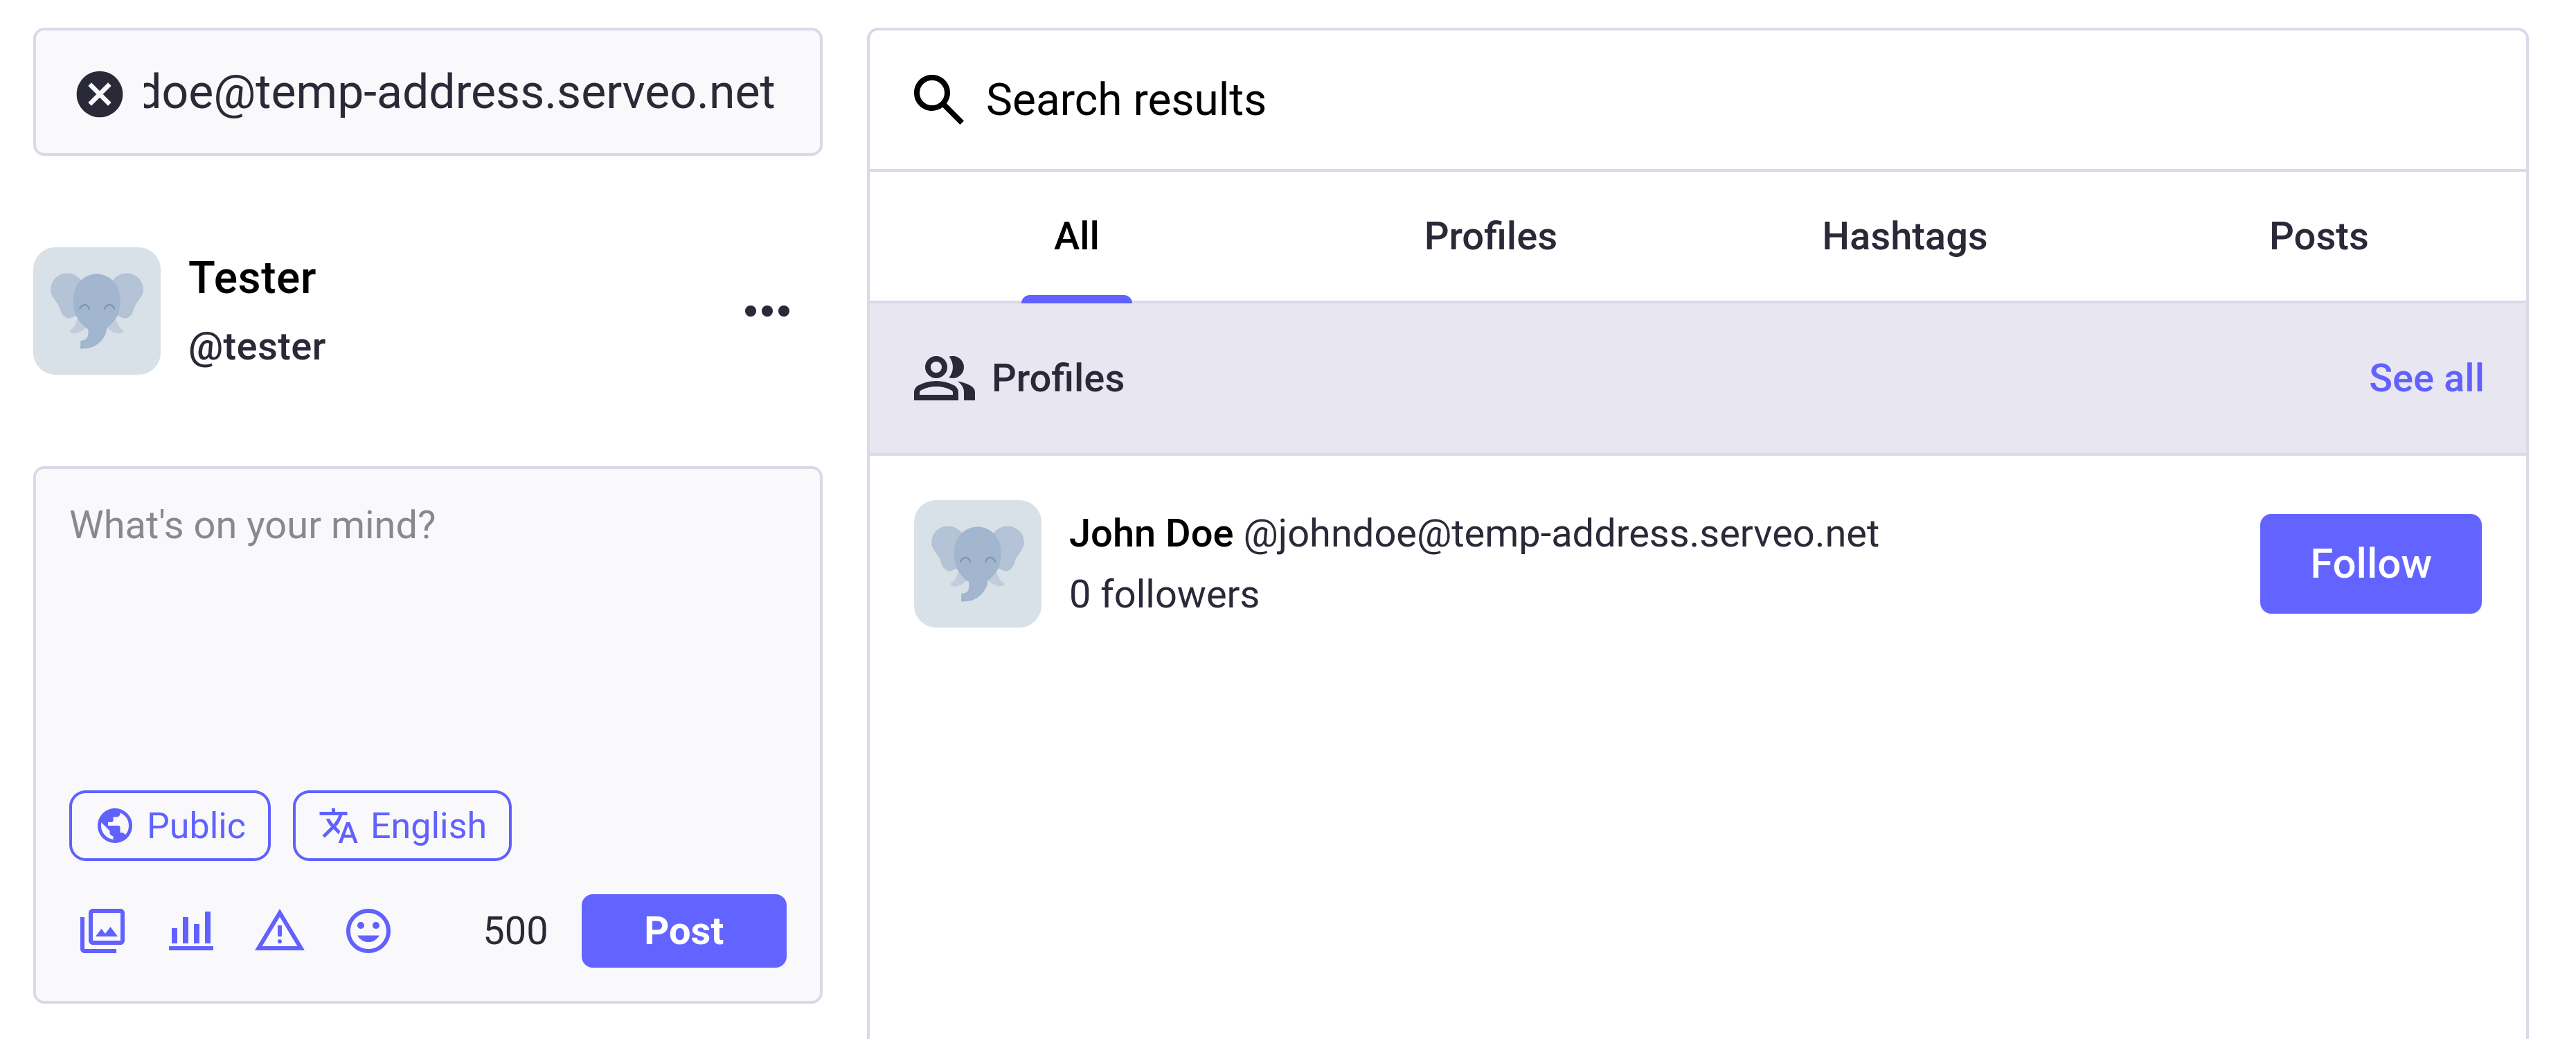
If the actor we created appears in the search results as shown above, it's working correctly. You can also click on the actor's name in the search results to go to their profile page:
But this is as far as we can go. Don't try to follow yet! For our actor to be followable from other servers, we need to implement an inbox.
NOTE
The fedify tunnel command automatically disconnects after a while if not used. When this happens, you need to press Ctrl+C to stop it, then run the fedify tunnel 8000 command again to establish a new connection.
Inbox
In ActivityPub, an inbox is an endpoint where an actor receives incoming activities from other actors. All actors have their own inbox, which is a URL that can receive activities via HTTP POST requests. When another actor sends a follow request, writes a post, comments, or performs any other interaction, the corresponding activity is delivered to the recipient's inbox. The server processes the activities that come into the inbox and responds appropriately, allowing it to communicate and function as part of the federated network.
For now, we'll start by implementing the reception of follow requests.
Table creation
We need to create a follows table to hold the actors who follow you (followers) and the actors you follow (following). Add the following SQL to the src/schema.sql file:
CREATE TABLE IF NOT EXISTS follows (
  following_id INTEGER          REFERENCES actors (id),
  follower_id  INTEGER          REFERENCES actors (id),
  created      TEXT    NOT NULL DEFAULT (CURRENT_TIMESTAMP)
                                CHECK (created <> ''),
  PRIMARY KEY (following_id, follower_id)
);
Let's create the follows table by executing src/schema.sql once again:
sqlite3 microblog.sqlite3 < src/schema.sqlOpen the src/schema.ts file and define a type to represent records stored in the follows table in JavaScript:
export interface Follow {
  following_id: number;
  follower_id: number;
  created: string;
}
Receiving Follow activity
Now it's time to implement the inbox. Actually, we've already written the following code in the src/federation.ts file earlier:
federation.setInboxListeners("/users/{identifier}/inbox", "/inbox");Before modifying this code, let's import the Accept and Follow classes and the getActorHandle() function provided by Fedify:
import {
  createFederation,
  exportJwk,
  generateCryptoKeyPair,
  importJwk,
} from "@fedify/fedify";
import {
  Accept,
  Endpoints,
  Follow,
  Person,
  getActorHandle,
} from "@fedify/vocab";
Now let's modify the code calling the setInboxListeners() method as follows:
federation
  .setInboxListeners("/users/{identifier}/inbox", "/inbox")
  .on(Follow, async (ctx, follow) => {
    if (follow.objectId == null) {
      logger.debug("The Follow object does not have an object: {follow}", {
        follow,
      });
      return;
    }
    const object = ctx.parseUri(follow.objectId);
    if (object == null || object.type !== "actor") {
      logger.debug("The Follow object's object is not an actor: {follow}", {
        follow,
      });
      return;
    }
    const follower = await follow.getActor();
    if (follower?.id == null || follower.inboxId == null) {
      logger.debug("The Follow object does not have an actor: {follow}", {
        follow,
      });
      return;
    }
    const followingId = db
      .prepare<unknown[], Actor>(
        `
        SELECT * FROM actors
        JOIN users ON users.id = actors.user_id
        WHERE users.username = ?
        `,
      )
      .get(object.identifier)?.id;
    if (followingId == null) {
      logger.debug(
        "Failed to find the actor to follow in the database: {object}",
        { object },
      );
    }
    const followerId = db
      .prepare<unknown[], Actor>(
        `
        -- Add a new follower actor record or update if it already exists
        INSERT INTO actors (uri, handle, name, inbox_url, shared_inbox_url, url)
        VALUES (?, ?, ?, ?, ?, ?)
        ON CONFLICT (uri) DO UPDATE SET
          handle = excluded.handle,
          name = excluded.name,
          inbox_url = excluded.inbox_url,
          shared_inbox_url = excluded.shared_inbox_url,
          url = excluded.url
        WHERE
          actors.uri = excluded.uri
        RETURNING *
        `,
      )
      .get(
        follower.id.href,
        await getActorHandle(follower),
        follower.name?.toString(),
        follower.inboxId.href,
        follower.endpoints?.sharedInbox?.href,
        follower.url?.href,
      )?.id;
    db.prepare(
      "INSERT INTO follows (following_id, follower_id) VALUES (?, ?)",
    ).run(followingId, followerId);
    const accept = new Accept({
      actor: follow.objectId,
      to: follow.actorId,
      object: follow,
    });
    await ctx.sendActivity(object, follower, accept);
  });
Let's examine the code carefully. The on() method defines the action to take when a specific type of activity is received. Here, we've written code to record the follower information in the database when a Follow activity is received, and then send an Accept(Follow) activity back to the actor who sent the follow request.
The follow.objectId should contain the URI of the actor being followed. We use the parseUri() method to check if the URI inside it points to the actor we created.
The getActorHandle() function returns the fediverse handle as a string from the given actor object.
If there's no information about the actor who sent the follow request in the actors table yet, we first add a record. If a record already exists, we update it with the latest data. Then, we add the follower to the follows table.
Once the record is completed in the database, we use the sendActivity() method to send an Accept(Follow) activity as a reply to the actor who sent the activity. It takes the sender as the first parameter, the recipient as the second parameter, and the activity object to send as the third parameter.
ActivityPub.Academy
Now it's time to check if follow requests are being received properly.
While it would be fine to test from a regular Mastodon server, let's use the ActivityPub.Academy server, which allows us to see exactly how activities are exchanged. ActivityPub.Academy is a special Mastodon server for education and debugging purposes, where you can easily create temporary accounts with just one click.

After agreeing to the privacy policy, click the Sign Up button to create a new account. The created account will have a randomly generated name and handle, and will disappear on its own after a day. Instead, you can create new accounts as many times as you want.
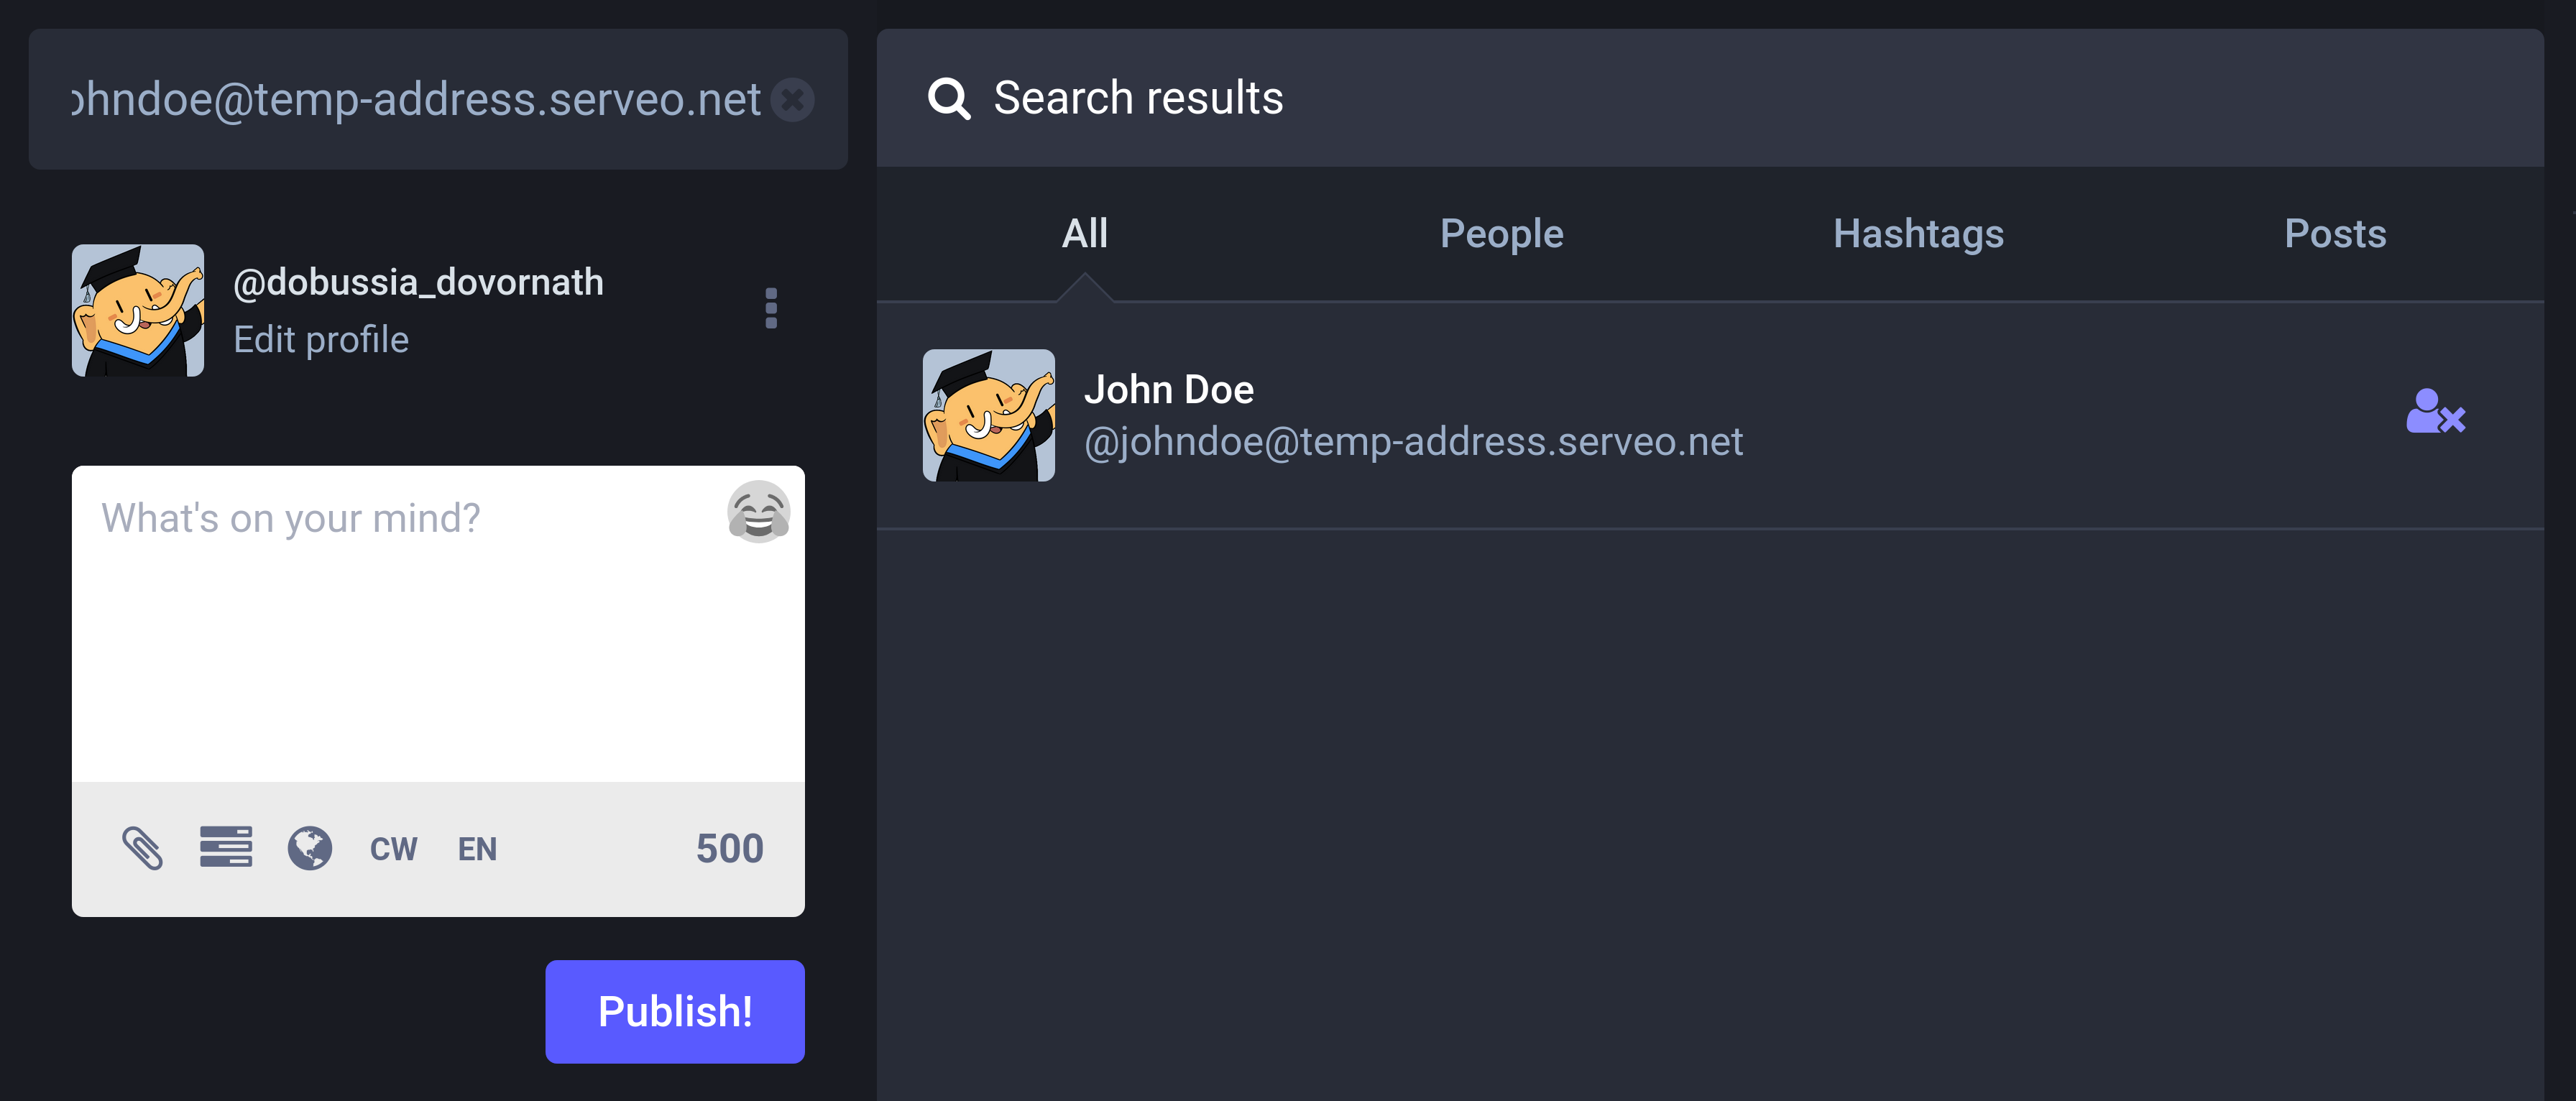
Once you're logged in, paste the handle of the actor we created into the search box in the top left corner of the screen:
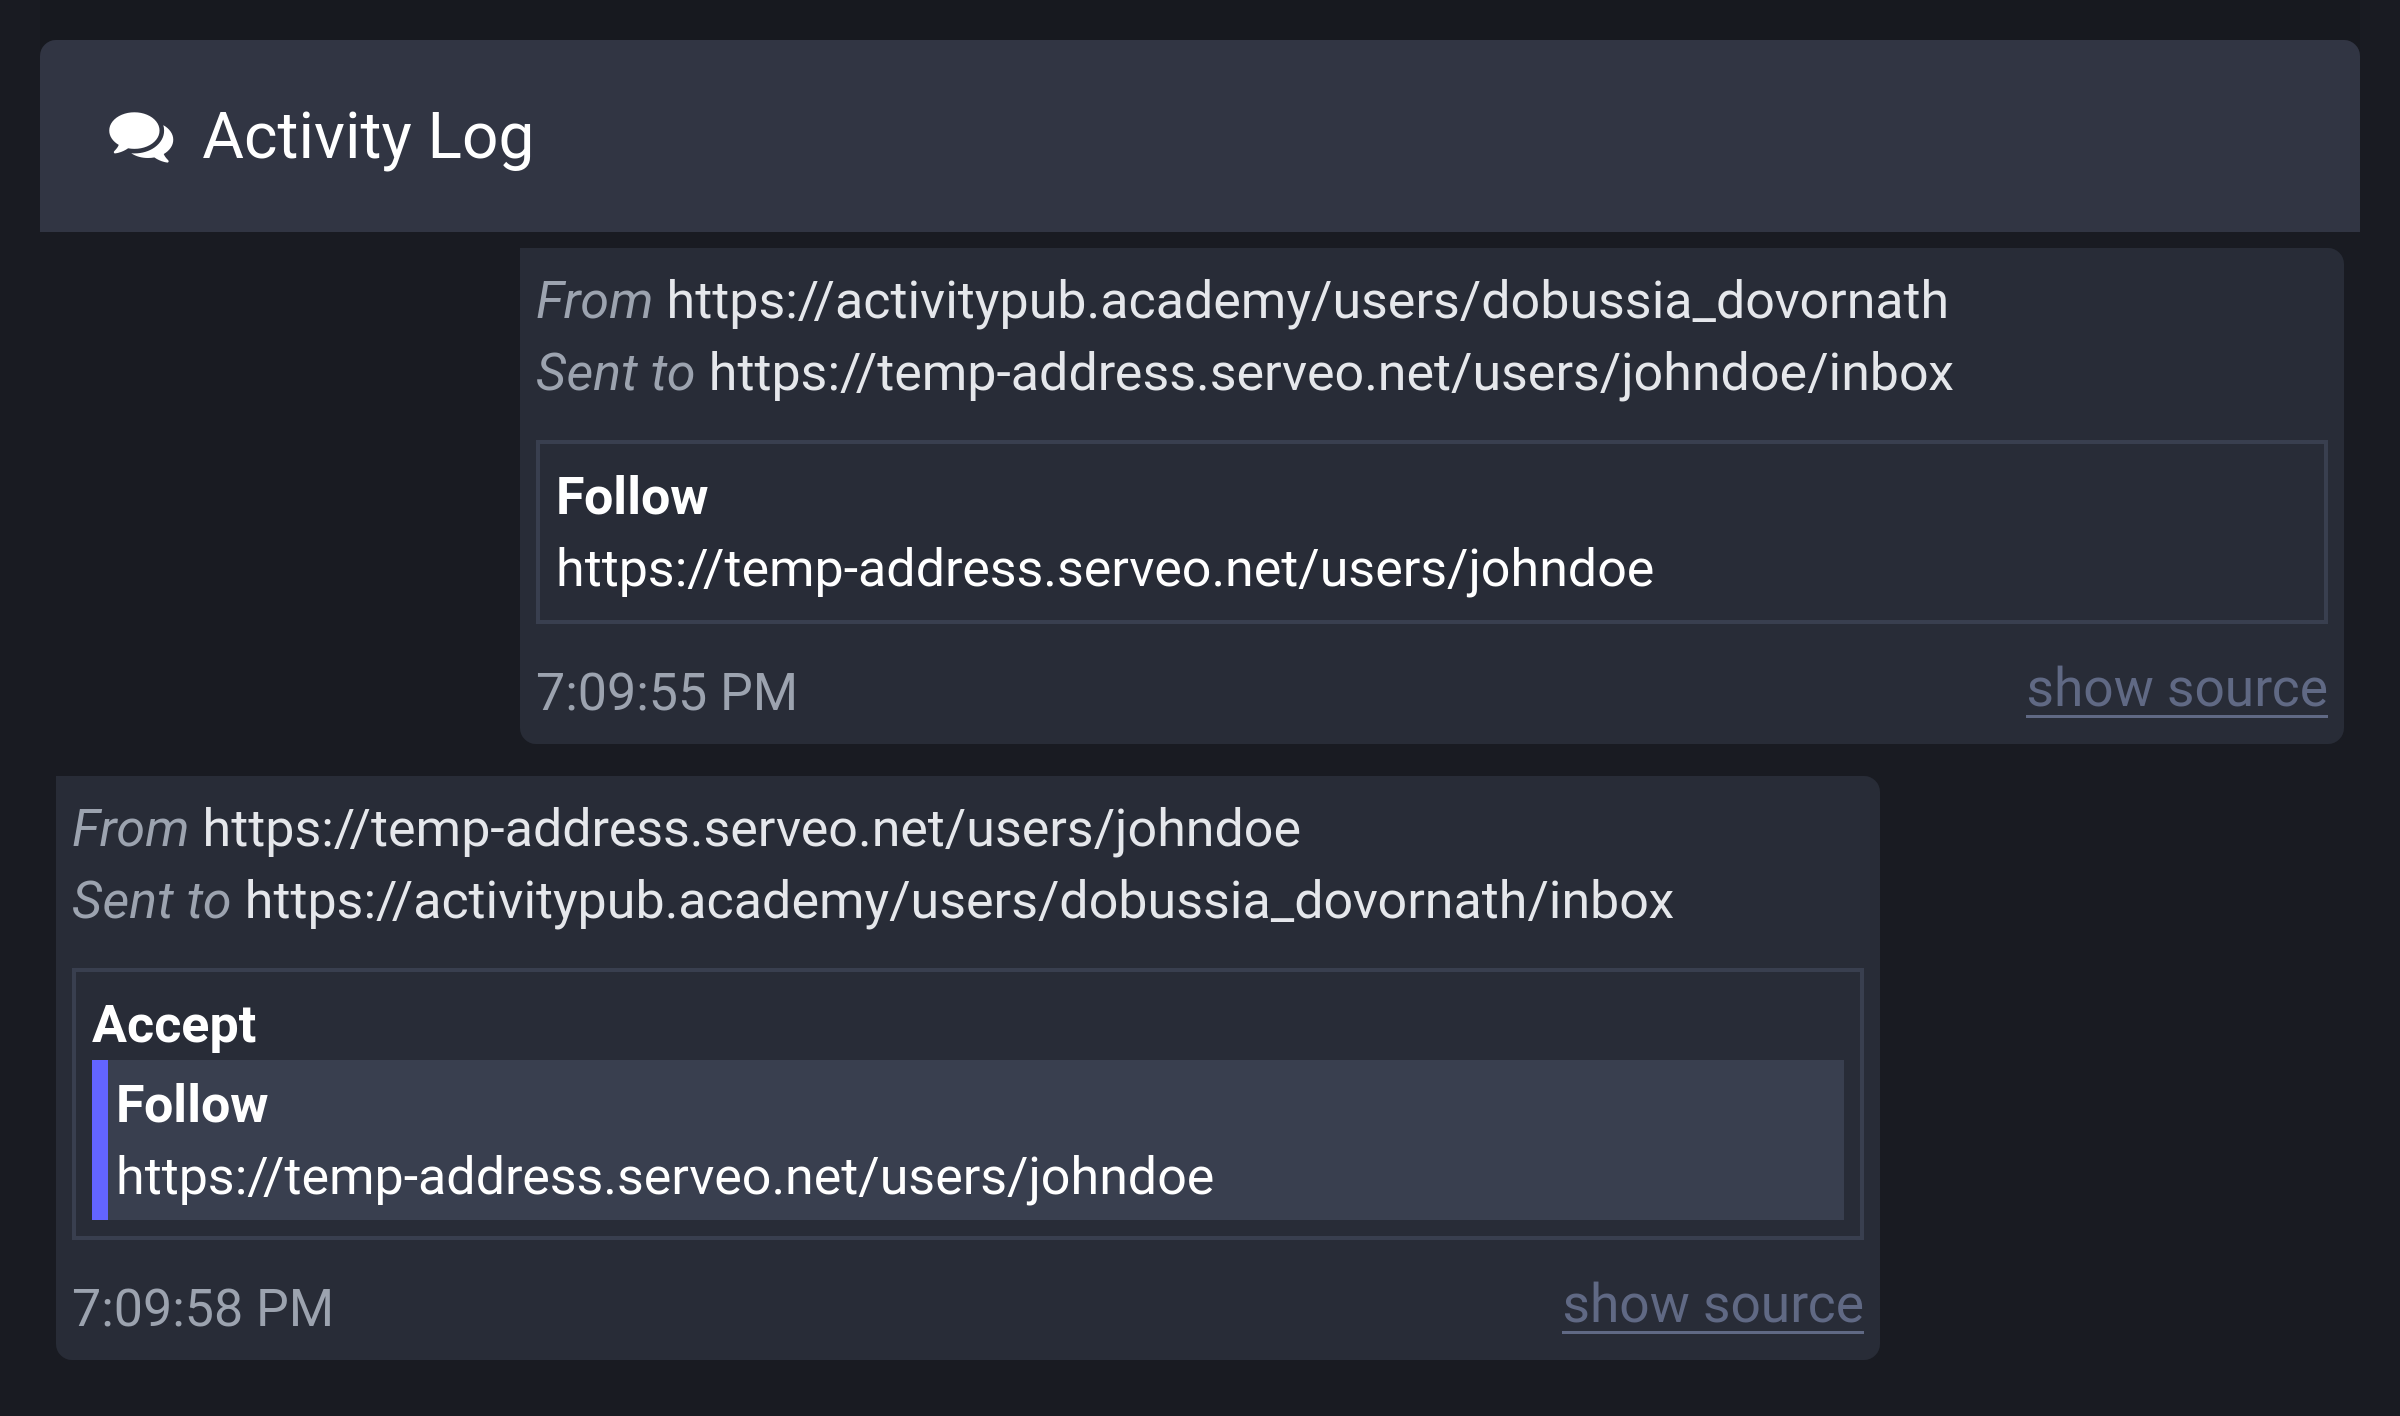
If our actor appears in the search results, click the follow button on the right to send a follow request. Then click on Activity Log in the right menu:
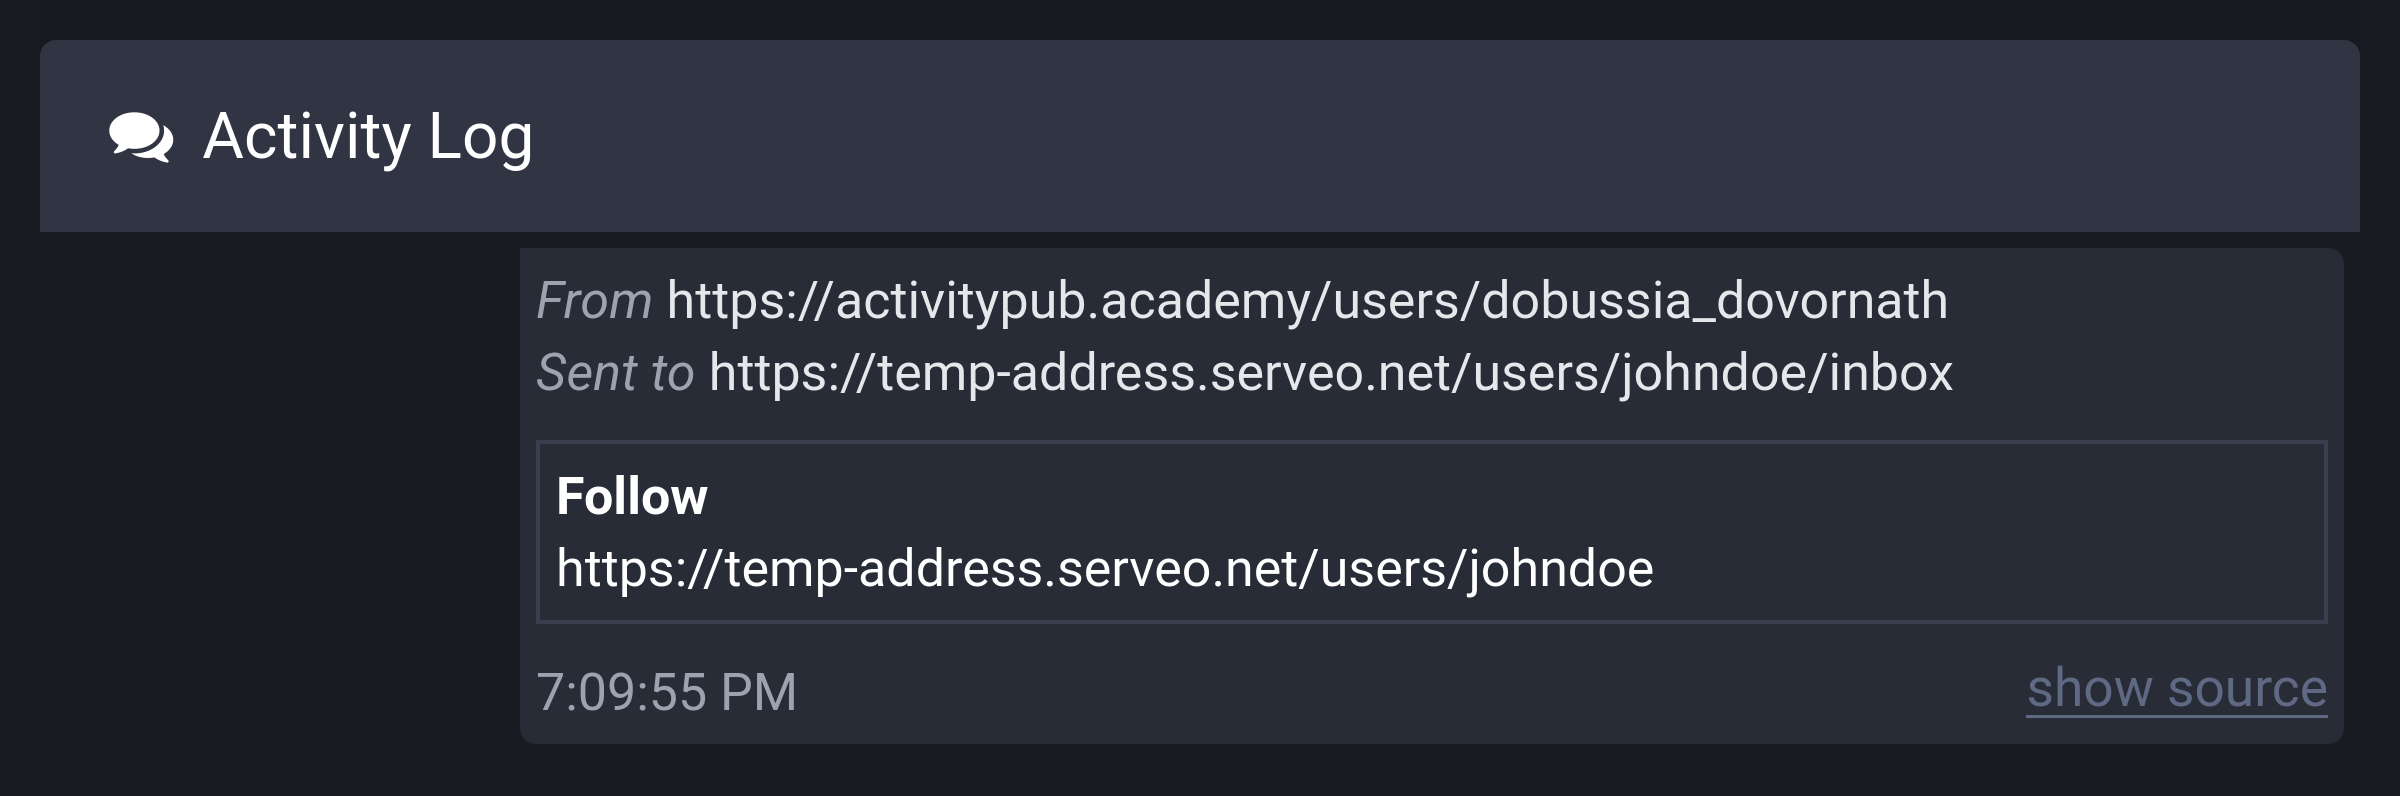
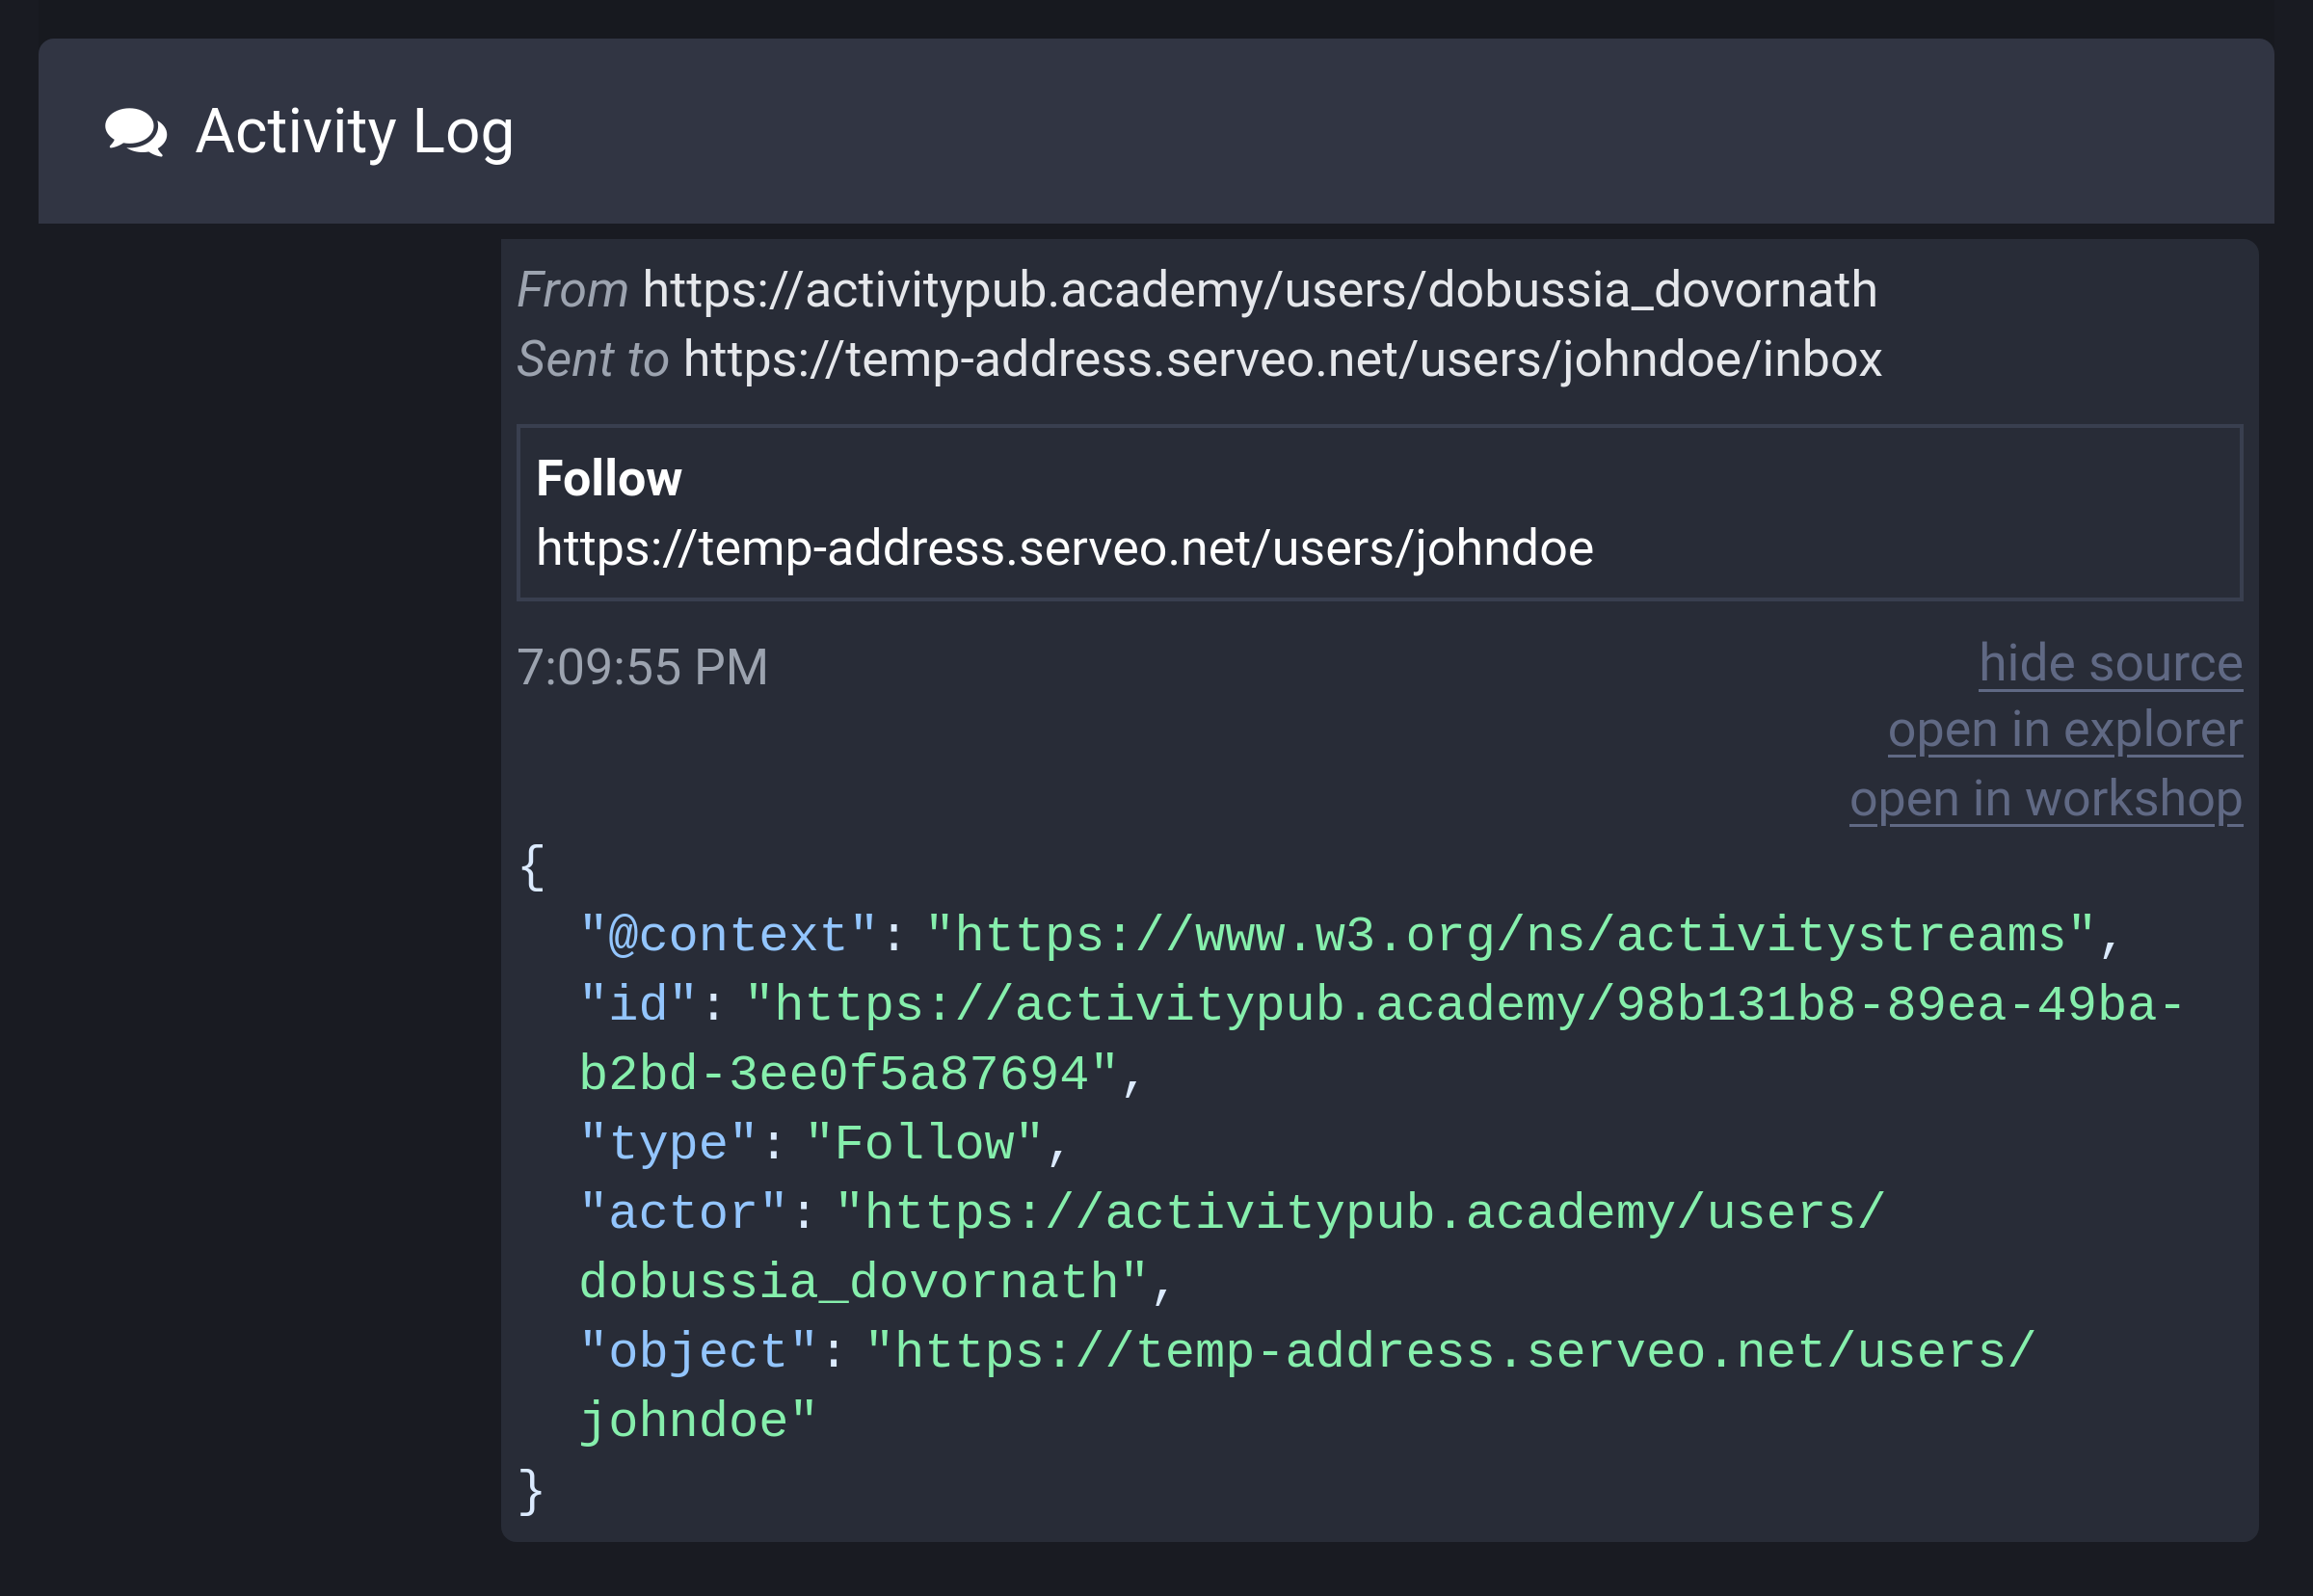
You'll see an indication that a Follow activity was sent from the ActivityPub.Academy server to the inbox of the actor we created by clicking the follow button just now. You can see the contents of the activity by clicking show source in the bottom right:
Testing
Now that we've confirmed that the activity was sent well, it's time to check if our inbox code is working properly. First, let's see if a record was created properly in the follows table:
echo "SELECT * FROM follows;" | sqlite3 -table microblog.sqlite3If the follow request was processed successfully, you should see a result like this (of course, the time will be different):
following_id | follower_id | created |
|---|---|---|
1 | 2 | 2024-09-01 10:19:41 |
Let's also check if a new record was created in the actors table:
echo "SELECT * FROM actors WHERE id > 1;" | sqlite3 -table microblog.sqlite3id | user_id | uri | handle | name | inbox_url | shared_inbox_url | url | created |
|---|---|---|---|---|---|---|---|---|
2 | https://activitypub.academy/users/dobussia_dovornath | @dobussia_dovornath@activitypub.academy | Dobussia Dovornath | https://activitypub.academy/users/dobussia_dovornath/inbox | https://activitypub.academy/inbox | https://activitypub.academy/@dobussia_dovornath | 2024-09-01 10:19:41 |
Now, let's look at ActivityPub.Academy's Activity Log again. If the Accept(Follow) activity sent by our actor arrived well, it should be displayed as follows:
This way, you've implemented your first interaction via ActivityPub!
Unfollow
What happens if an actor from another server unfollows our actor after following it? Let's test this in ActivityPub.Academy. As before, enter our actor's fediverse handle in the ActivityPub.Academy search box:
If you look closely, you'll see an unfollow button in place of the follow button to the right of the actor name. Click this button to unfollow, then go to the Activity Log to see what activity is sent:
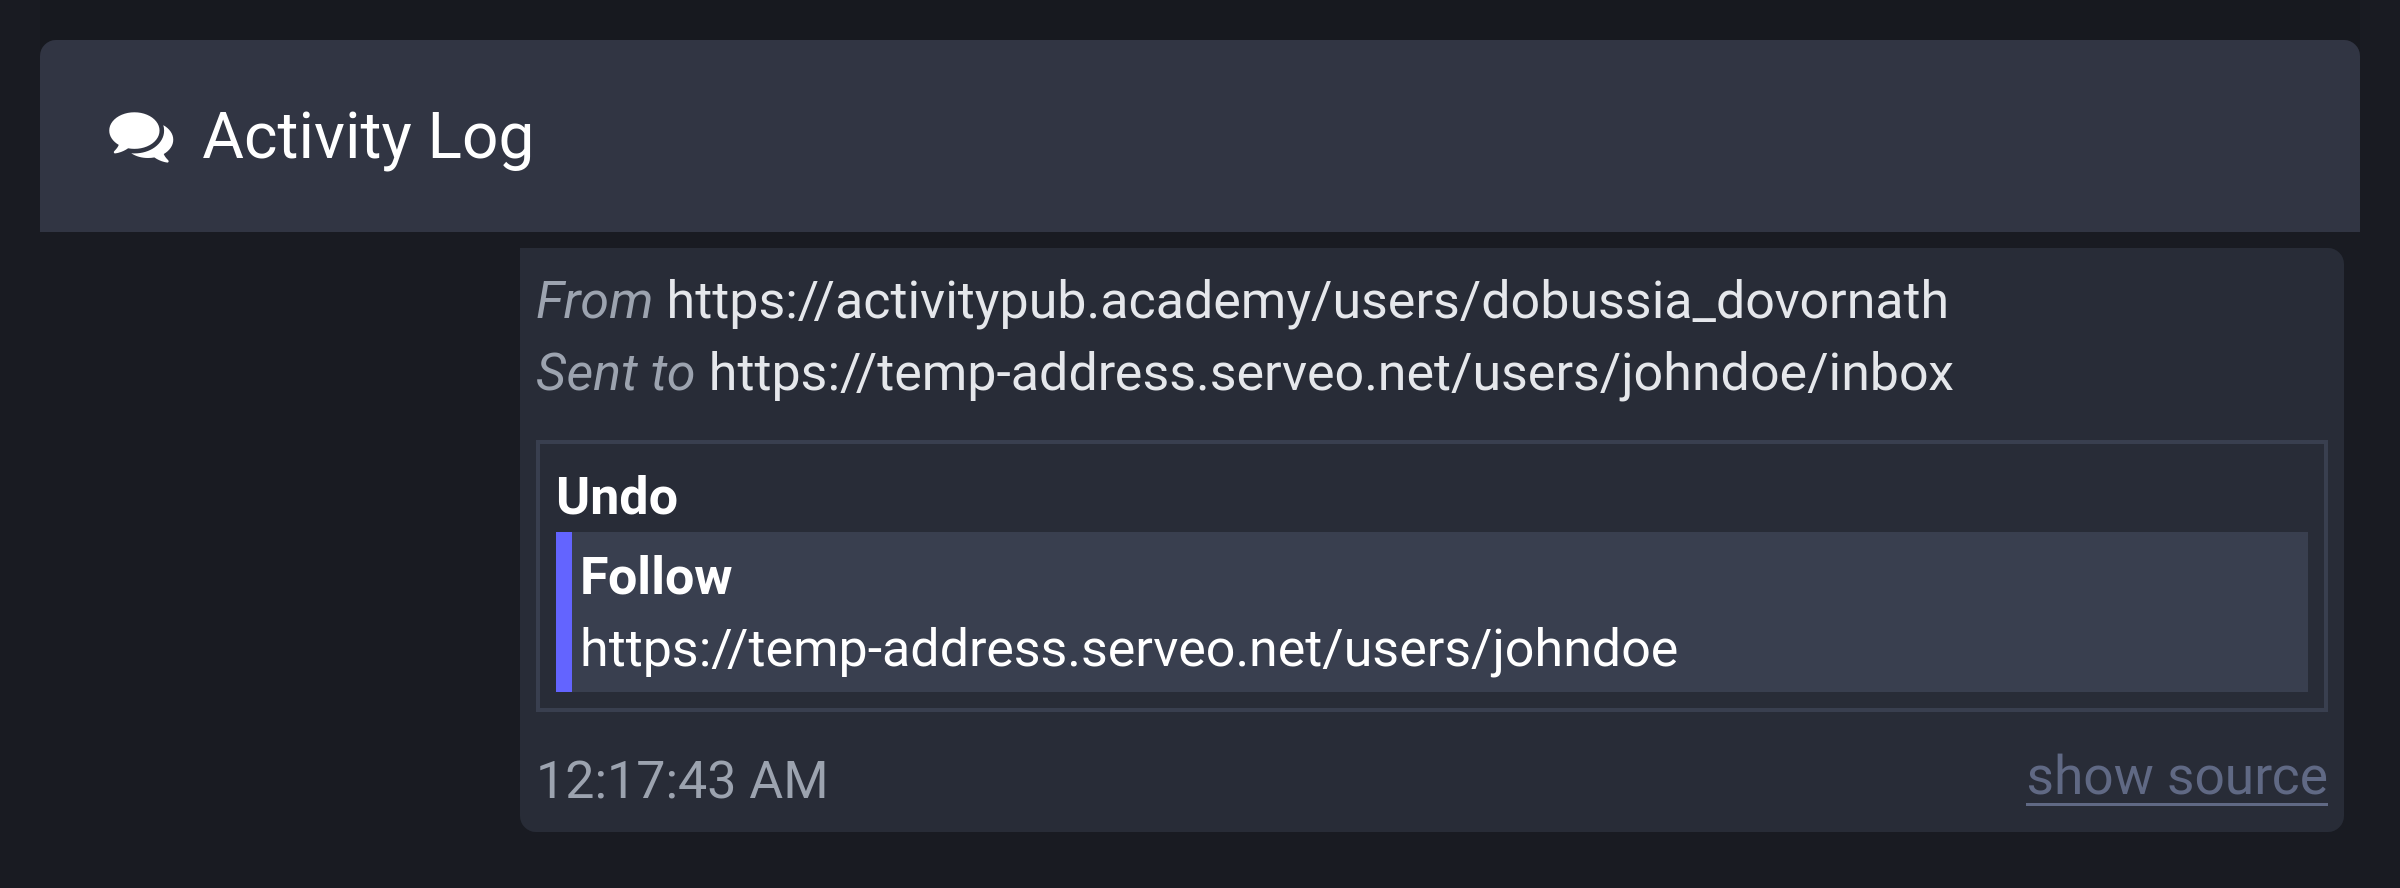
As you can see, an Undo(Follow) activity has been sent. If you click show source in the bottom right, you can see the detailed contents of the activity:
{
  "@context": "https://www.w3.org/ns/activitystreams",
  "id": "https://activitypub.academy/users/dobussia_dovornath#follows/3283/undo",
  "type": "Undo",
  "actor": "https://activitypub.academy/users/dobussia_dovornath",
  "object": {
    "id": "https://activitypub.academy/98b131b8-89ea-49ba-b2bd-3ee0f5a87694",
    "type": "Follow",
    "actor": "https://activitypub.academy/users/dobussia_dovornath",
    "object": "https://temp-address.serveo.net/users/johndoe"
  }
}
Looking at this JSON object, you can see that the Undo(Follow) activity includes the Follow activity that was received by our inbox earlier. However, since we haven't defined any behavior for when the inbox receives an Undo(Follow) activity, nothing has happened.
Receiving Undo(Follow) activity
To implement unfollow, open the src/federation.ts file and import the Undo class provided by Fedify:
import {
  createFederation,
  exportJwk,
  generateCryptoKeyPair,
  importJwk,
} from "@fedify/fedify";
import {
  Accept,
  Endpoints,
  Follow,
  Person,
  Undo,
  getActorHandle,
} from "@fedify/vocab";
Then add on(Undo, ...) in succession after on(Follow, ...):
federation
  .setInboxListeners("/users/{identifier}/inbox", "/inbox")
  .on(Follow, async (ctx, follow) => {
    // ... omitted ...
  })
  .on(Undo, async (ctx, undo) => {
    const object = await undo.getObject();
    if (!(object instanceof Follow)) return;
    if (undo.actorId == null || object.objectId == null) return;
    const parsed = ctx.parseUri(object.objectId);
    if (parsed == null || parsed.type !== "actor") return;
    db.prepare(
      `
      DELETE FROM follows
      WHERE following_id = (
        SELECT actors.id
        FROM actors
        JOIN users ON actors.user_id = users.id
        WHERE users.username = ?
      ) AND follower_id = (SELECT id FROM actors WHERE uri = ?)
      `,
    ).run(parsed.identifier, undo.actorId.href);
  });
This time, the code is shorter than when processing follow requests. It checks if the thing inside the Undo(Follow) activity is a Follow activity, uses the parseUri() method to check if the follow target of the Follow activity to be canceled is our actor, and then deletes the corresponding record from the follows table.
Testing
We can't unfollow once more since we already clicked the unfollow button in ActivityPub.Academy earlier. We'll have to follow again and then unfollow to test. But before that, we need to empty the follows table. Otherwise, there will be an error when the follow request comes in because the record already exists.
Let's empty the follows table using the sqlite3 command:
echo "DELETE FROM follows;" | sqlite3 microblog.sqlite3Now press the follow button again, then check the database:
echo "SELECT * FROM follows;" | sqlite3 -table microblog.sqlite3If the follow request was processed successfully, you should see a result like this:
following_id | follower_id | created |
|---|---|---|
1 | 2 | 2024-09-02 01:05:17 |
Now press the unfollow button again, then check the database one more time:
echo "SELECT count(*) FROM follows;" | sqlite3 -table microblog.sqlite3If the unfollow request was processed successfully, the record should have disappeared, so you should see a result like this:
count(*) |
|---|
0 |
Followers list
It's cumbersome to view the followers list using the sqlite3 command every time, so let's make it possible to view the followers list on the web.
Let's start by adding a new component to the src/views.tsx file. First, import the Actor type:
import type { Actor } from "./schema.ts";Then define the <FollowerList> component and the <ActorLink> component:
export interface FollowerListProps {
  followers: Actor[];
}

export const FollowerList: FC<FollowerListProps> = ({ followers }) => (
  <>
    <h2>Followers</h2>
    <ul>
      {followers.map((follower) => (
        <li key={follower.id}>
          <ActorLink actor={follower} />
        </li>
      ))}
    </ul>
  </>
);

export interface ActorLinkProps {
  actor: Actor;
}

export const ActorLink: FC<ActorLinkProps> = ({ actor }) => {
  const href = actor.url ?? actor.uri;
  return actor.name == null ? (
    <a href={href} class="secondary">
      {actor.handle}
    </a>
  ) : (
    <>
      <a href={href}>{actor.name}</a>{" "}
      <small>
        (
        <a href={href} class="secondary">
          {actor.handle}
        </a>
        )
      </small>
    </>
  );
};
The <ActorLink> component is used to represent a single actor, and the <FollowerList> component uses the <ActorLink> component to represent the list of followers. As you can see, since JSX doesn't have conditional statements or loops, we're using the ternary operator and the Array.map() method.
Now let's create an endpoint to display the followers list. Open the src/app.tsx file and import the <FollowerList> component:
import { FollowerList, Layout, Profile, SetupForm } from "./views.tsx";Then add a request handler for GET /users/{username}/followers:
app.get("/users/:username/followers", async (c) => {
const followers = db
.prepare<unknown[], Actor>(
`
SELECT followers.*
FROM follows
JOIN actors AS followers ON follows.follower_id = followers.id
JOIN actors AS following ON follows.following_id = following.id
JOIN users ON users.id = following.user_id
WHERE users.username = ?
ORDER BY follows.created DESC
`,
)
.all(c.req.param("username"));
return c.html(
<Layout>
<FollowerList followers={followers} />
</Layout>,
);
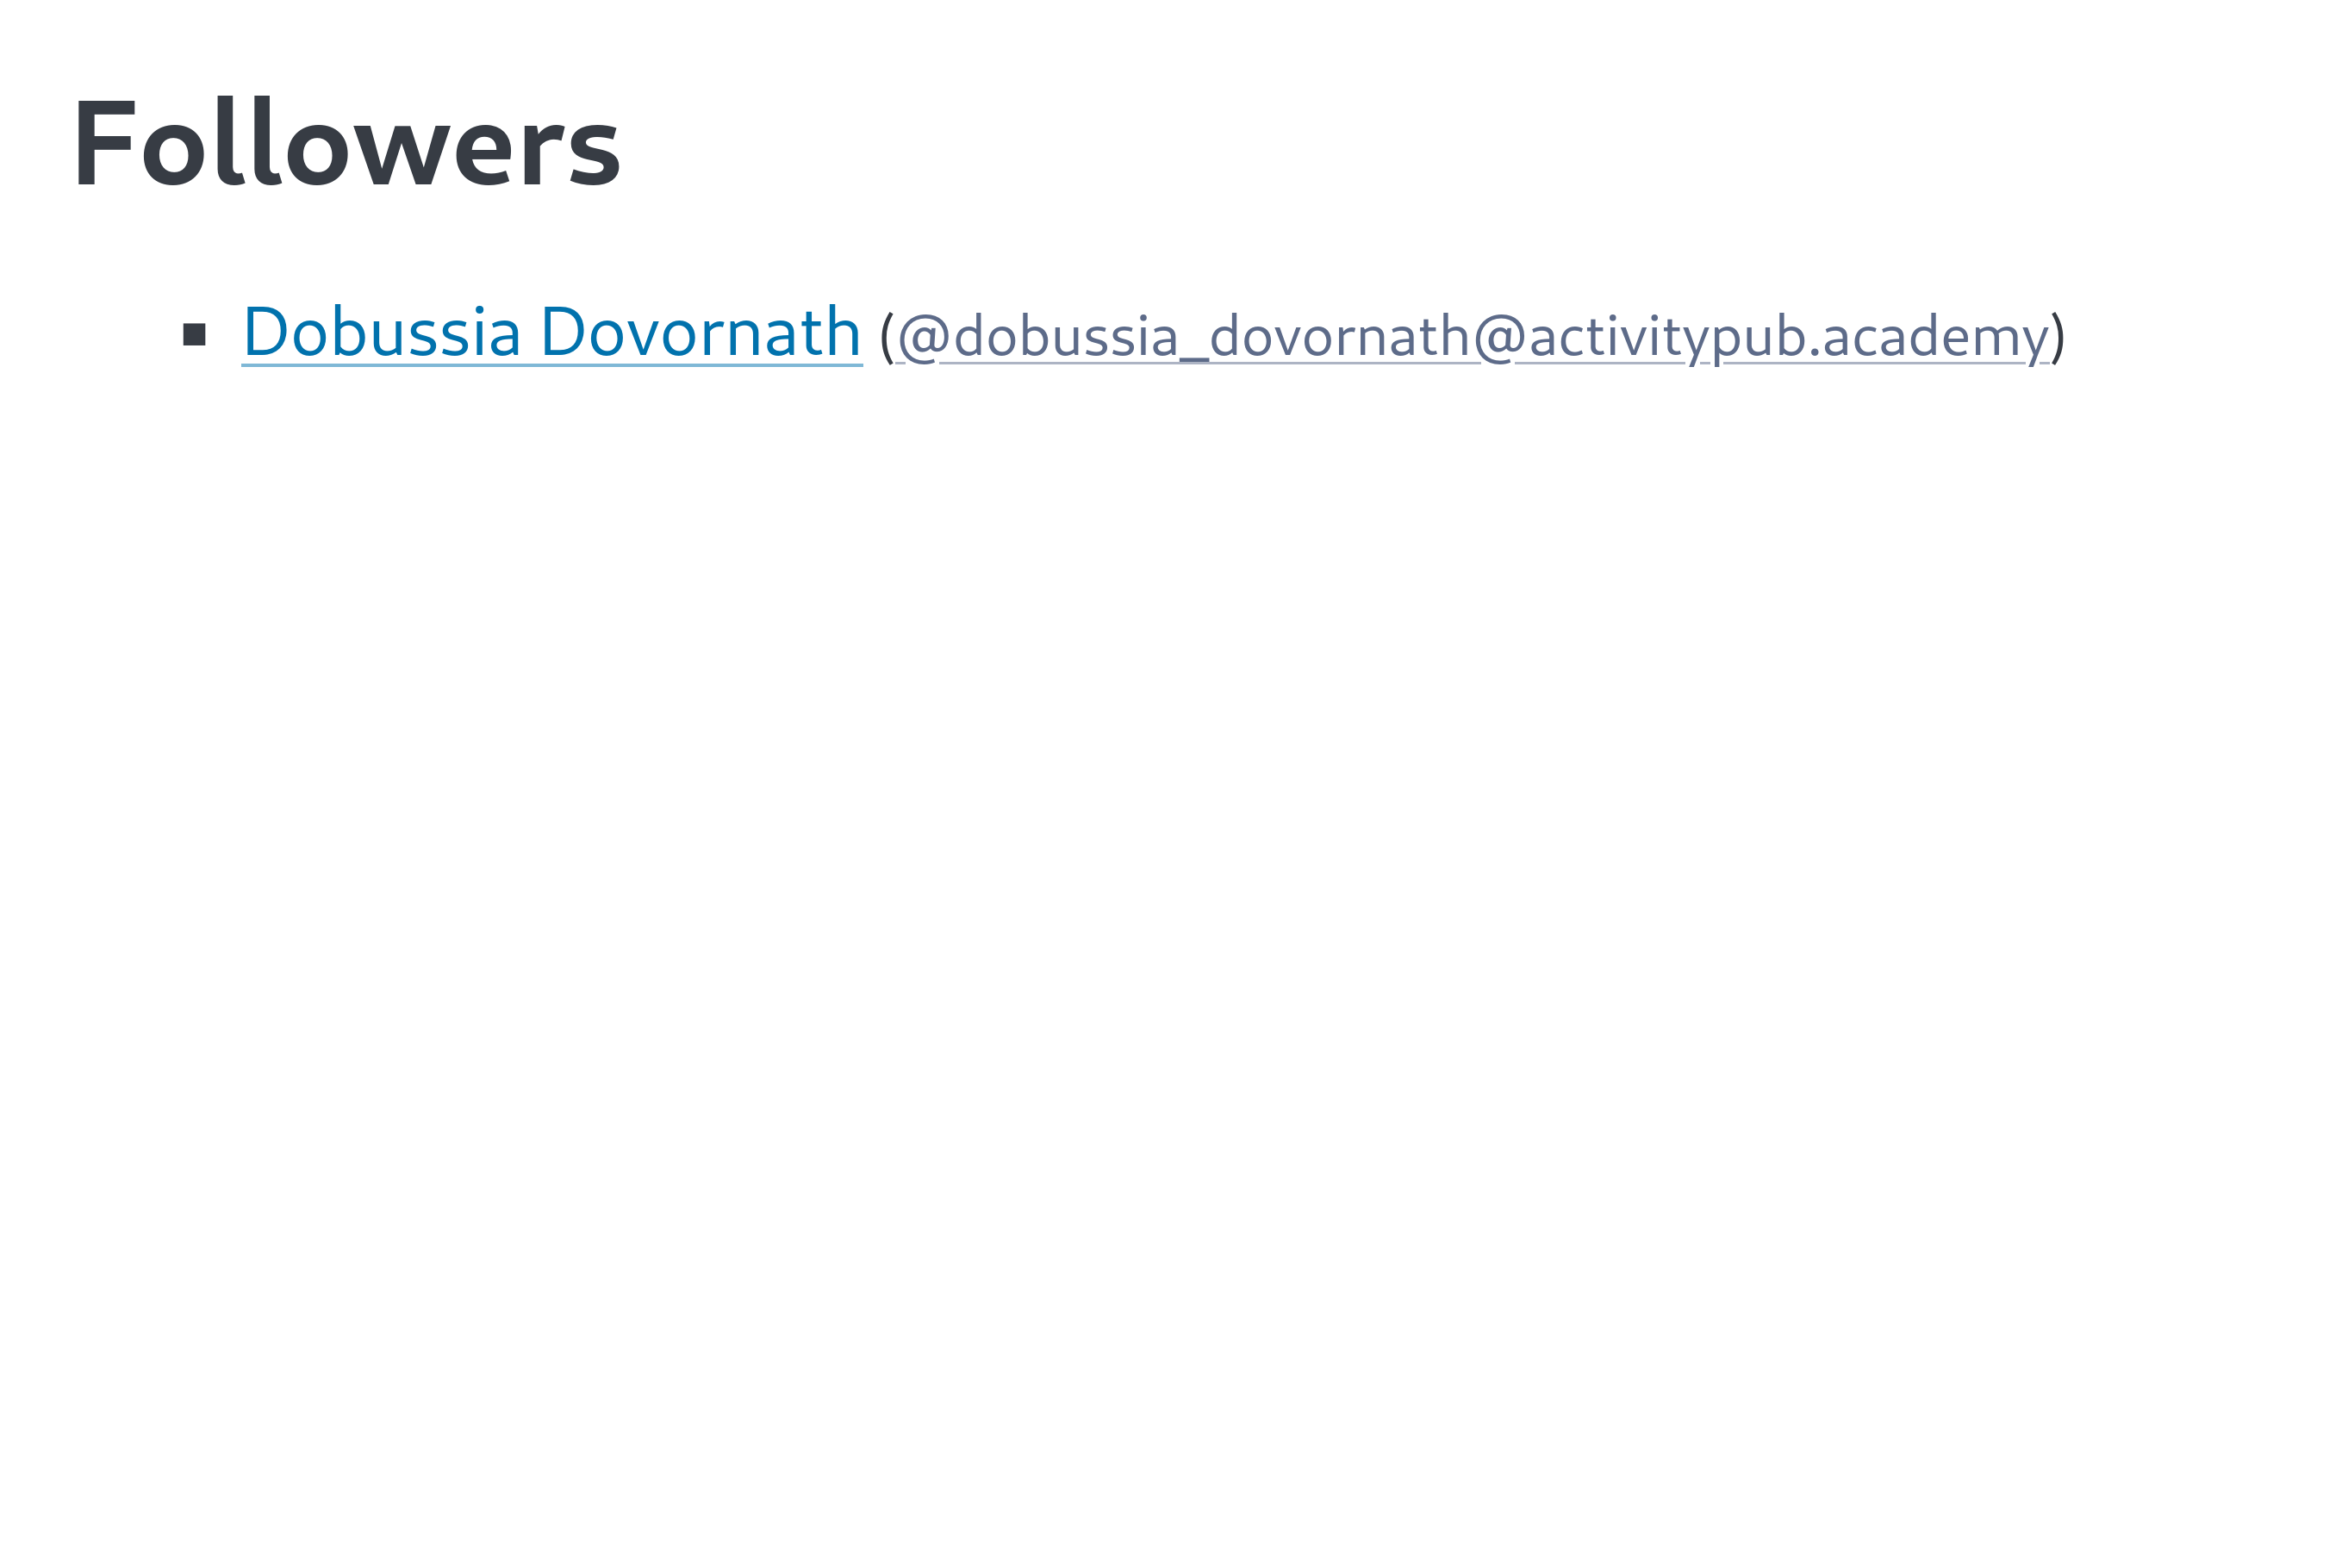
});Now, shall we check if it's displaying correctly? There should be followers, so with fedify tunnel running, follow our actor from another Mastodon server or ActivityPub.Academy. After the follow request is accepted, open the http://localhost:8000/users/johndoe/followers page in your web browser, and you should see something like this:
Now that we've created the followers list, it would be nice to display the number of followers on the profile page as well. Open the src/views.tsx file again and modify the <Profile> component as follows:
export interface ProfileProps {
name: string;
username: string;
handle: string;
followers: number;
}
export const Profile: FC<ProfileProps> = ({
name,
username,
handle,
followers,
}) => (
<>
<hgroup>
<h1>
<a href={`/users/${username}`}>{name}</a>
</h1>
<p>
<span style="user-select: all;">{handle}</span> ·{" "}
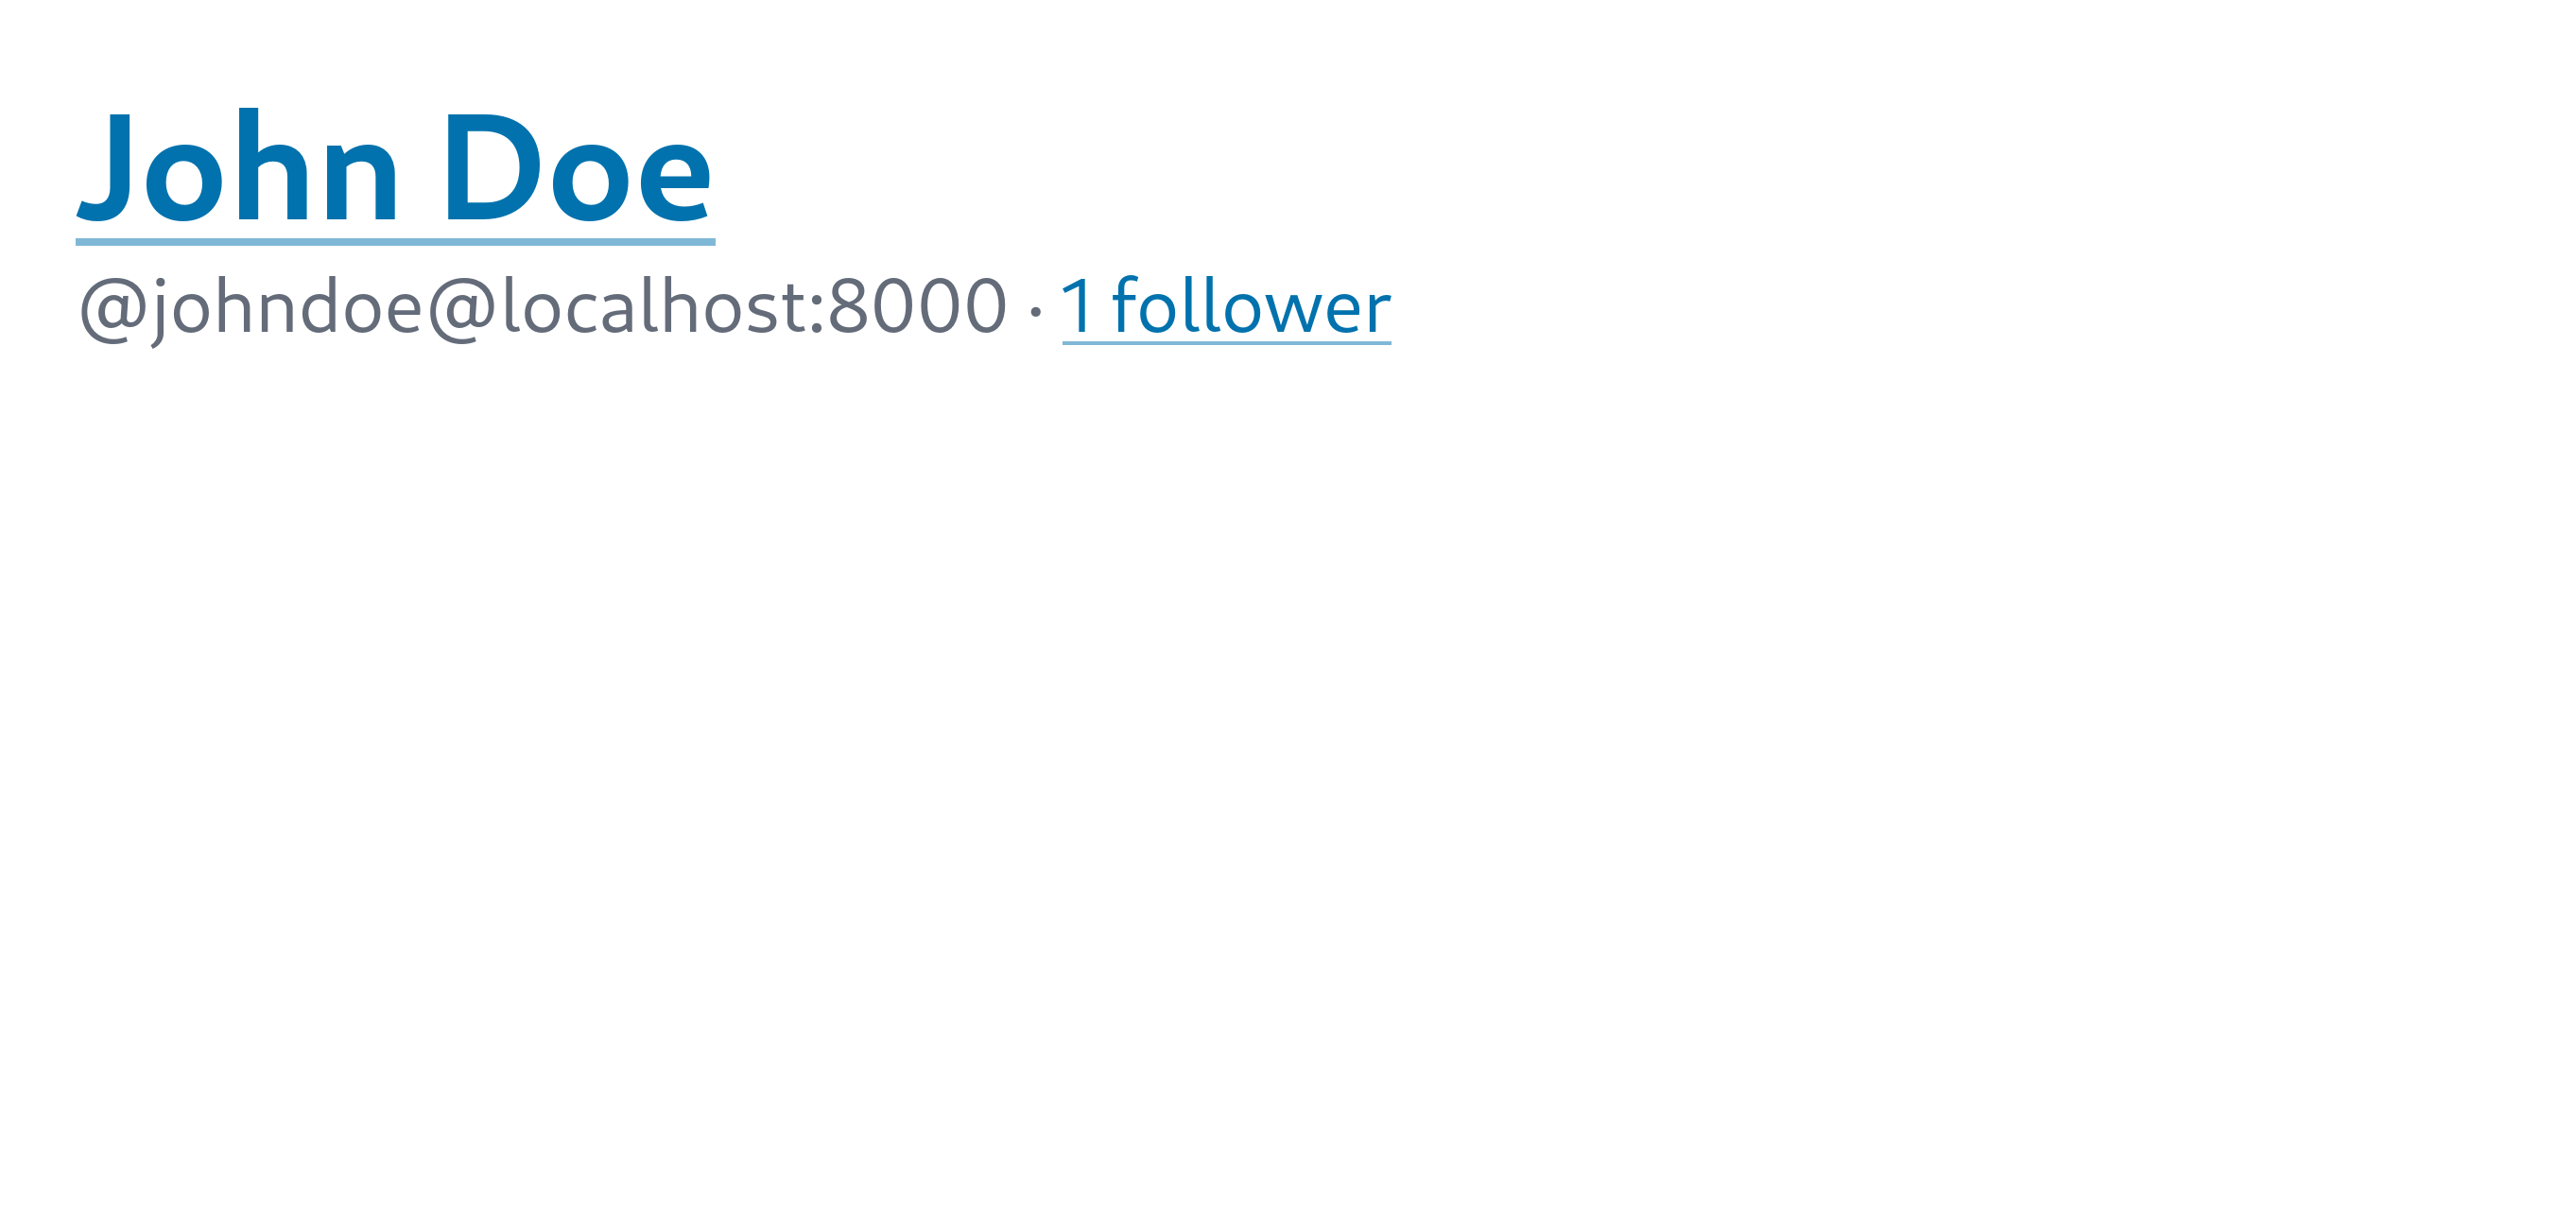
<a href={`/users/${username}/followers`}>
{followers === 1 ? "1 follower" : `${followers} followers`}
</a>
</p>
</hgroup>
</>
);Two props have been added to ProfileProps. followers is a prop that holds the number of followers, as the name suggests. username receives the username that will go into the URL to link to the followers list.
Now go back to the src/app.tsx file and modify the GET /users/{username} request handler as follows:
app.get("/users/:username", async (c) => {
  // ... omitted ...
  if (user == null) return c.notFound();

  // oxlint-disable-next-line typescript/no-non-null-assertion -- Always returns a single record
  const { followers } = db
    .prepare<unknown[], { followers: number }>(
      `
      SELECT count(*) AS followers
      FROM follows
      JOIN actors ON follows.following_id = actors.id
      WHERE actors.user_id = ?
      `,
    )
    .get(user.id)!;
  // ... omitted ...
  return c.html(
    <Layout>
      <Profile
        name={user.name ?? user.username}
        username={user.username}
        handle={handle}
        followers={followers}
      />
    </Layout>,
  );
});
SQL that counts the number of records in the follows table in the database has been added. Now, let's check the changed profile page. When you open the http://localhost:8000/users/johndoe page in your web browser, you should see something like this:
Followers collection
However, there's one problem. Let's look up our actor from a Mastodon server that is not ActivityPub.Academy. (You know how to look it up, right? With the server exposed to the public internet, enter the actor's handle in the Mastodon search box.) When you view our actor's profile in Mastodon, you might notice something strange:
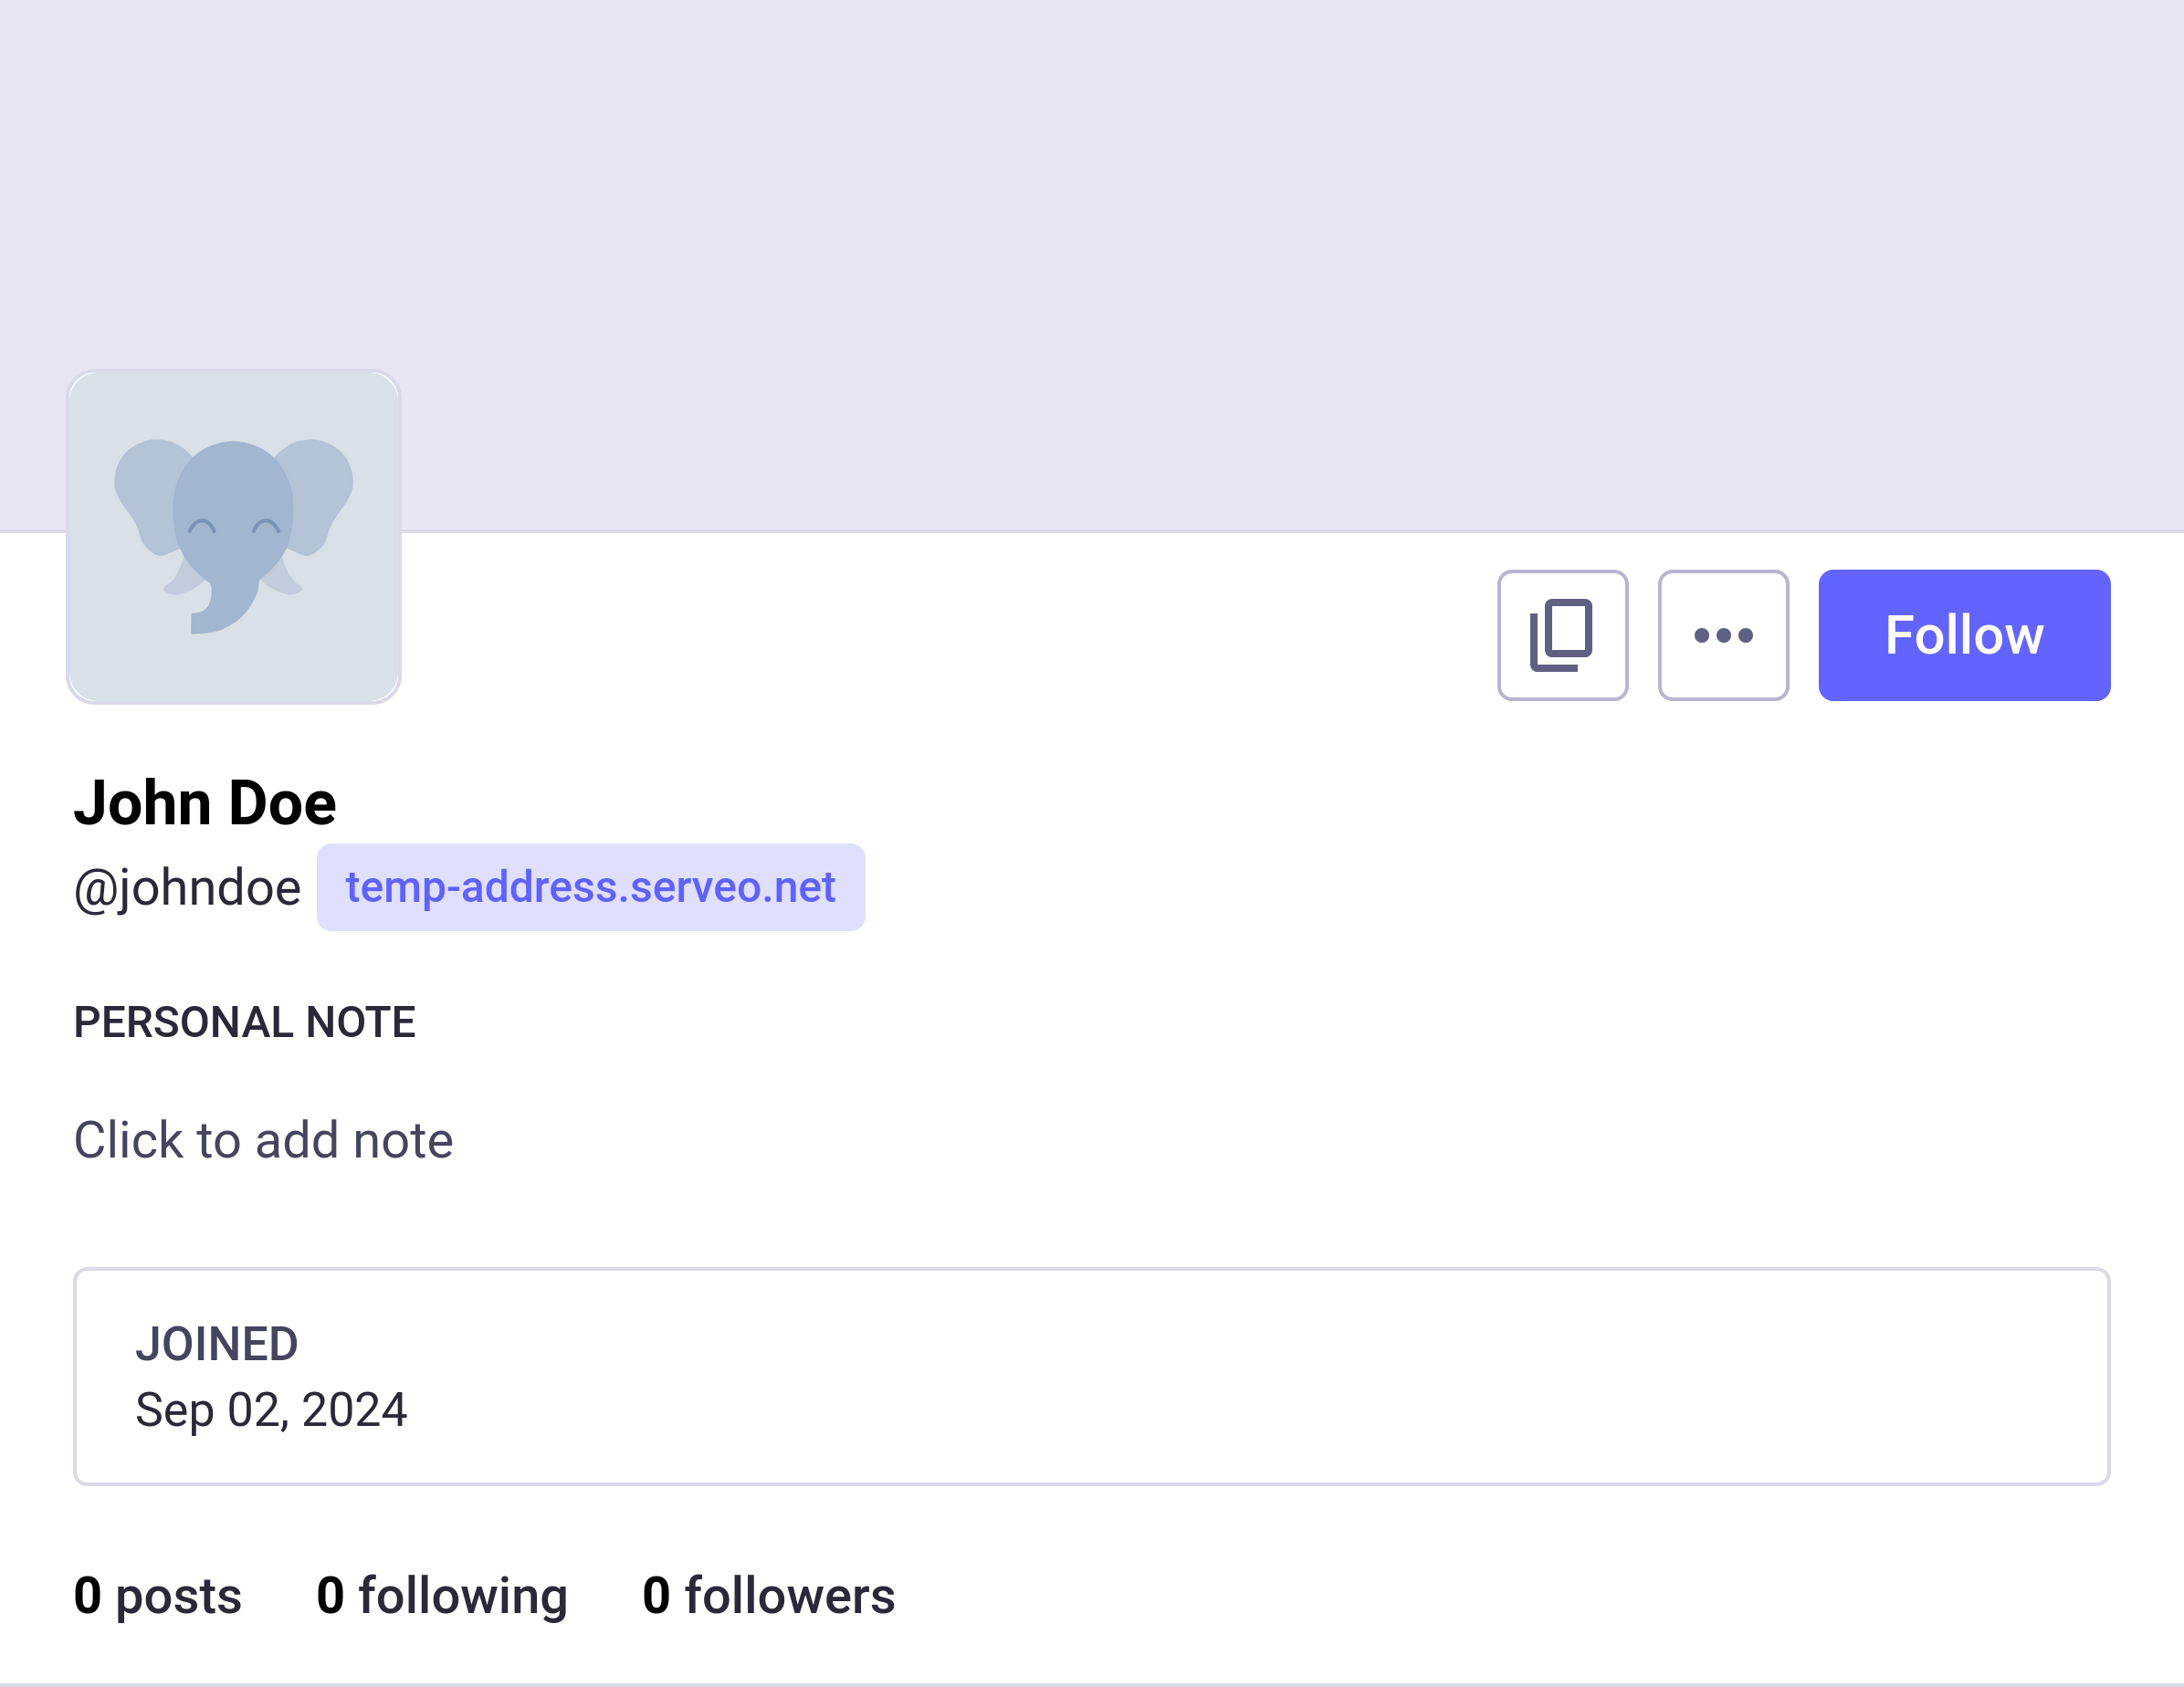
The number of followers is shown as 0. This is because our actor is not exposing the followers list via ActivityPub. To expose the followers list in ActivityPub, we need to define a followers collection.
Open the src/federation.ts file and import the Recipient type provided by Fedify:
import {
  createFederation,
  exportJwk,
  generateCryptoKeyPair,
  importJwk,
} from "@fedify/fedify";
import {
  Accept,
  Endpoints,
  Follow,
  Person,
  Undo,
  getActorHandle,
  type Recipient,
} from "@fedify/vocab";
Then add a followers collection dispatcher at the bottom:
federation
  .setFollowersDispatcher(
    "/users/{identifier}/followers",
    (ctx, identifier, cursor) => {
      const followers = db
        .prepare<unknown[], Actor>(
          `
          SELECT followers.*
          FROM follows
          JOIN actors AS followers ON follows.follower_id = followers.id
          JOIN actors AS following ON follows.following_id = following.id
          JOIN users ON users.id = following.user_id
          WHERE users.username = ?
          ORDER BY follows.created DESC
          `,
        )
        .all(identifier);
      const items: Recipient[] = followers.map((f) => ({
        id: new URL(f.uri),
        inboxId: new URL(f.inbox_url),
        endpoints:
          f.shared_inbox_url == null
            ? null
            : { sharedInbox: new URL(f.shared_inbox_url) },
      }));
      return { items };
    },
  )
  .setCounter((ctx, identifier) => {
    const result = db
      .prepare<unknown[], { cnt: number }>(
        `
        SELECT count(*) AS cnt
        FROM follows
        JOIN actors ON actors.id = follows.following_id
        JOIN users ON users.id = actors.user_id
        WHERE users.username = ?
        `,
      )
      .get(identifier);
    return result == null ? 0 : result.cnt;
  });
The setFollowersDispatcher() method creates a followers collection object to respond to when a GET /users/{identifier}/followers request comes in. Although the SQL is a bit long, it essentially gets the list of actors following the actor with the identifier parameter. The items contains Recipient objects, and the Recipient type looks like this:
export interface Recipient {
  readonly id: URL | null;
  readonly inboxId: URL | null;
  readonly endpoints?: {
    sharedInbox: URL | null;
  } | null;
}
The id property contains the actor's unique IRI, and inboxId contains the URL of the actor's personal inbox. endpoints.sharedInbox contains the URL of the actor's shared inbox. Since we have all that information in our actors table, we can fill the items array with that information.
The setCounter() method gets the total number of the followers collection. Here too, the SQL is a bit complex, but in summary, it's counting the number of actors following the actor with the identifier parameter.
Now, let's check if the followers collection is working properly by using the fedify lookup command:
fedify lookup http://localhost:8000/users/johndoe/followersIf implemented correctly, you should see a result like this:
✔ Looking up the object...
OrderedCollection {
  totalItems: 1,
  items: [ URL "https://activitypub.academy/users/dobussia_dovornath" ]
}
However, just creating a followers collection like this doesn't let other servers know where the followers collection is. So we need to link to the followers collection in the actor dispatcher:
federation
  .setActorDispatcher("/users/{identifier}", async (ctx, identifier) => {
    // ... omitted ...
    return new Person({
      // ... omitted ...
      followers: ctx.getFollowersUri(identifier),
    });
  })
Let's look up the actor with fedify lookup again:
fedify lookup http://localhost:8000/users/johndoeIf you see a "followers" property included in the result as shown below, it's correct:
✔ Looking up the object...
Person {
  ... omitted ...
  inbox: URL "http://localhost:8000/users/johndoe/inbox",
  followers: URL "http://localhost:8000/users/johndoe/followers",
  endpoints: Endpoints { sharedInbox: URL "http://localhost:8000/inbox" }
}
Now, let's look up our actor in Mastodon again. But the result might be a bit disappointing:
The number of followers is still shown as 0. This is because Mastodon caches information about actors from other servers. There are ways to update this, but they're not as easy as pressing the F5 key:
One way is to wait for a week. Mastodon clears the cache that holds information about actors from other servers 7 days after the last update.
Another way is to send an
Updateactivity, but this requires tedious coding.Or you could try looking it up from another Mastodon server where the cache hasn't been created yet.
The last method is to turn off and on
fedify tunnelto get a new temporary domain assigned.
If you want to see the correct number of followers displayed on another Mastodon server, try one of the methods I've listed.
Posts
Now, it's finally time to implement posts. Unlike a typical blog, the microblog we're creating should be able to store posts created on other servers as well. Let's design with this in mind.
Table creation
Let's start by creating a posts table. Open the src/schema.sql file and add the following SQL:
CREATE TABLE IF NOT EXISTS posts (
  id       INTEGER NOT NULL PRIMARY KEY,
  uri      TEXT    NOT NULL UNIQUE CHECK (uri <> ''),
  actor_id INTEGER NOT NULL REFERENCES actors (id),
  content  TEXT    NOT NULL,
  url      TEXT             CHECK (url LIKE 'https://%' OR url LIKE 'http://%'),
  created  TEXT    NOT NULL DEFAULT (CURRENT_TIMESTAMP) CHECK (created <> '')
);
The
idcolumn is the primary key of the table.The
uricolumn holds the unique URI of the post. As mentioned earlier, all ActivityPub objects must have a unique URI.The
actor_idcolumn points to the actor who wrote the post.The
contentcolumn contains the content of the post.The
urlcolumn contains the URL where the post is displayed in a web browser. There are cases where the URI of an ActivityPub object and the URL of the page displayed in a web browser match, but there are also cases where they don't, so a separate column is necessary. However, it can be empty.The
createdcolumn contains the time the post was created.
Let's execute the SQL to create the posts table:
sqlite3 microblog.sqlite3 < src/schema.sqlAlso define a Post type in the src/schema.ts file to represent records that will be stored in the posts table in JavaScript:
export interface Post {
  id: number;
  uri: string;
  actor_id: number;
  content: string;
  url: string | null;
  created: string;
}
Home page
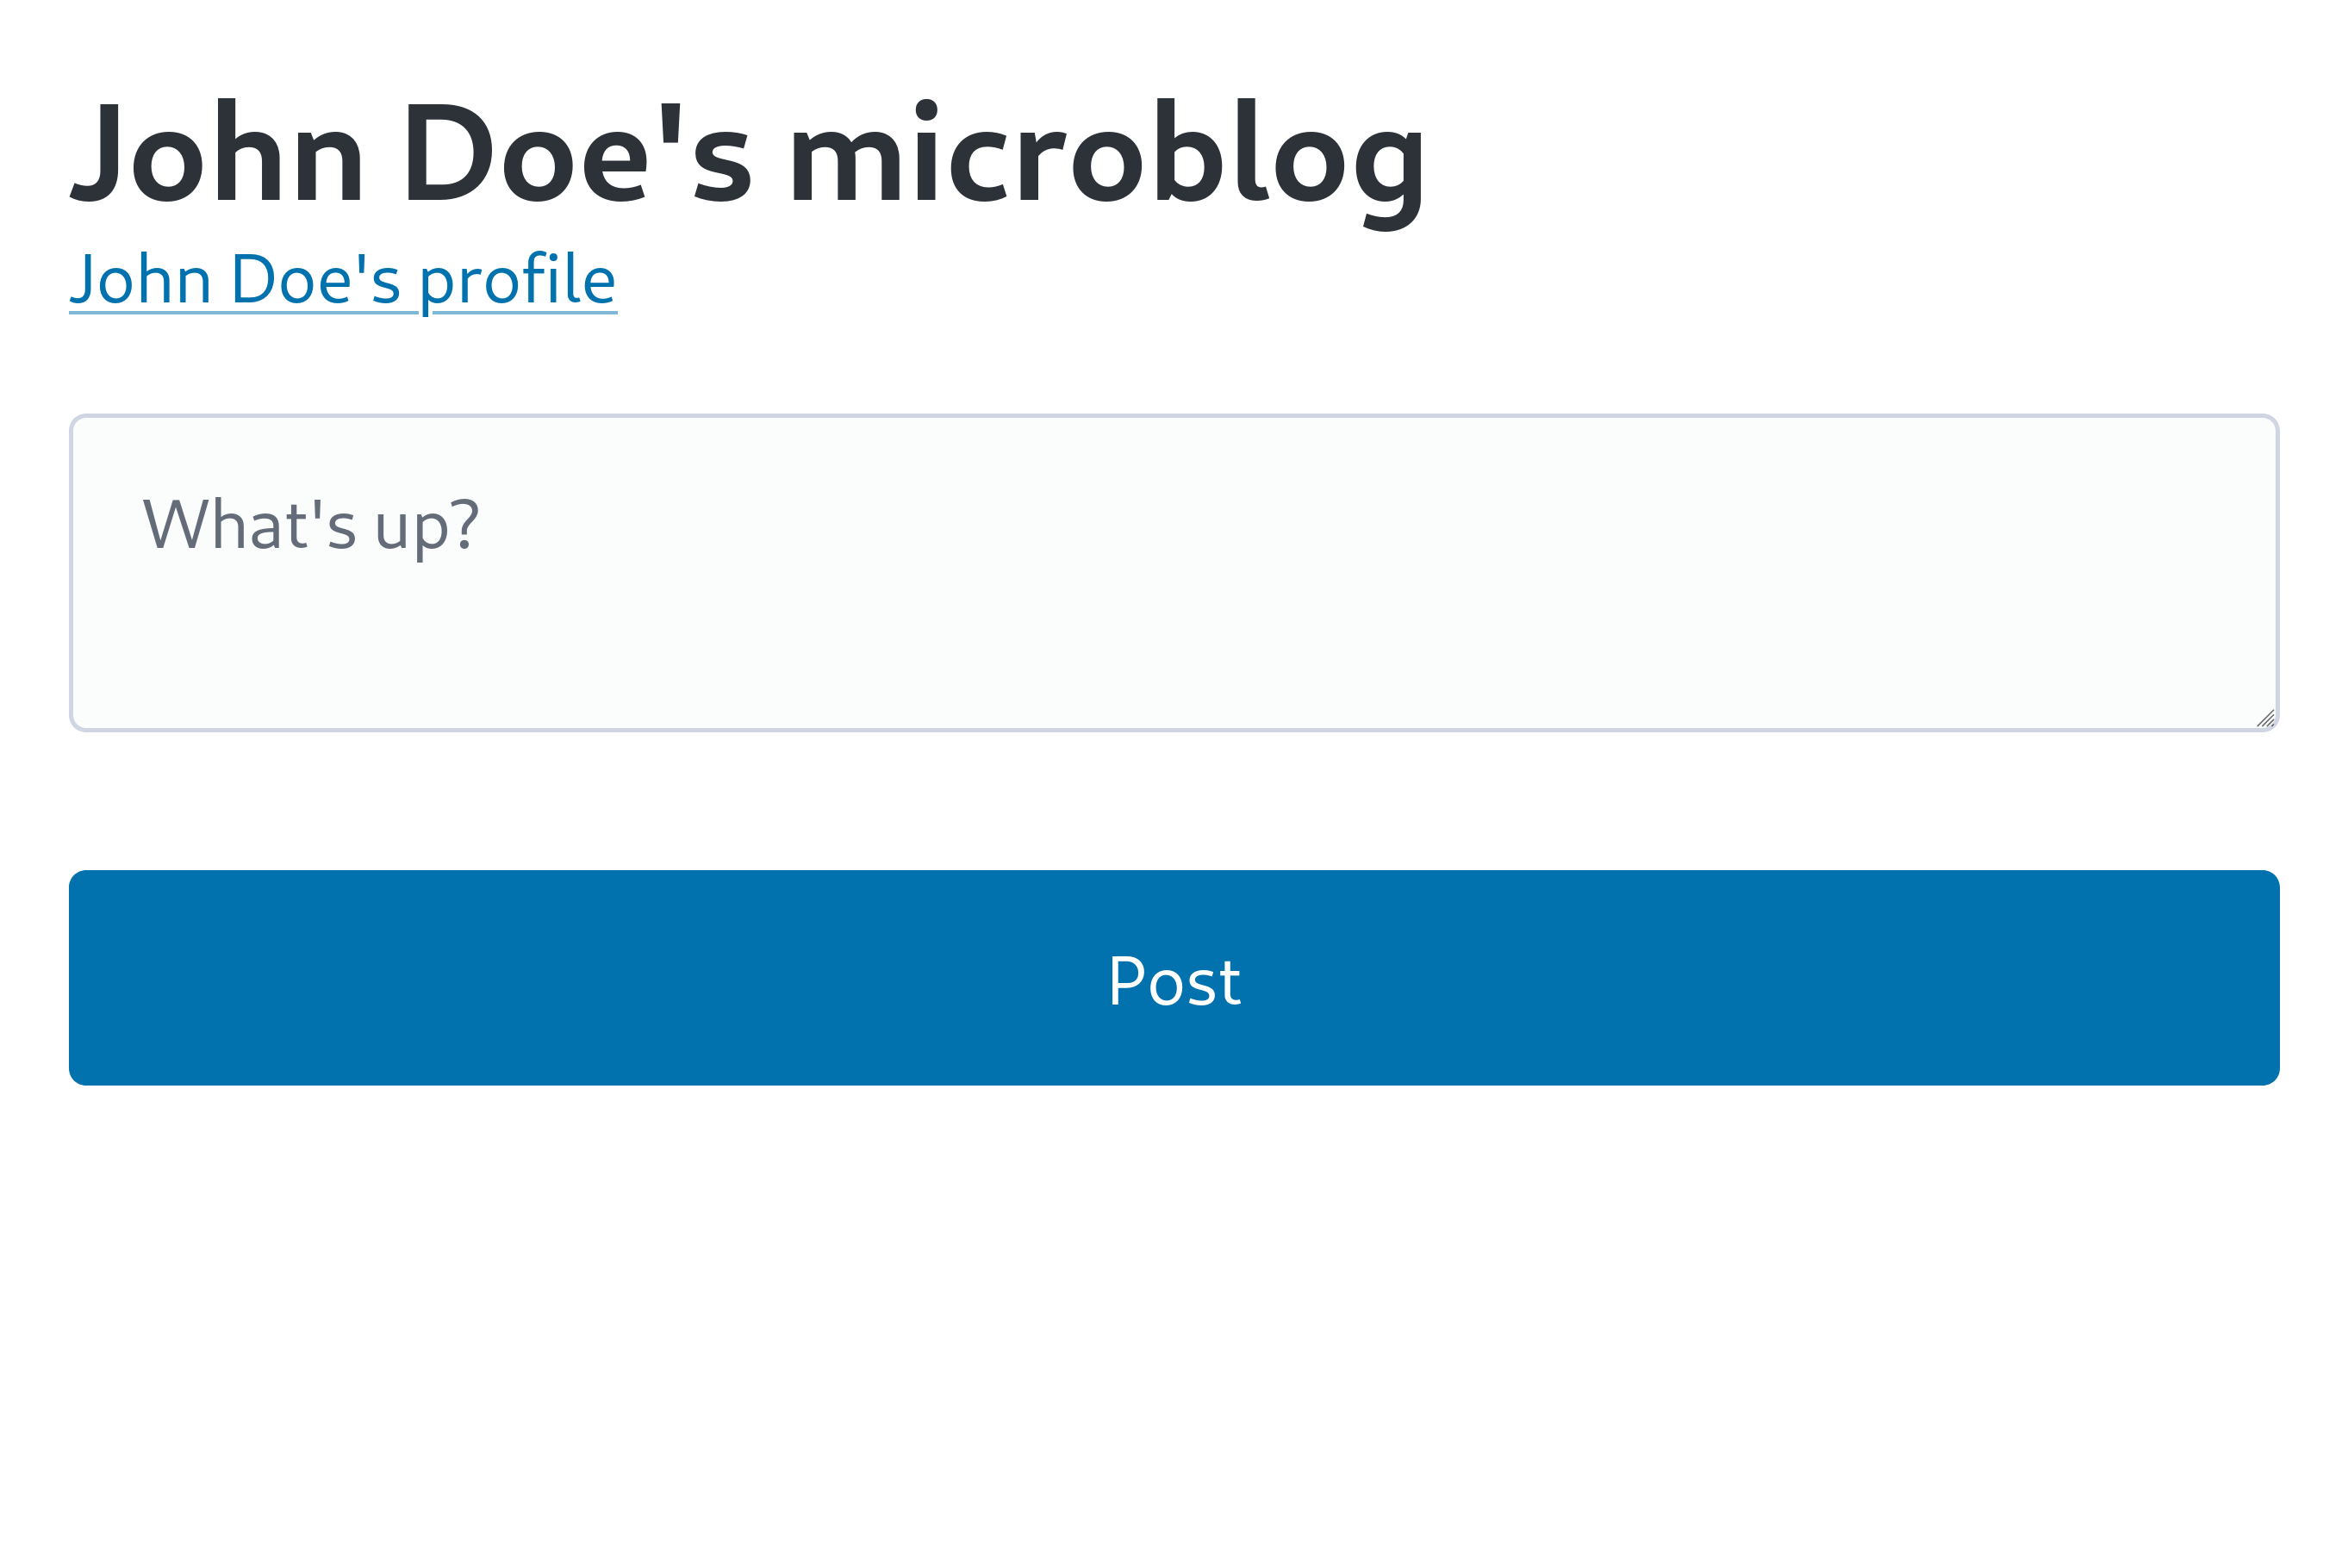
To write a post, there needs to be a form somewhere, right? Come to think of it, we haven't properly created the home page yet. Let's add a post creation form to the home page.
First, open the src/views.tsx file and import the User type:
import type { Actor, User } from "./schema.ts";Then define the <Home> component:
export interface HomeProps {
  user: User & Actor;
}

export const Home: FC<HomeProps> = ({ user }) => (
  <>
    <hgroup>
      <h1>{user.name}'s microblog</h1>
      <p>
        <a href={`/users/${user.username}`}>{user.name}'s profile</a>
      </p>
    </hgroup>
    <form method="post" action={`/users/${user.username}/posts`}>
      <fieldset>
        <label>
          <textarea name="content" required={true} placeholder="What's up?" />
        </label>
      </fieldset>
      <input type="submit" value="Post" />
    </form>
  </>
);
Then open the src/app.tsx file and import the <Home> component we just defined:
import { FollowerList, Home, Layout, Profile, SetupForm } from "./views.tsx";And modify the existing GET / request handler:
app.get("/", (c) => {
  const user = db
    .prepare<unknown[], User & Actor>(
      `
      SELECT users.*, actors.*
      FROM users
      JOIN actors ON users.id = actors.user_id
      LIMIT 1
      `,
    )
    .get();
  if (user == null) return c.redirect("/setup");

  return c.html(
    <Layout>
      <Home user={user} />
    </Layout>,
  );
});
If you've done this much, let's check if the home page comes out well. When you open the http://localhost:8000/ page in your web browser, you should see something like this:
Record insertion
Now that we've created the post creation form, we need code to actually save the post content to the posts table.
First, open the src/federation.ts file and import the Note class provided by Fedify:
import {
  createFederation,
  exportJwk,
  generateCryptoKeyPair,
  importJwk,
} from "@fedify/fedify";
import {
  Accept,
  Endpoints,
  Follow,
  Note,
  Person,
  Undo,
  getActorHandle,
  type Recipient,
} from "@fedify/vocab";
Add the following code:
federation.setObjectDispatcher(
  Note,
  "/users/{identifier}/posts/{id}",
  (ctx, values) => {
    return null;
  },
);
This code doesn't do much yet, but it's needed to determine the permalink format of the posts. We'll implement it properly later.
In ActivityPub, the content of posts is exchanged in HTML format. Therefore, we need to convert the content received in plain text format to HTML format. At this time, we need the stringify-entities package to convert characters like < and > to HTML entities like < and >:
npm add stringify-entitiesThen open the src/app.tsx file and import the installed package:
import { stringifyEntities } from "stringify-entities";Also import the Post type and the Note class provided by Fedify:
import type { Actor, Post, User } from "./schema.ts";
import { Note } from "@fedify/vocab";
And implement the POST /users/{username}/posts request handler:
app.post("/users/:username/posts", async (c) => {
  const username = c.req.param("username");
  const actor = db
    .prepare<unknown[], Actor>(
      `
      SELECT actors.*
      FROM actors
      JOIN users ON users.id = actors.user_id
      WHERE users.username = ?
      `,
    )
    .get(username);
  if (actor == null) return c.redirect("/setup");
  const form = await c.req.formData();
  const content = form.get("content")?.toString();
  if (content == null || content.trim() === "") {
    return c.text("Content is required", 400);
  }
  const ctx = fedi.createContext(c.req.raw, undefined);
  const url: string | null = db.transaction(() => {
    const post = db
      .prepare<unknown[], Post>(
        `
        INSERT INTO posts (uri, actor_id, content)
        VALUES ('https://localhost/', ?, ?)
        RETURNING *
        `,
      )
      .get(actor.id, stringifyEntities(content, { escapeOnly: true }));
    if (post == null) return null;
    const url = ctx.getObjectUri(Note, {
      identifier: username,
      id: post.id.toString(),
    }).href;
    db.prepare("UPDATE posts SET uri = ?, url = ? WHERE id = ?").run(
      url,
      url,
      post.id,
    );
    return url;
  })();
  if (url == null) return c.text("Failed to create post", 500);
  return c.redirect(url);
});
Although it's a normal code that adds a record to the posts table, there's one peculiar part. To get the URI of the ActivityPub object representing the post, posts.id needs to be determined first, so we first insert a temporary URI https://localhost/ into the posts.uri column to add the record, then use the determined posts.id to get the actual URI using the getObjectUri() method and update the record.
Now, let's open the http://localhost:8000/ page in your web browser and create a post:
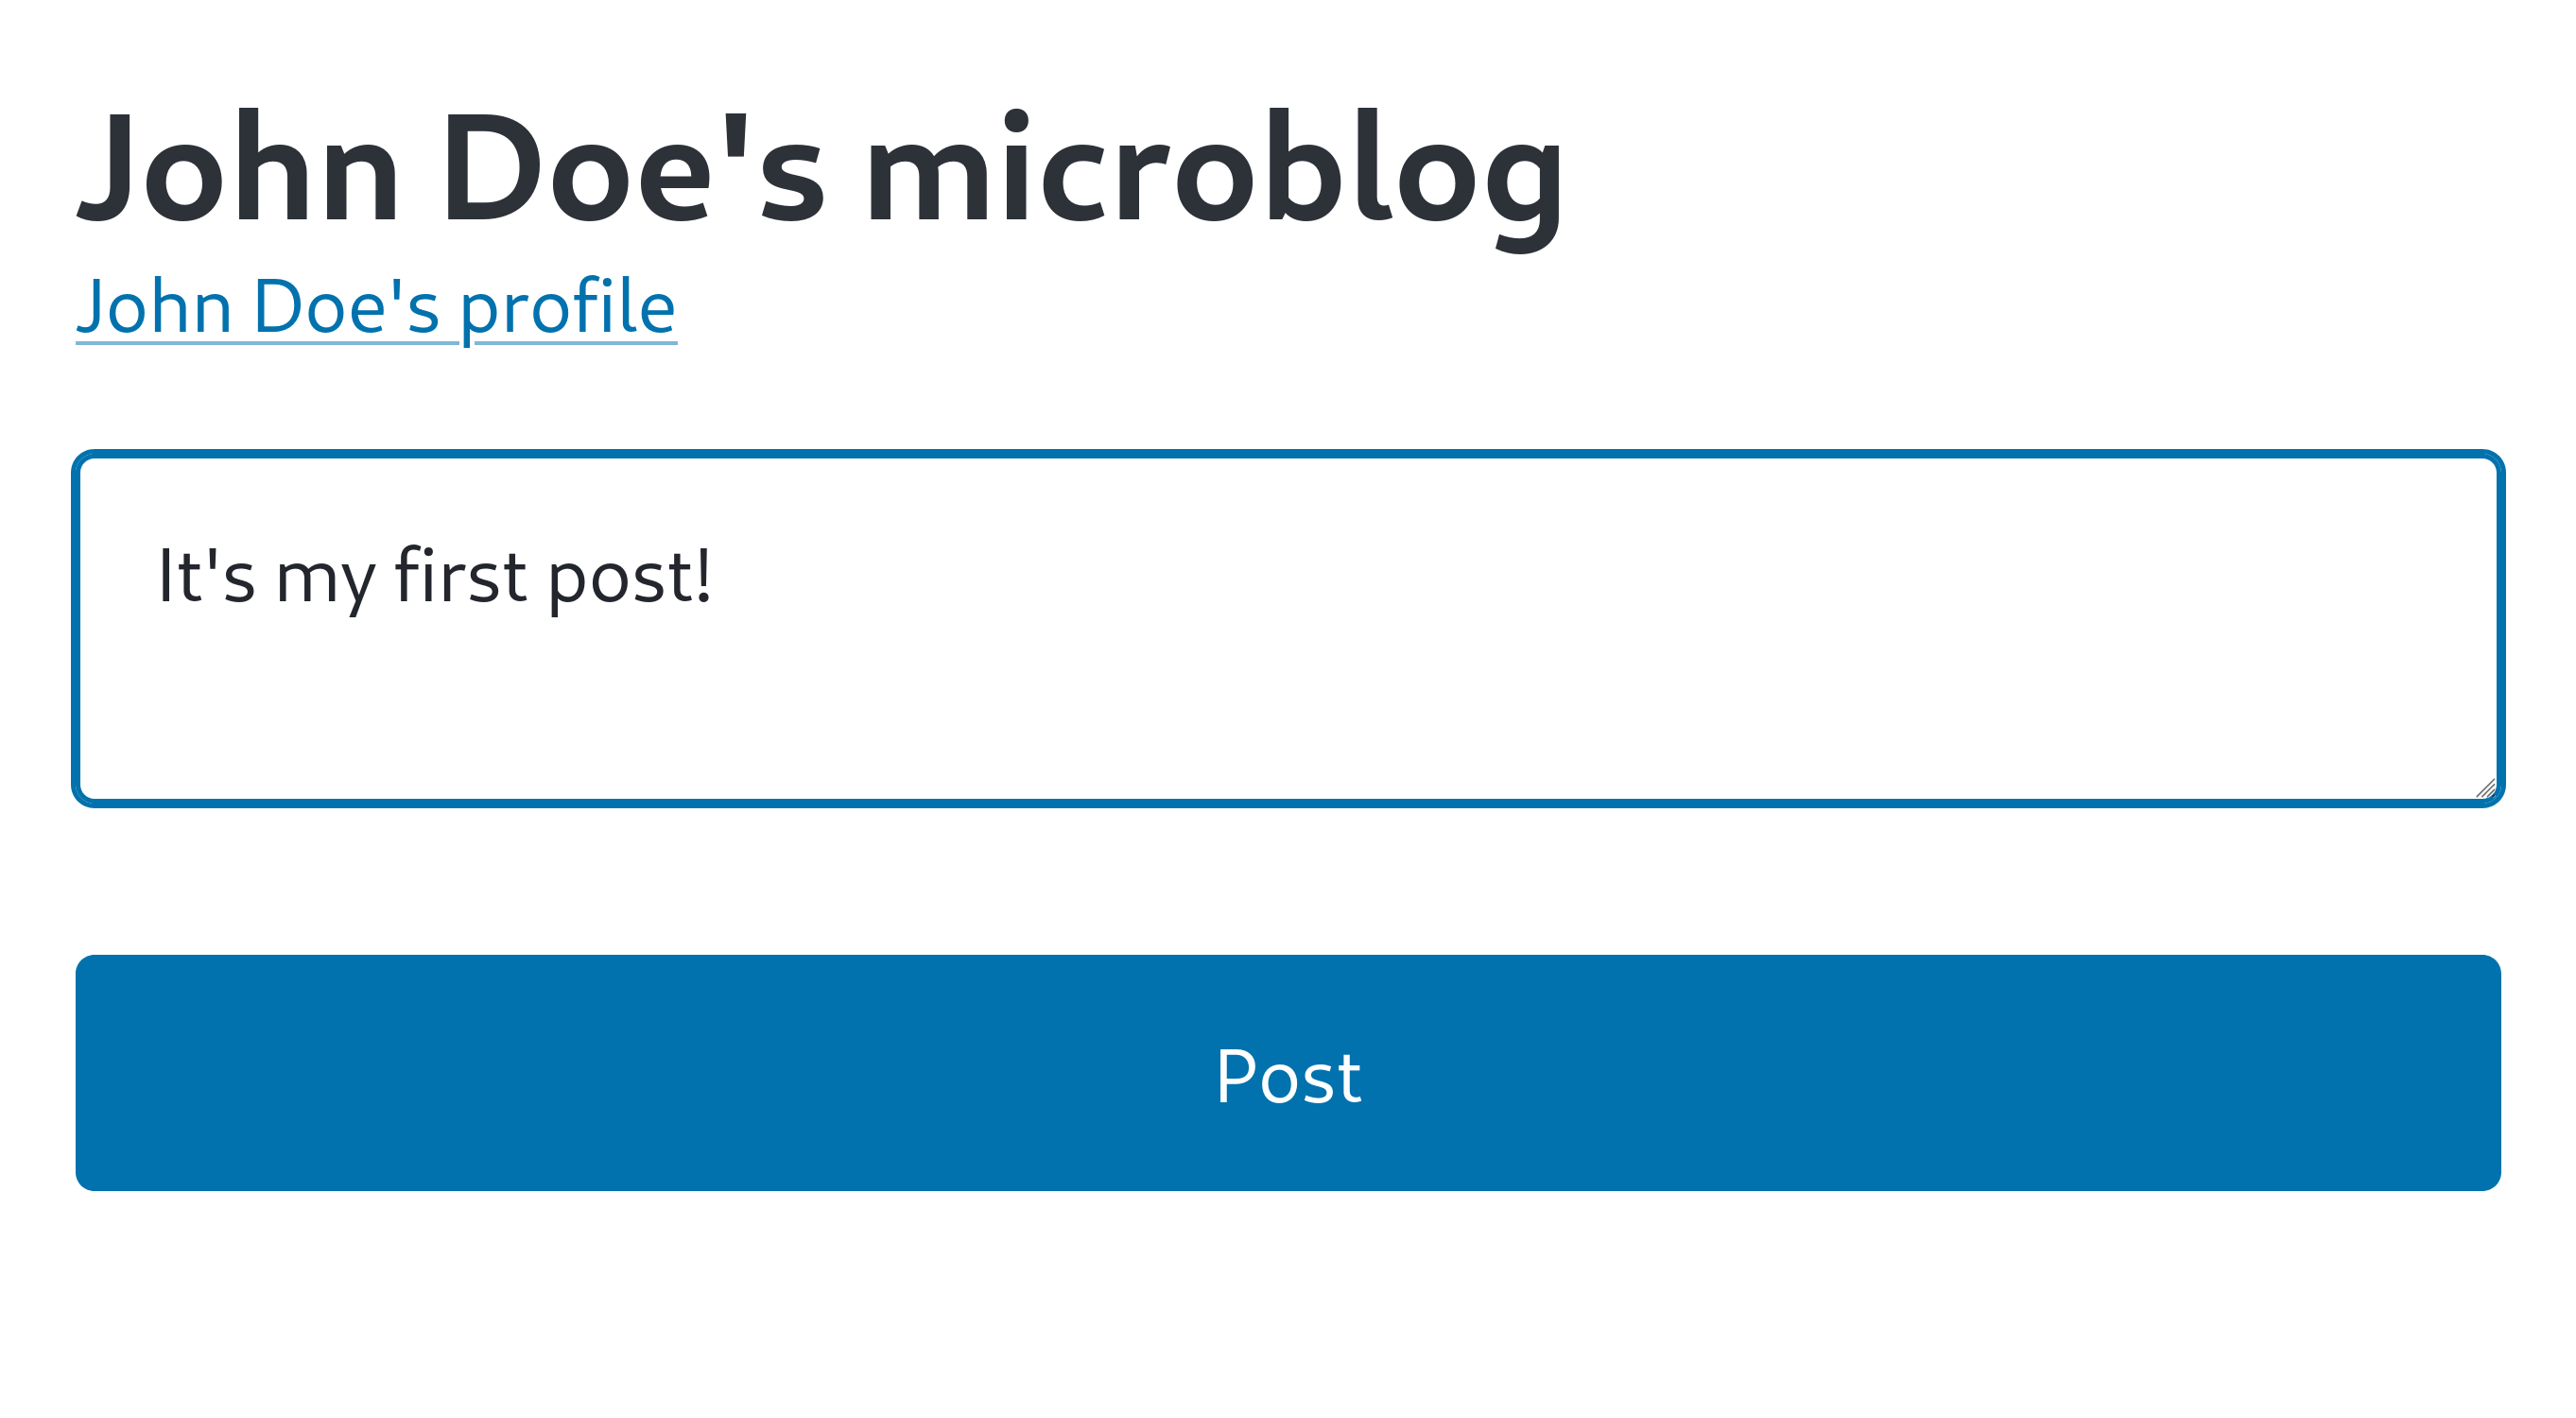
When you press the Post button to create a post, unfortunately you'll get a 404 Not Found error:

This is because we implemented it to redirect to the post's permalink, but we haven't implemented the post page yet. However, a record should have been created in the posts table. Let's check:
echo "SELECT * FROM posts;" | sqlite3 -table microblog.sqlite3You should see a result like this:
id | uri | actor_id | content | url | created |
|---|---|---|---|---|---|
1 | http://localhost:8000/users/johndoe/posts/1 | 1 | It's my first post! | http://localhost:8000/users/johndoe/posts/1 | 2024-09-02 08:10:55 |
Post page
To prevent the 404 Not Found error after creating a post, let's implement the post page.
Open the src/views.tsx file and import the Post type:
import type { Actor, Post, User } from "./schema.ts";Then define the <PostPage> component and the <PostView> component:
export interface PostPageProps extends ProfileProps, PostViewProps {}

export const PostPage: FC<PostPageProps> = (props) => (
  <>
    <Profile
      name={props.name}
      username={props.username}
      handle={props.handle}
      followers={props.followers}
    />
    <PostView post={props.post} />
  </>
);

export interface PostViewProps {
  post: Post & Actor;
}

export const PostView: FC<PostViewProps> = ({ post }) => (
  <article>
    <header>
      <ActorLink actor={post} />
    </header>
    {/* oxlint-disable-next-line react/no-danger -- The post content is sanitized before storage */}
    <div dangerouslySetInnerHTML={{ __html: post.content }} />
    <footer>
      <a href={post.url ?? post.uri}>
        <time datetime={new Date(post.created).toISOString()}>
          {post.created}
        </time>
      </a>
    </footer>
  </article>
);
Now let's load the post data from the database and render it with the <PostPage> component. Open the src/app.tsx file and import the <PostPage> component we just defined:
import {
  FollowerList,
  Home,
  Layout,
  PostPage,
  Profile,
  SetupForm,
} from "./views.tsx";
And implement the GET /users/{username}/posts/{id} request handler:
app.get("/users/:username/posts/:id", (c) => {
  const post = db
    .prepare<unknown[], Post & Actor & User>(
      `
      SELECT users.*, actors.*, posts.*
      FROM posts
      JOIN actors ON actors.id = posts.actor_id
      JOIN users ON users.id = actors.user_id
      WHERE users.username = ? AND posts.id = ?
      `,
    )
    .get(c.req.param("username"), c.req.param("id"));
  if (post == null) return c.notFound();

  // oxlint-disable-next-line typescript/no-non-null-assertion -- Always returns a single record
  const { followers } = db
    .prepare<unknown[], { followers: number }>(
      `
      SELECT count(*) AS followers
      FROM follows
      WHERE follows.following_id = ?
      `,
    )
    .get(post.actor_id)!;
  return c.html(
    <Layout>
      <PostPage
        name={post.name ?? post.username}
        username={post.username}
        handle={post.handle}
        followers={followers}
        post={post}
      />
    </Layout>,
  );
});
Now let's open the http://localhost:8000/users/johndoe/posts/1 page that gave a 404 Not Found error earlier in your web browser:
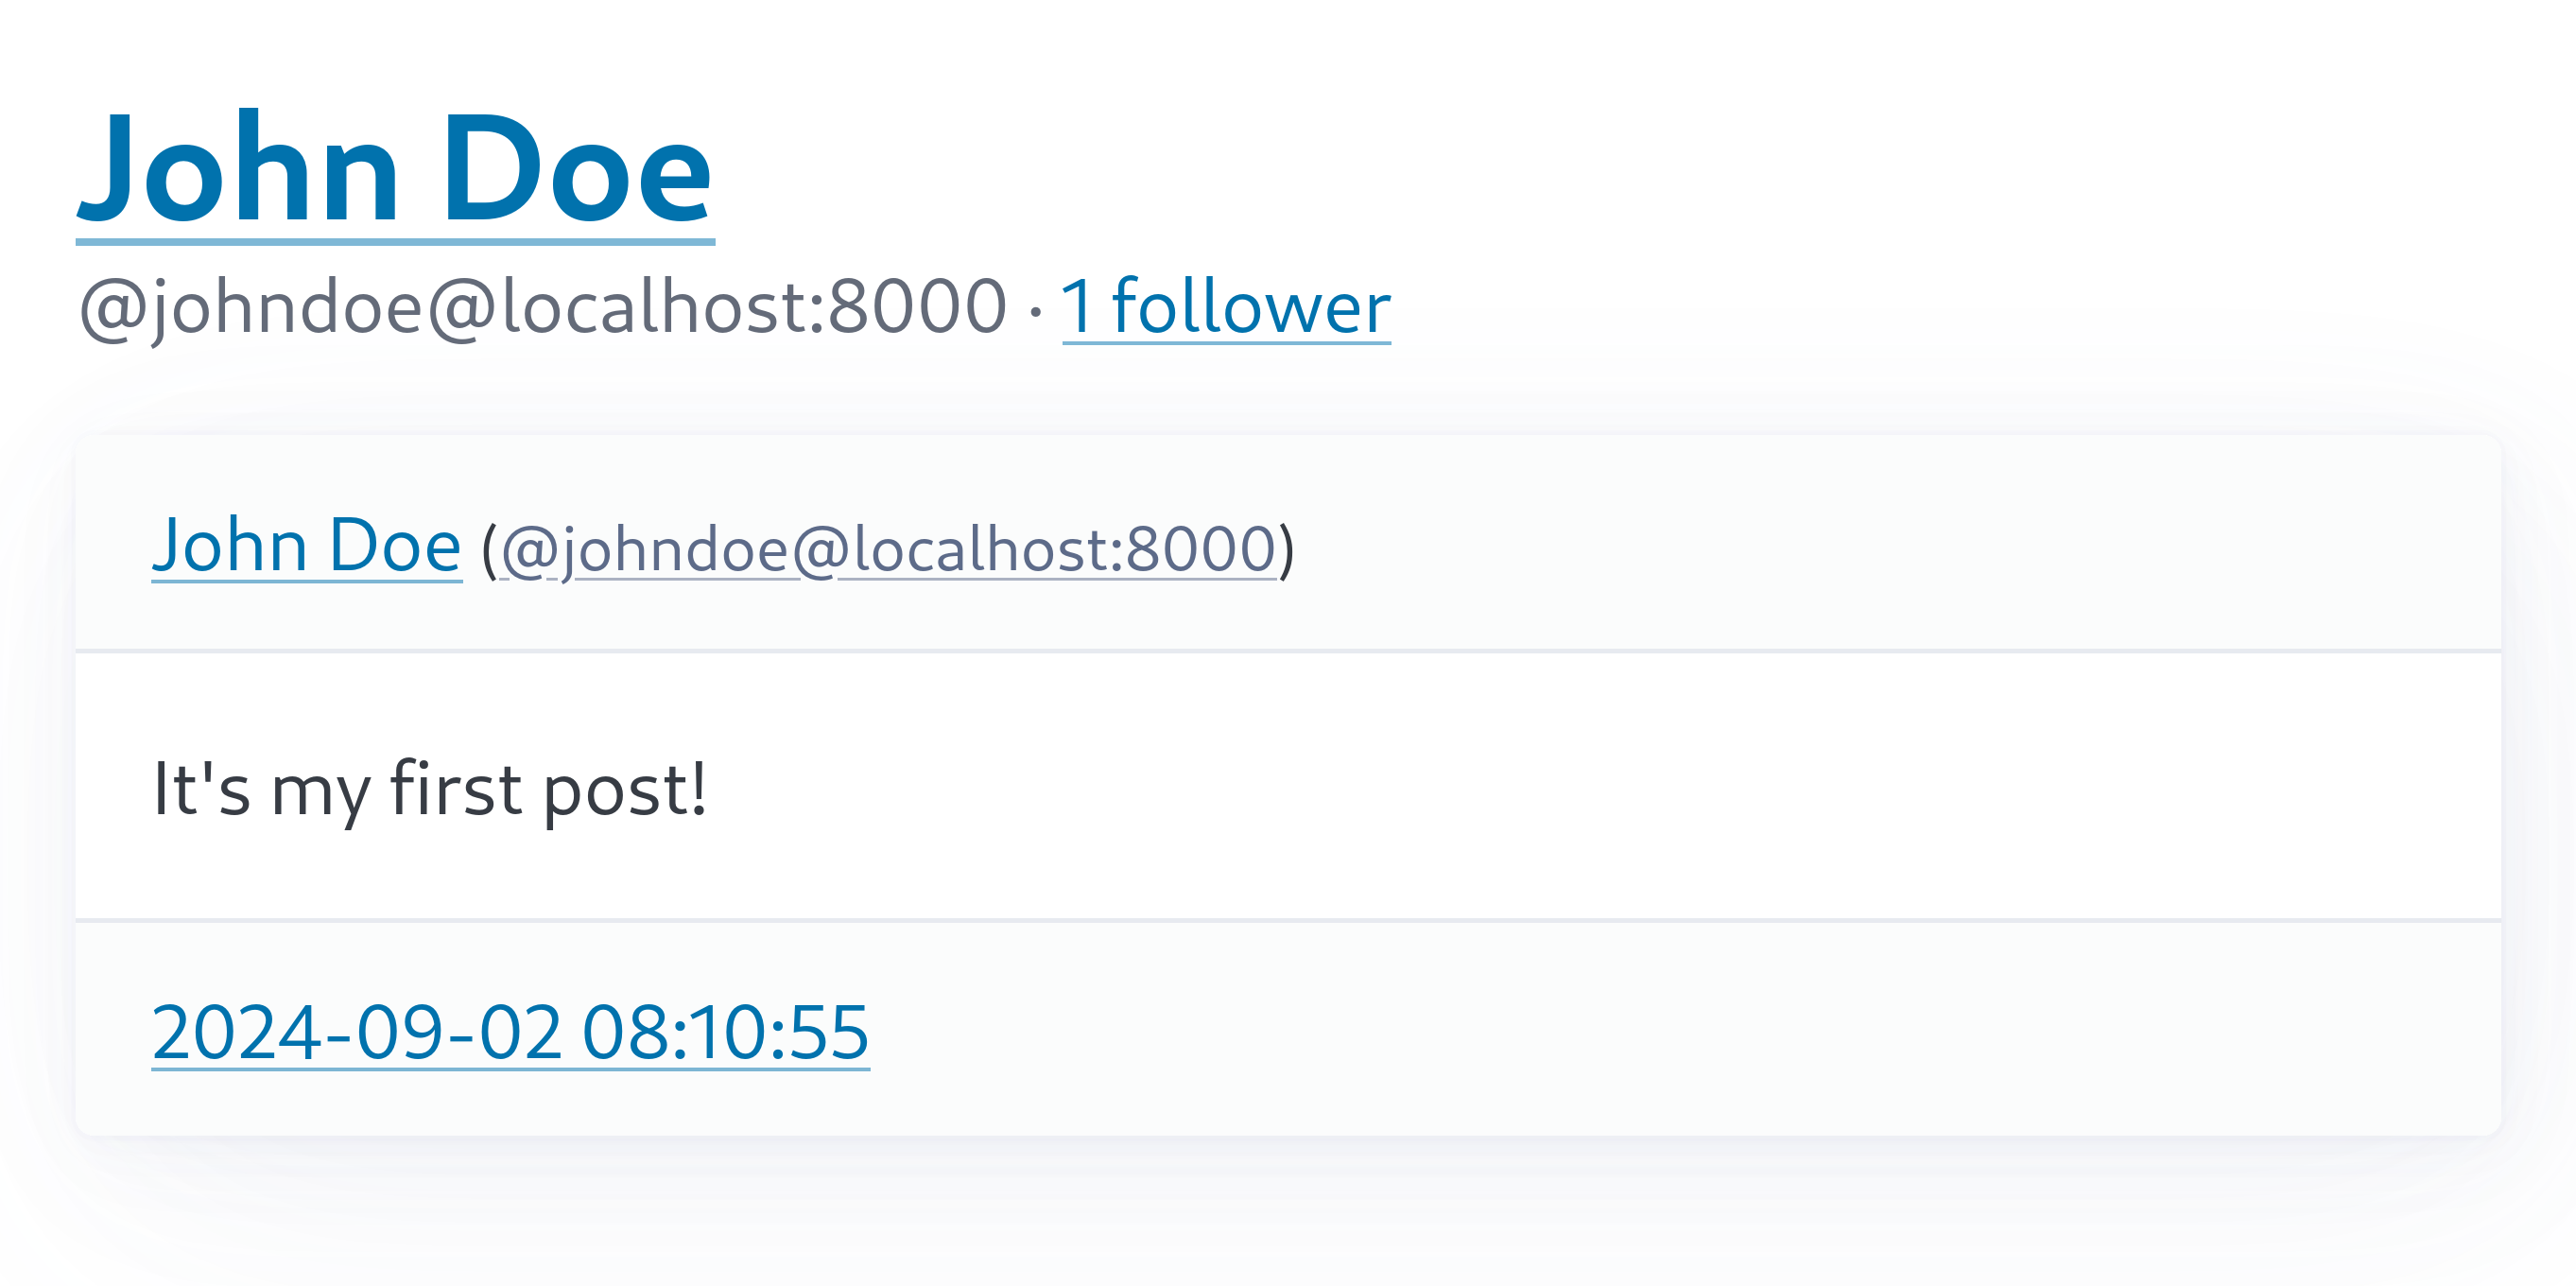
Note object dispatcher
Now, can we check if the post can be viewed from other Mastodon servers? First, use fedify tunnel to expose the local server to the public internet.
In that state, try entering the post's permalink https://temp-address.serveo.net/users/johndoe/posts/1 (replace with your temporary domain name) in the Mastodon search box:
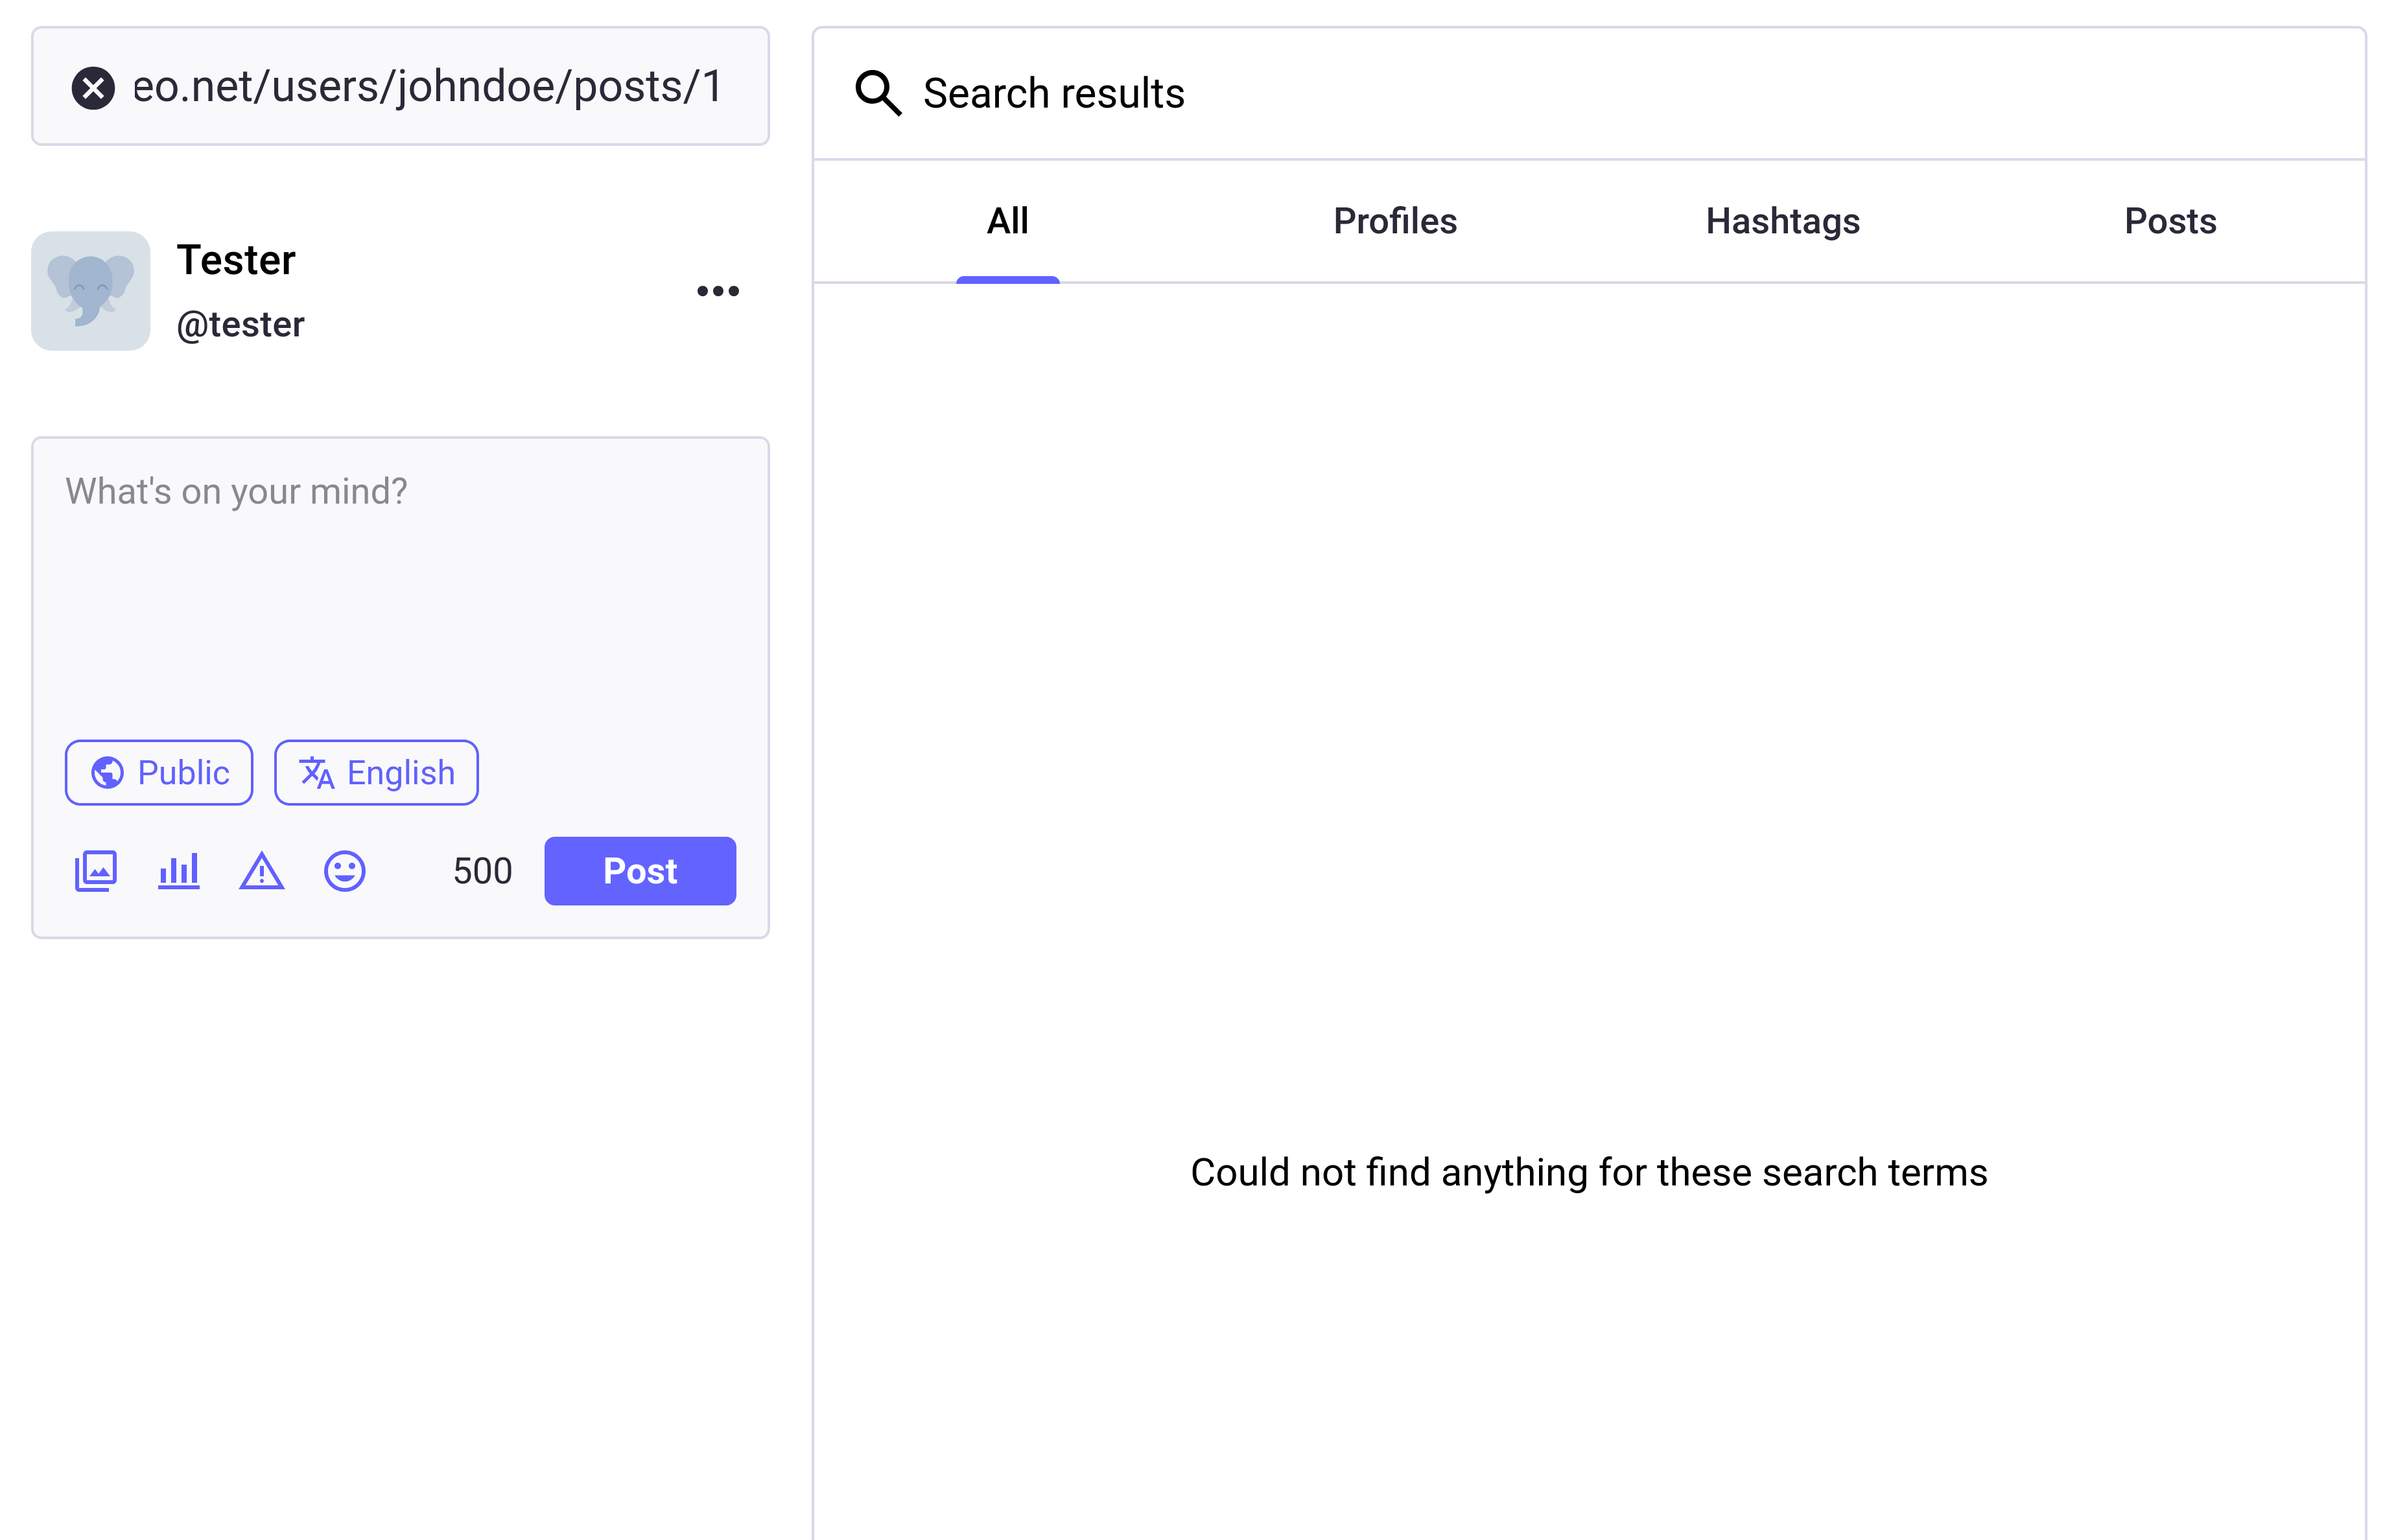
Unfortunately, the search results are empty. This is because we haven't exposed the post as an ActivityPub object. Let's expose the post as an ActivityPub object.
Before implementation, we need to install a necessary library. Because the Temporal API used by Fedify to represent time is not yet built into Node.js, we need the temporal-polyfill package to polyfill it:
npm add temporal-polyfillOpen the src/federation.ts file and import the installed package:
import { Temporal } from "temporal-polyfill";Also import the Post type and the PUBLIC_COLLECTION constant provided by Fedify:
import {
  createFederation,
  exportJwk,
  generateCryptoKeyPair,
  importJwk,
} from "@fedify/fedify";
import {
  Accept,
  Endpoints,
  Follow,
  Note,
  PUBLIC_COLLECTION,
  Person,
  Undo,
  getActorHandle,
  type Recipient,
} from "@fedify/vocab";
import type {
  Actor,
  Key,
  Post,
  User,
} from "./schema.ts";
Short posts like microblog posts are usually represented as Note in ActivityPub. We've already created an empty implementation of the object dispatcher for the Note class:
federation.setObjectDispatcher(
  Note,
  "/users/{identifier}/posts/{id}",
  (ctx, values) => {
    return null;
  },
);
Let's modify this as follows:
federation.setObjectDispatcher(
  Note,
  "/users/{identifier}/posts/{id}",
  (ctx, values) => {
    const post = db
      .prepare<unknown[], Post>(
        `
        SELECT posts.*
        FROM posts
        JOIN actors ON actors.id = posts.actor_id
        JOIN users ON users.id = actors.user_id
        WHERE users.username = ? AND posts.id = ?
        `,
      )
      .get(values.identifier, values.id);
    if (post == null) return null;
    return new Note({
      id: ctx.getObjectUri(Note, values),
      attribution: ctx.getActorUri(values.identifier),
      to: PUBLIC_COLLECTION,
      cc: ctx.getFollowersUri(values.identifier),
      content: post.content,
      mediaType: "text/html",
      published: Temporal.Instant.from(`${post.created.replace(" ", "T")}Z`),
      url: ctx.getObjectUri(Note, values),
    });
  },
);
The property values filled when creating the Note object have the following roles:
Putting
ctx.getActorUri(values.identifier)in theattributionproperty indicates that the author of this post is the actor we created.Putting
PUBLIC_COLLECTIONin thetoproperty indicates that this post is a public post.Putting
ctx.getFollowersUri(values.identifier)in theccproperty indicates that this post is delivered to followers, but this itself doesn't have much meaning.
Now, let's try entering the post's permalink https://temp-address.serveo.net/users/johndoe/posts/1 (replace with your temporary domain name) in the Mastodon search box again:
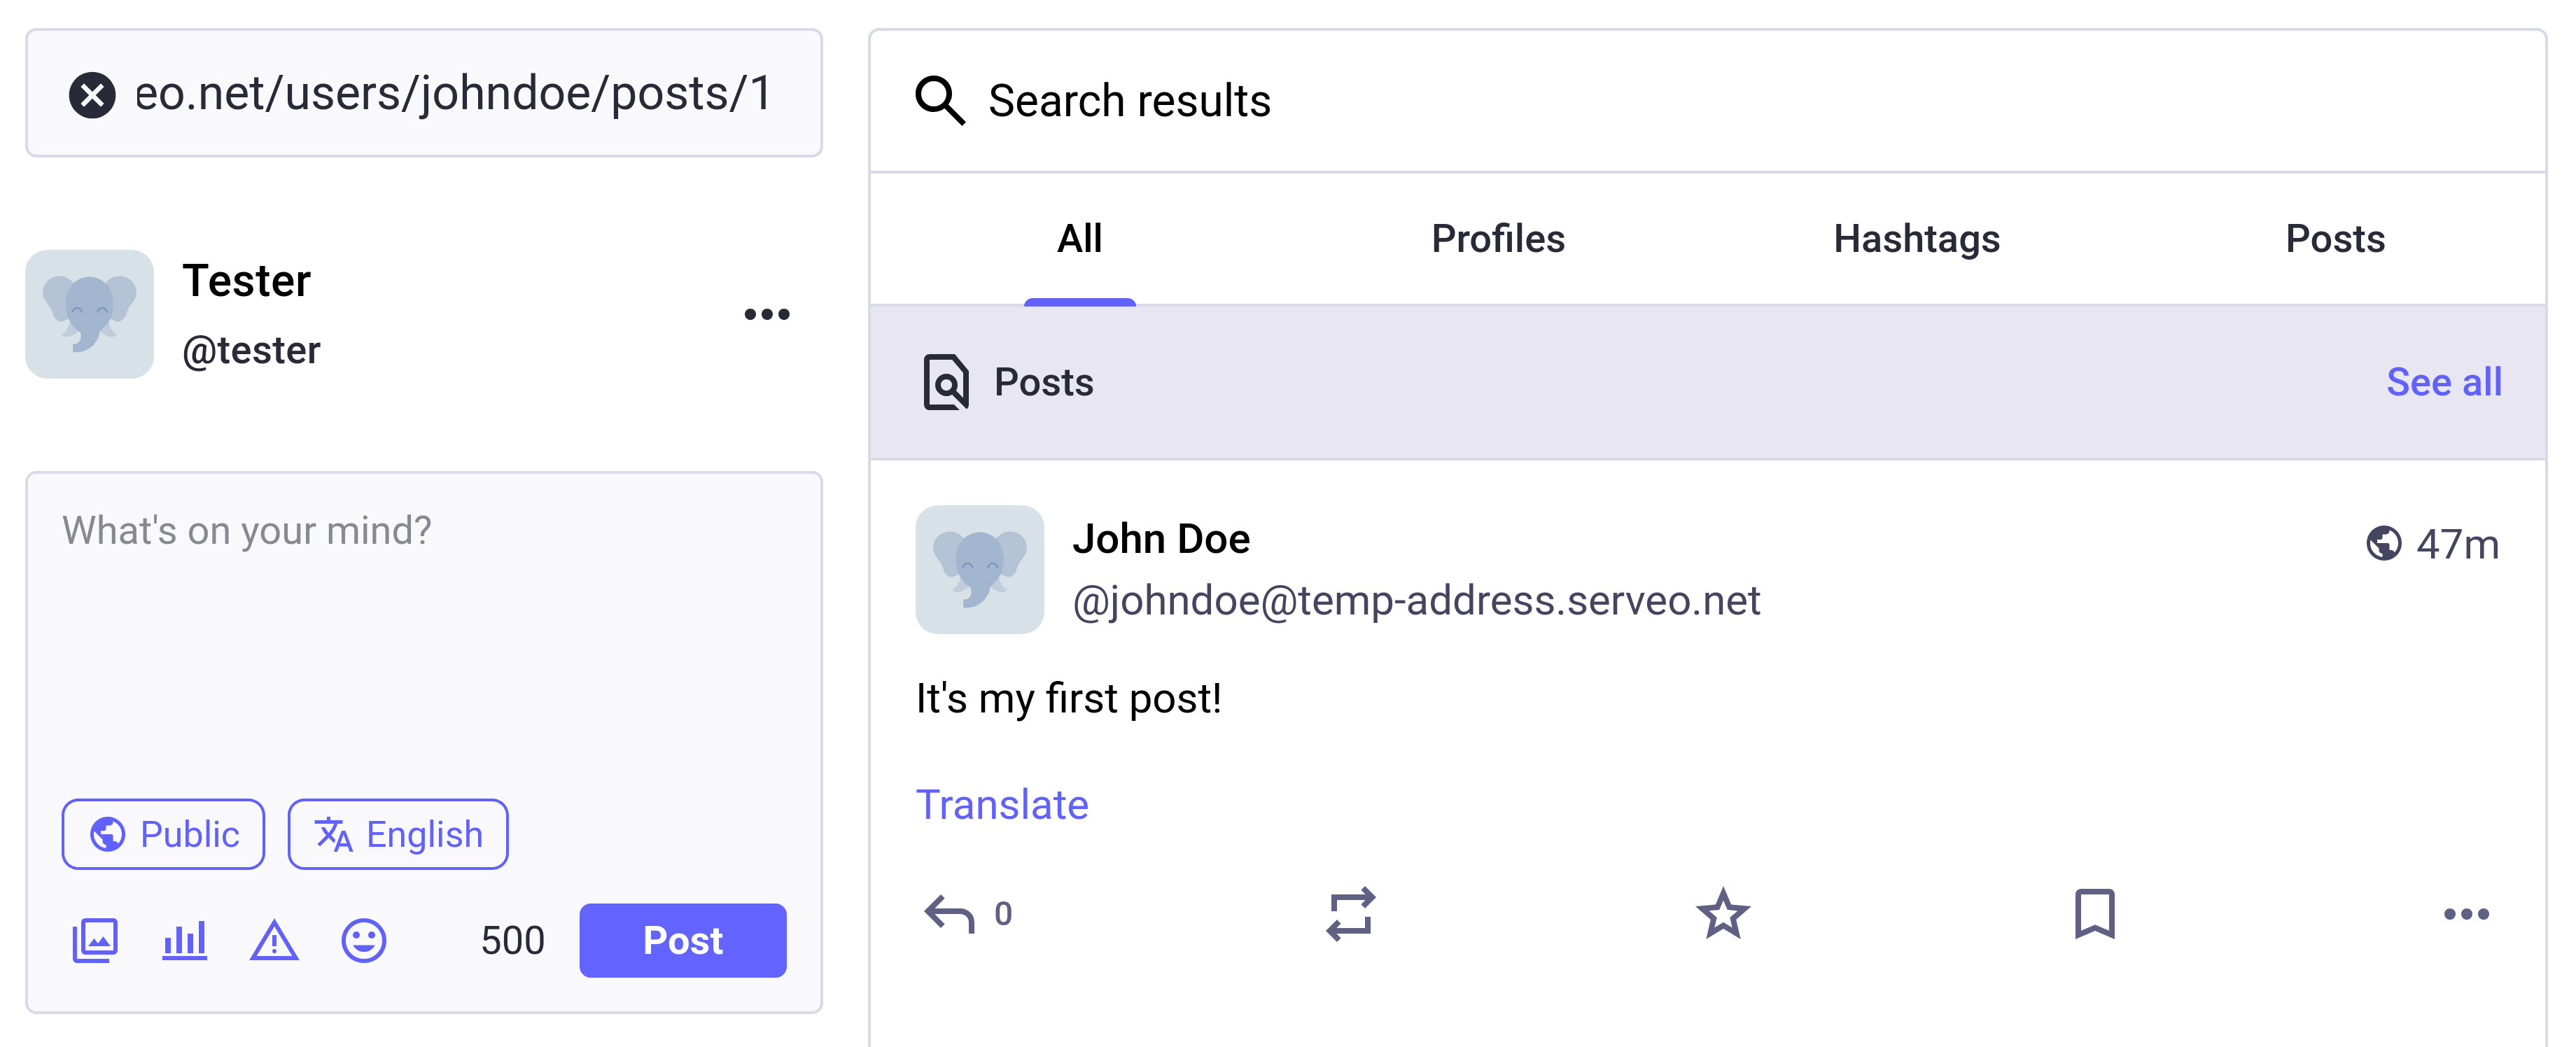
This time, our created post appears properly in the search results!
Sending Create(Note) activity
However, even if you follow our created actor from Mastodon, newly created posts won't appear in the Mastodon timeline. This is because Mastodon doesn't automatically fetch new posts; instead, the side that created the new post needs to send a Create(Note) activity to notify that a new post has been created.
Let's modify the code to send a Create(Note) activity when creating a post. Open the src/app.tsx file and import the Create class provided by Fedify:
import { Create, Note } from "@fedify/vocab";Then modify the POST /users/{username}/posts request handler as follows:
app.post("/users/:username/posts", async (c) => {
  // ... omitted ...
  const ctx = fedi.createContext(c.req.raw, undefined);
  const post: Post | null = db.transaction(() => {
    const post = db
      .prepare<unknown[], Post>(
        `
        INSERT INTO posts (uri, actor_id, content)
        VALUES ('https://localhost/', ?, ?)
        RETURNING *
        `,
      )
      .get(actor.id, stringifyEntities(content, { escapeOnly: true }));
    if (post == null) return null;
    const url = ctx.getObjectUri(Note, {
      identifier: username,
      id: post.id.toString(),
    }).href;
    db.prepare("UPDATE posts SET uri = ?, url = ? WHERE id = ?").run(
      url,
      url,
      post.id,
    );
    return post;
  })();
  if (post == null) return c.text("Failed to create post", 500);
  const noteArgs = { identifier: username, id: post.id.toString() };
  const note = await ctx.getObject(Note, noteArgs);
  await ctx.sendActivity(
    { identifier: username },
    "followers",
    new Create({
      id: new URL("#activity", note?.id ?? undefined),
      object: note,
      actors: note?.attributionIds,
      tos: note?.toIds,
      ccs: note?.ccIds,
    }),
  );
  return c.redirect(ctx.getObjectUri(Note, noteArgs).href);
});
The getObject() method returns the ActivityPub object created by the object dispatcher. Here, it will return a Note object. We put that Note object in the object property when creating the Create object. We set the tos (plural of to) and ccs (plural of cc) properties of the activity the same as the Note object. We set an arbitrary unique URI for the id of the activity.
TIP
The id property of the activity object doesn't necessarily need to be an accessible URI. It just needs to be unique.
The second parameter of the sendActivity() method is where the recipients go, and here we've specified the special option "followers". When this option is specified, it uses the followers collection dispatcher we implemented earlier to send the activity to all followers.
Now that we've finished the implementation, let's check if the Create(Note) activity is sent properly.
With the fedify tunnel command exposing the local server to the public internet, go to ActivityPub.Academy and follow @johndoe@temp-address.serveo.net (replace the domain name with the temporary domain name assigned to you). After making sure that the follow request has been accepted in the followers list, go to https://temp-address.serveo.net/ (again, replace the domain name) in your web browser and create a new post.
WARNING
When testing activity transmission, you must access via a domain name accessible from the public internet, not localhost. This is because when determining the ID of ActivityPub objects, the URI is constructed based on the domain name of the incoming request.
To check if the Create(Note) activity was sent well, let's look at ActivityPub.Academy's Activity Log:
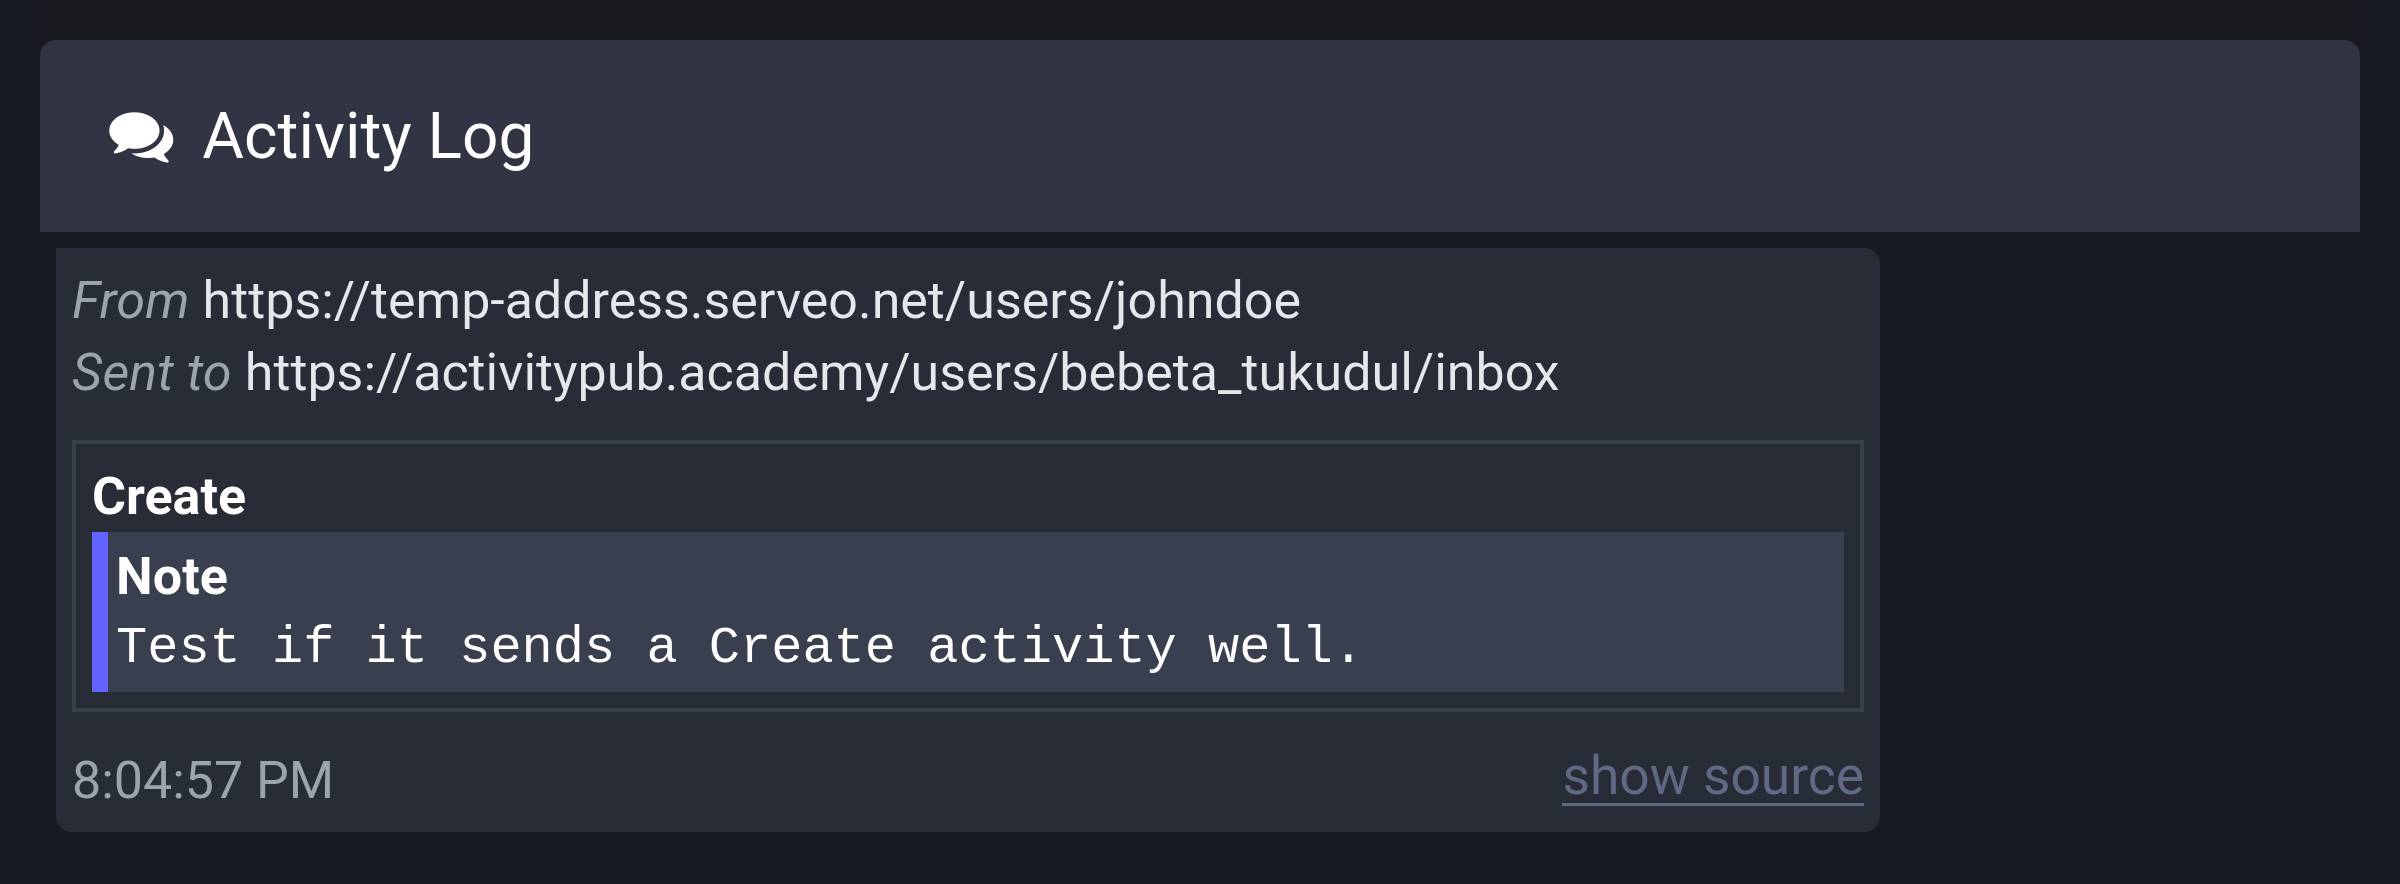
It came in well. Now let's look at the timeline in ActivityPub.Academy:
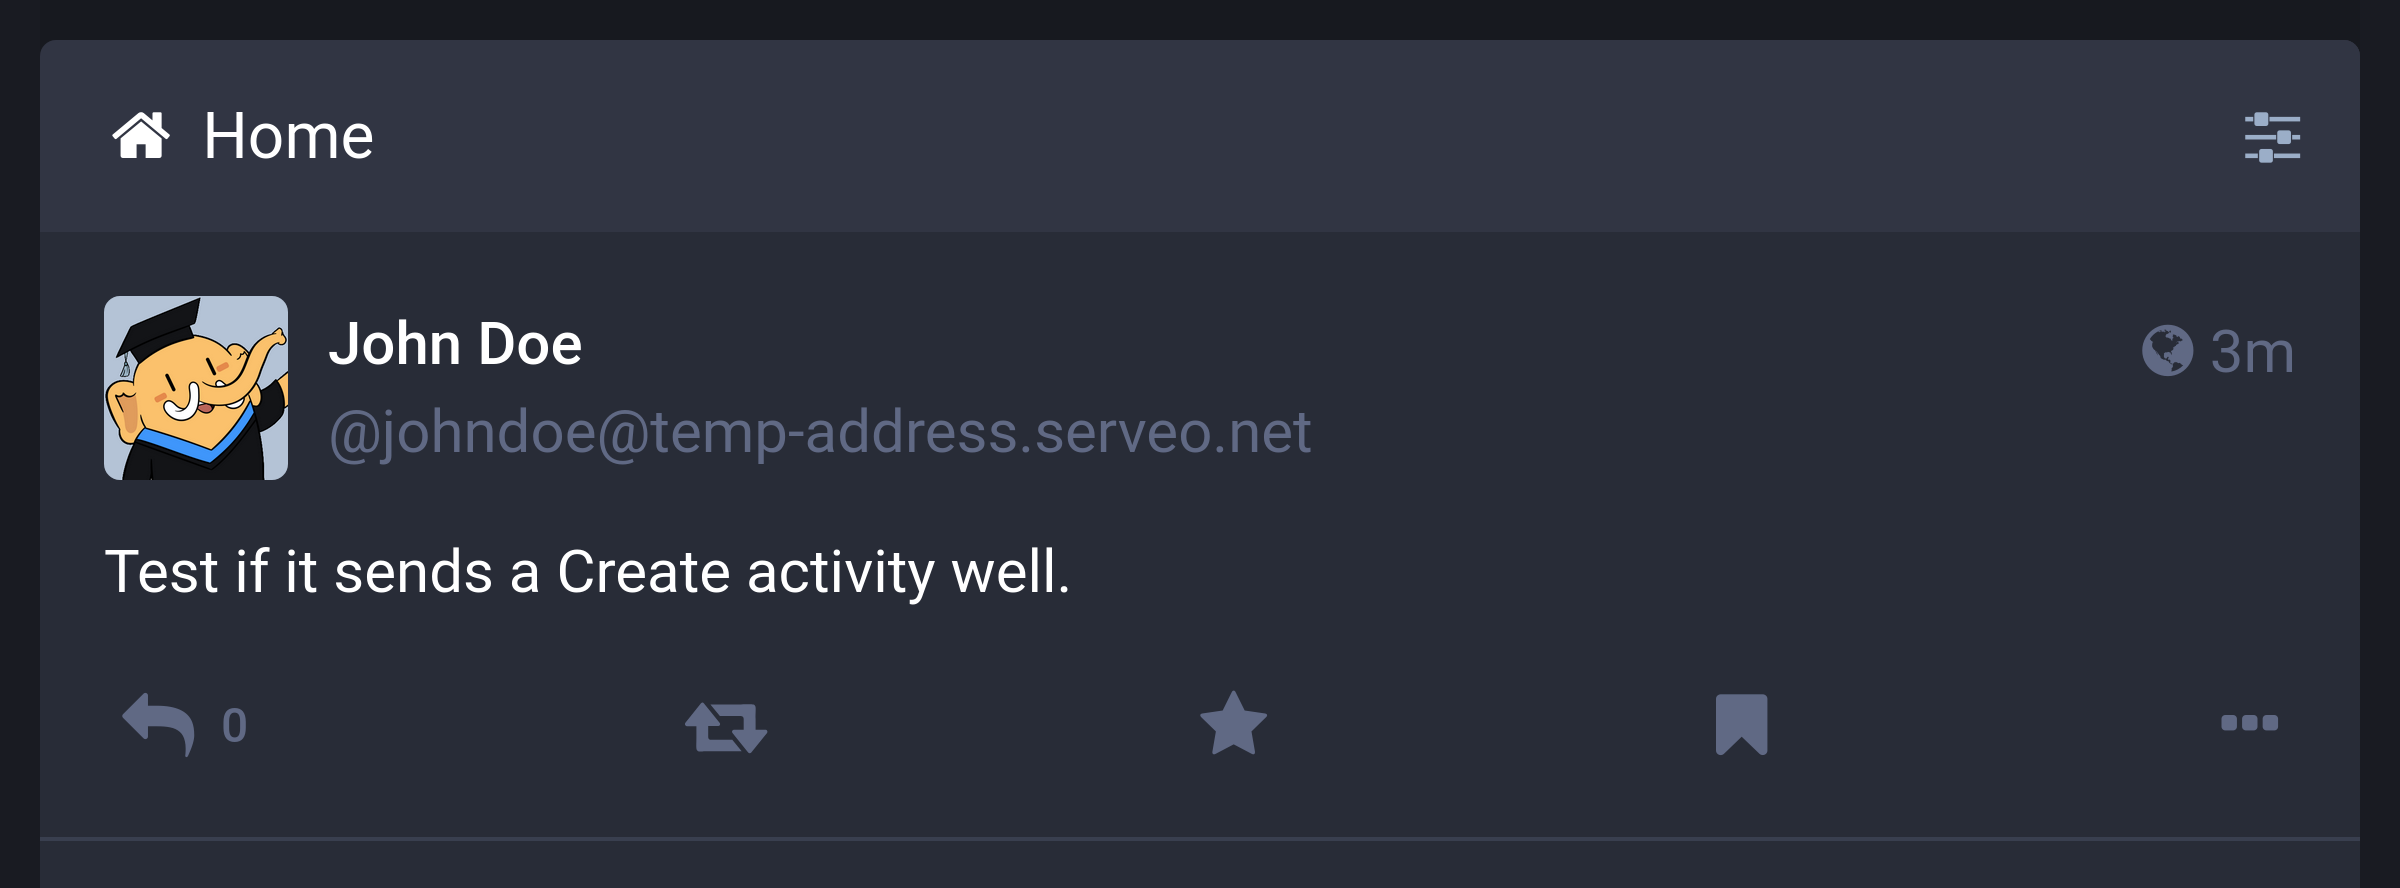
We did it!
Post list on profile page
Currently, the profile page only shows the name, fediverse handle, and number of followers, but not the actual posts. Let's display the created posts on the profile page.
First, open the src/views.tsx file and add a <PostList> component:
export interface PostListProps {
  posts: (Post & Actor)[];
}

export const PostList: FC<PostListProps> = ({ posts }) => (
  <>
    {posts.map((post) => (
      <div key={post.id}>
        <PostView post={post} />
      </div>
    ))}
  </>
);
Then, open the src/app.tsx file and import the <PostList> component we just defined:
import {
  FollowerList,
  Home,
  Layout,
  PostList,
  PostPage,
  Profile,
  SetupForm,
} from "./views.tsx";
Modify the existing GET /users/{username} request handler as follows:
app.get("/users/:username", async (c) => {
  // ... omitted ...
  const posts = db
    .prepare<unknown[], Post & Actor>(
      `
      SELECT actors.*, posts.*
      FROM posts
      JOIN actors ON posts.actor_id = actors.id
      WHERE actors.user_id = ?
      ORDER BY posts.created DESC
      `,
    )
    .all(user.user_id);
  // ... omitted ...
  return c.html(
    <Layout>
      // ... omitted ...
      <PostList posts={posts} />
    </Layout>,
  );
});
Now, let's open the http://localhost:8000/users/johndoe page in your web browser:
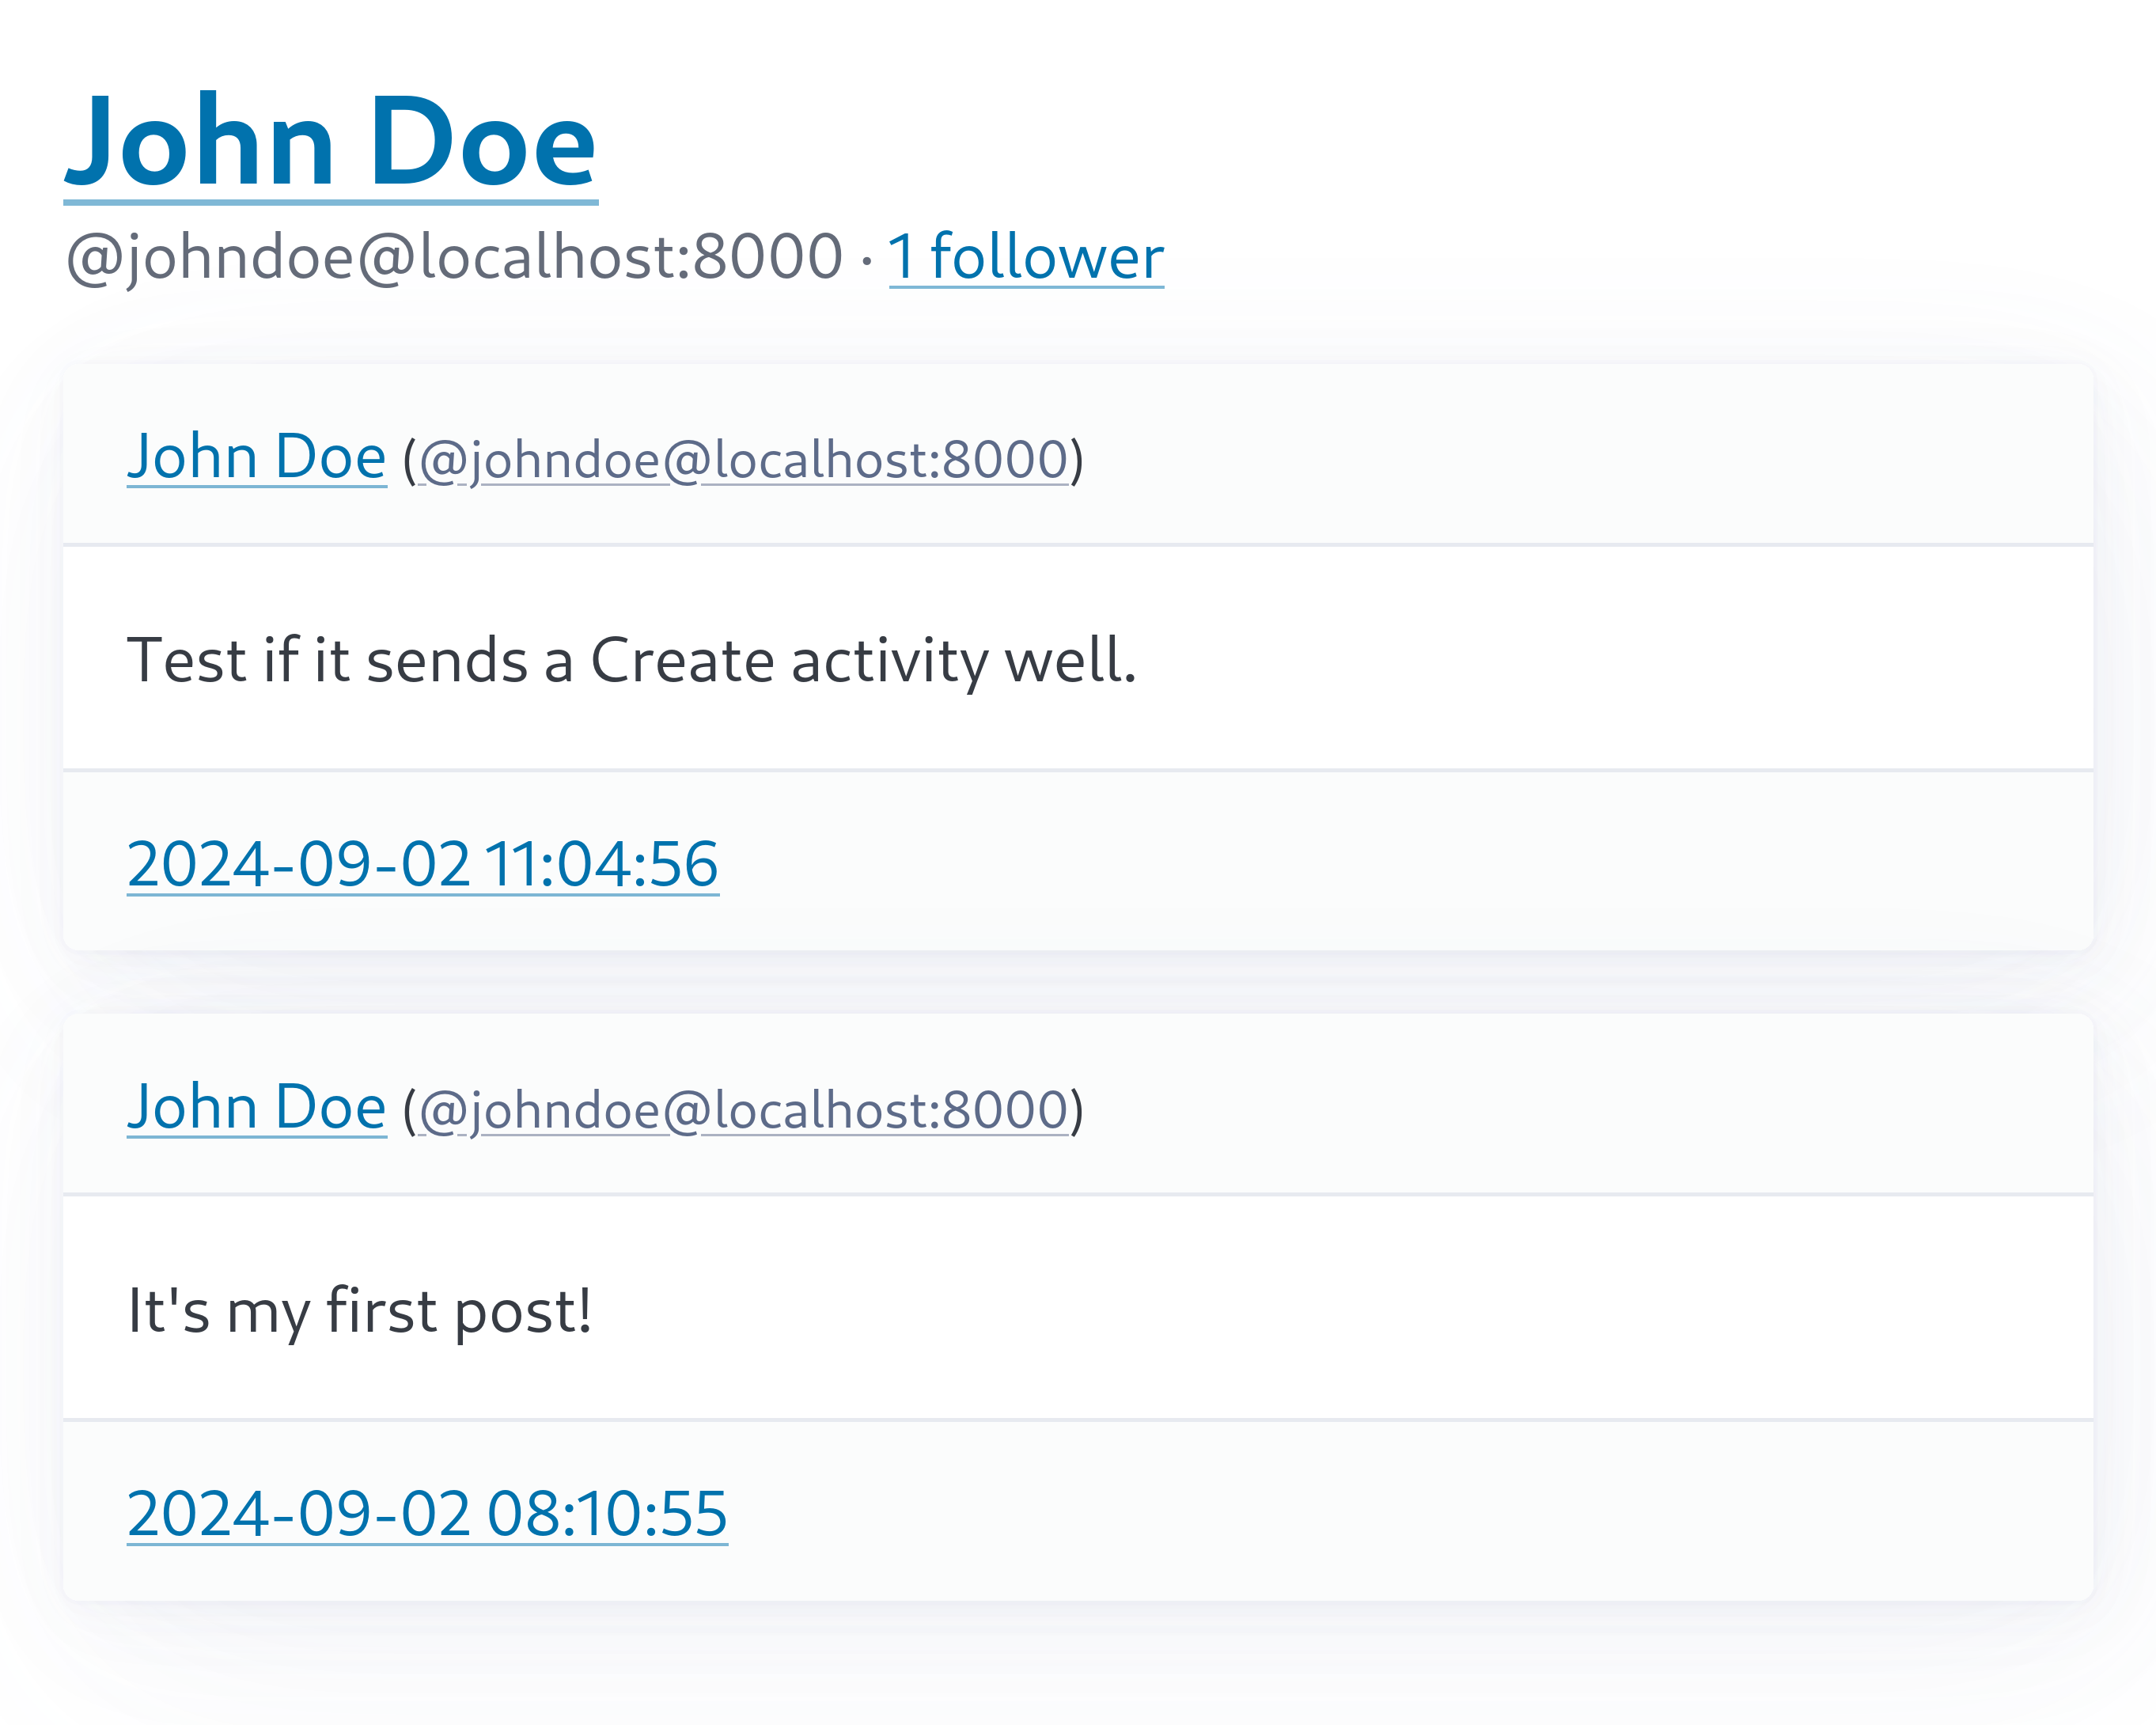
You can see that the created posts are displayed well.
Follow
Currently, our actor can receive follow requests from actors on other servers, but it can't send follow requests to actors on other servers. Since we can't follow, we also can't see posts created by other actors. So, let's add the functionality to send follow requests to actors on other servers.
Let's start with the UI. Open the src/views.tsx file and modify the existing <Home> component as follows:
export const Home: FC<HomeProps> = ({ user }) => (
  <>
    <hgroup>
      {/* ... omitted ... */}
    </hgroup>
    <form method="post" action={`/users/${user.username}/following`}>
      {/* oxlint-disable-next-line jsx-a11y/no-redundant-roles -- PicoCSS requires role=group */}
      <fieldset role="group">
        <input
          type="text"
          name="actor"
          required={true}
          placeholder="Enter an actor handle (e.g., @johndoe@mastodon.com) or URI (e.g., https://mastodon.com/@johndoe)"
        />
        <input type="submit" value="Follow" />
      </fieldset>
    </form>
    <form method="post" action={`/users/${user.username}/posts`}>
      {/* ... omitted ... */}
    </form>
  </>
);
To check if the home page has been modified correctly, open the http://localhost:8000/ page in your web browser:
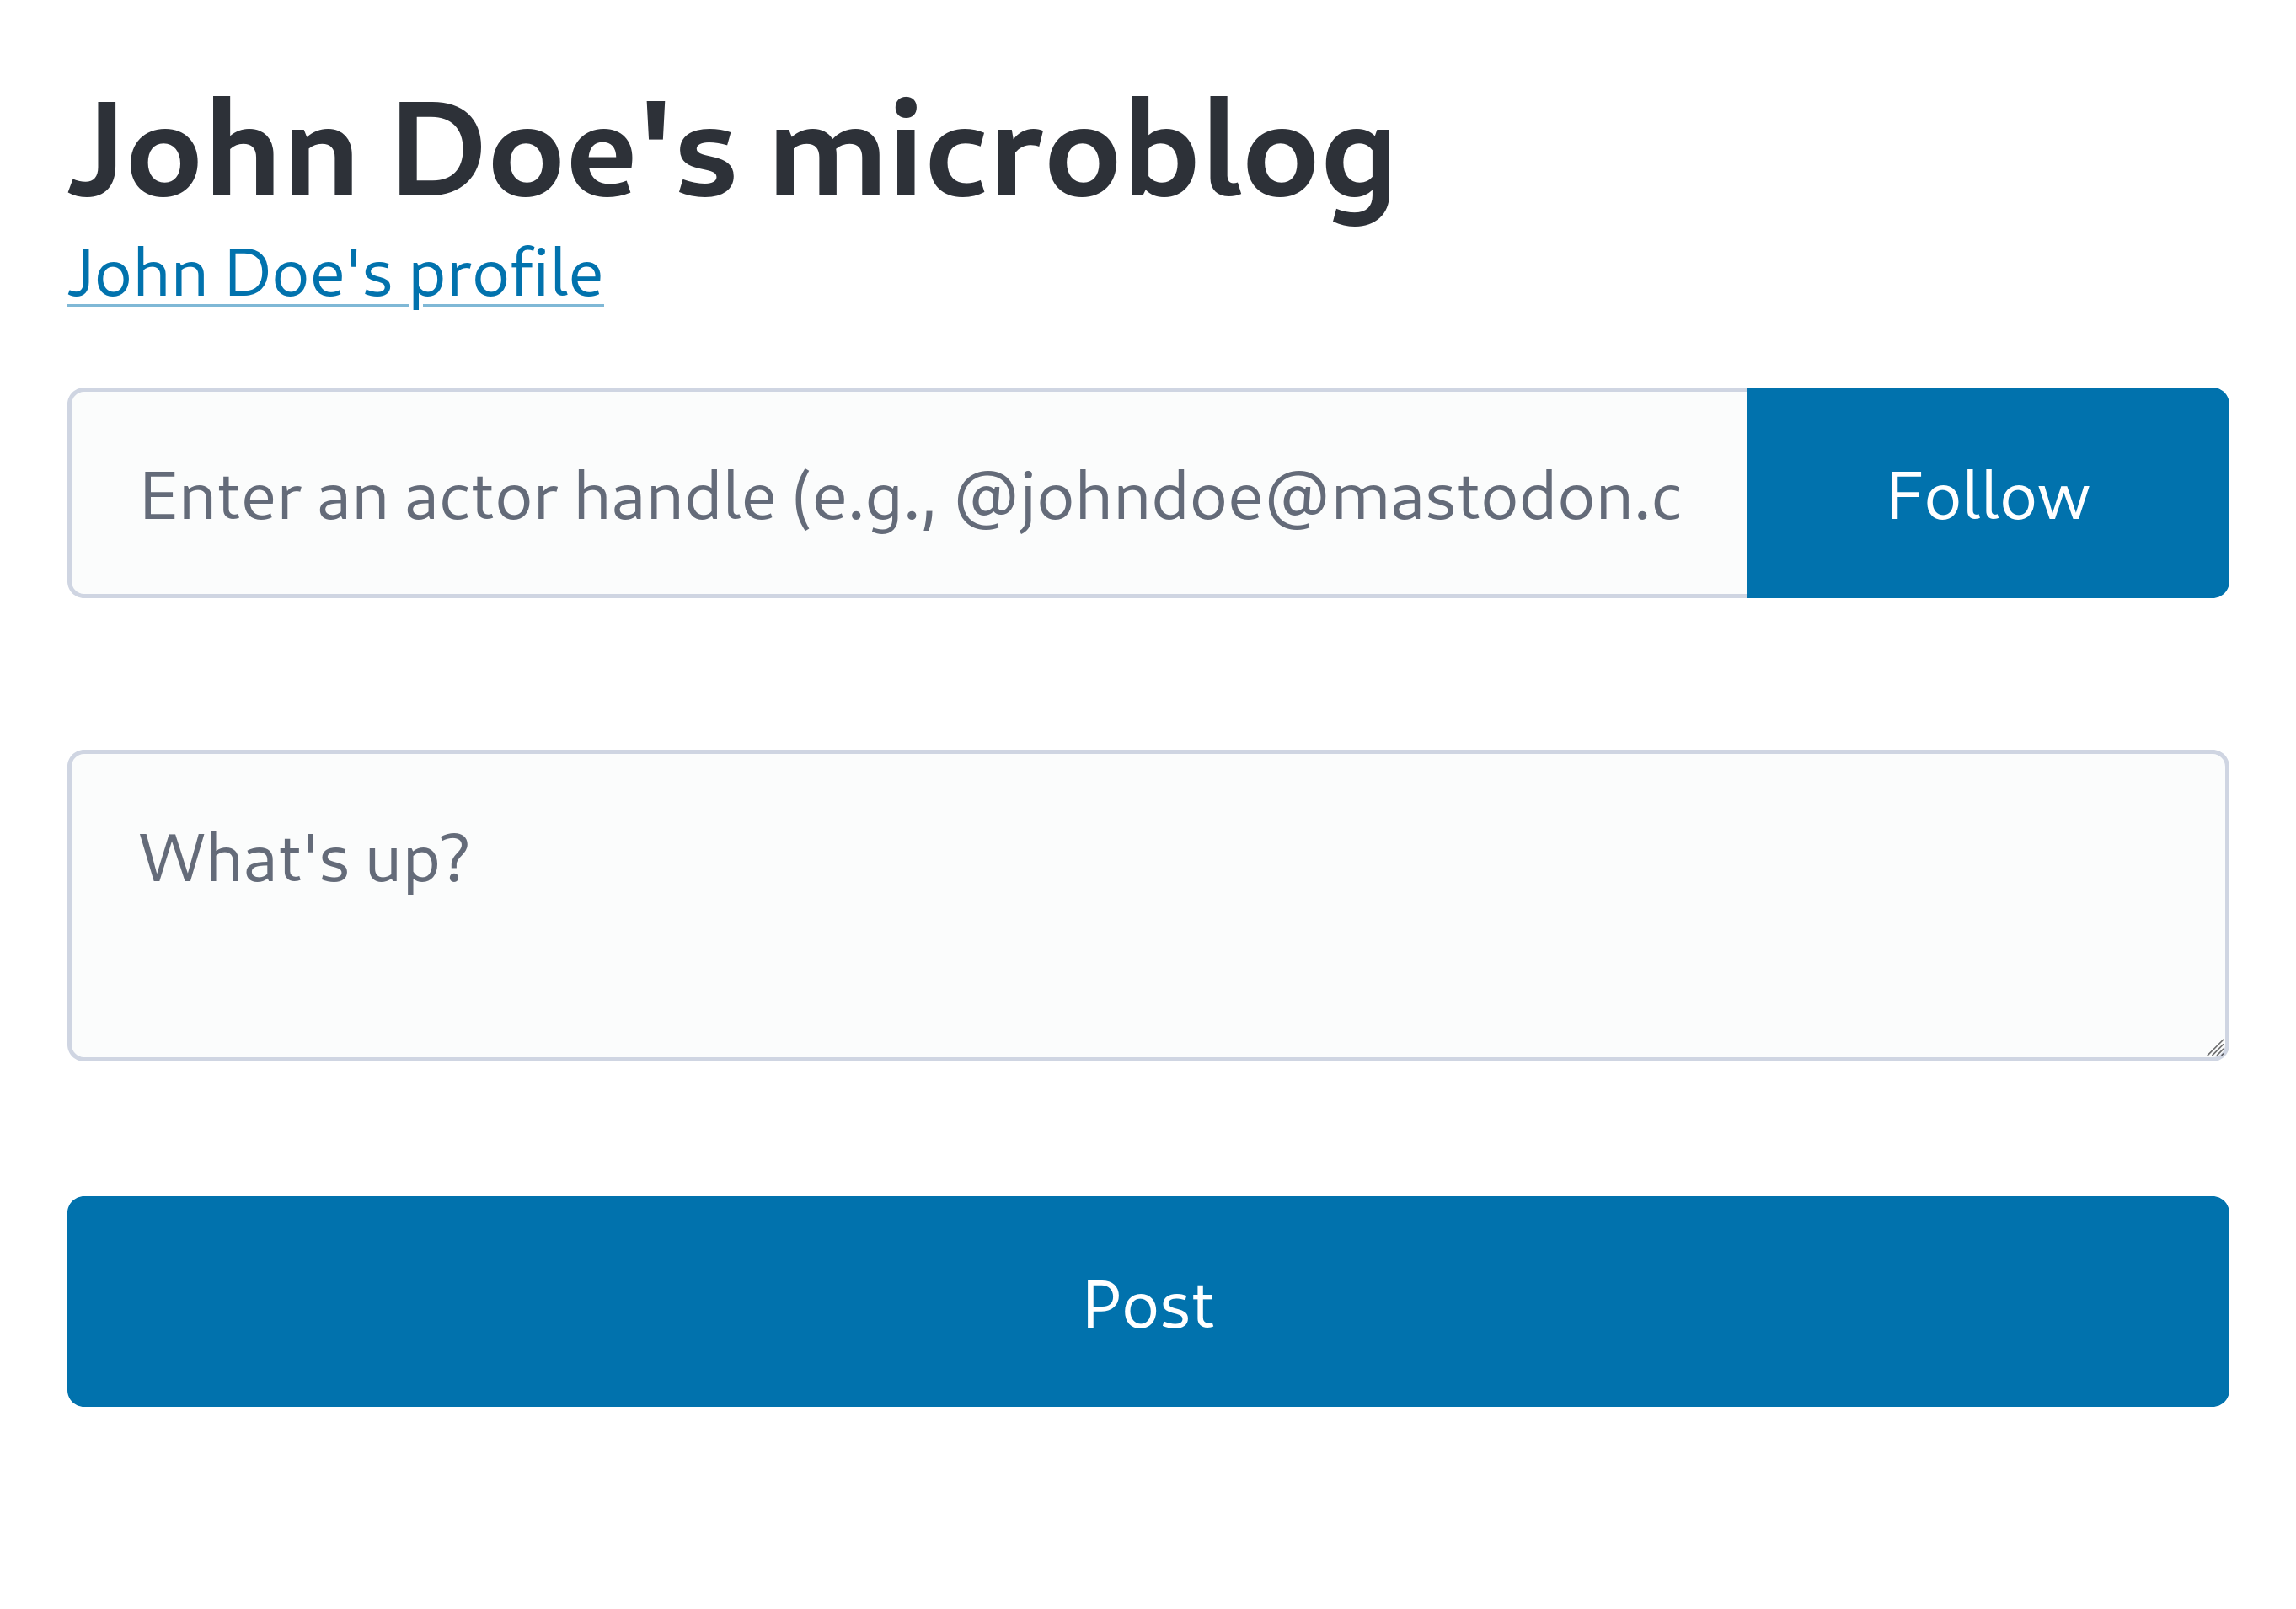
Sending Follow activity
Now that we have the follow request UI, let's write the code to actually send the Follow activity.
Open the src/app.tsx file and import the Follow class and the isActor() function provided by Fedify:
import {
  Create,
  Follow,
  isActor,
  Note,
} from "@fedify/vocab";
Then add a POST /users/{username}/following request handler:
app.post("/users/:username/following", async (c) => {
  const username = c.req.param("username");
  const form = await c.req.formData();
  const handle = form.get("actor");
  if (typeof handle !== "string") {
    return c.text("Invalid actor handle or URL", 400);
  }
  const ctx = fedi.createContext(c.req.raw, undefined);
  const actor = await ctx.lookupObject(handle.trim());
  if (!isActor(actor)) {
    return c.text("Invalid actor handle or URL", 400);
  }
  await ctx.sendActivity(
    { identifier: username },
    actor,
    new Follow({
      actor: ctx.getActorUri(username),
      object: actor.id,
      to: actor.id,
    }),
  );
  return c.text("Successfully sent a follow request");
});
Context.lookupObject() method looks up ActivityPub objects, including actors. It takes the unique URI of an ActivityPub object or a fediverse handle as input and returns the looked-up ActivityPub object.
The isActor() function checks if the given ActivityPub object is an actor.
In this code, we're using the sendActivity() method to send a Follow activity to the looked-up actor. However, we're not adding any records to the follows table yet. This is because we should add the record after receiving an Accept(Follow) activity from the other party.
Testing
We need to check if the implemented follow request functionality is working properly. This time too, we need to send an activity, so use the fedify tunnel command to expose the local server to the public internet, then enter the https://temp-address.serveo.net/ page (replace the domain name) in your web browser:
You need to enter the fediverse handle of the actor you want to follow in the follow request input field. Here, for easy debugging, let's enter an actor from ActivityPub.Academy. By the way, you can see the handle of the temporary account logged in to ActivityPub.Academy by clicking on the temporary account name to go to the profile page and looking just below the name:
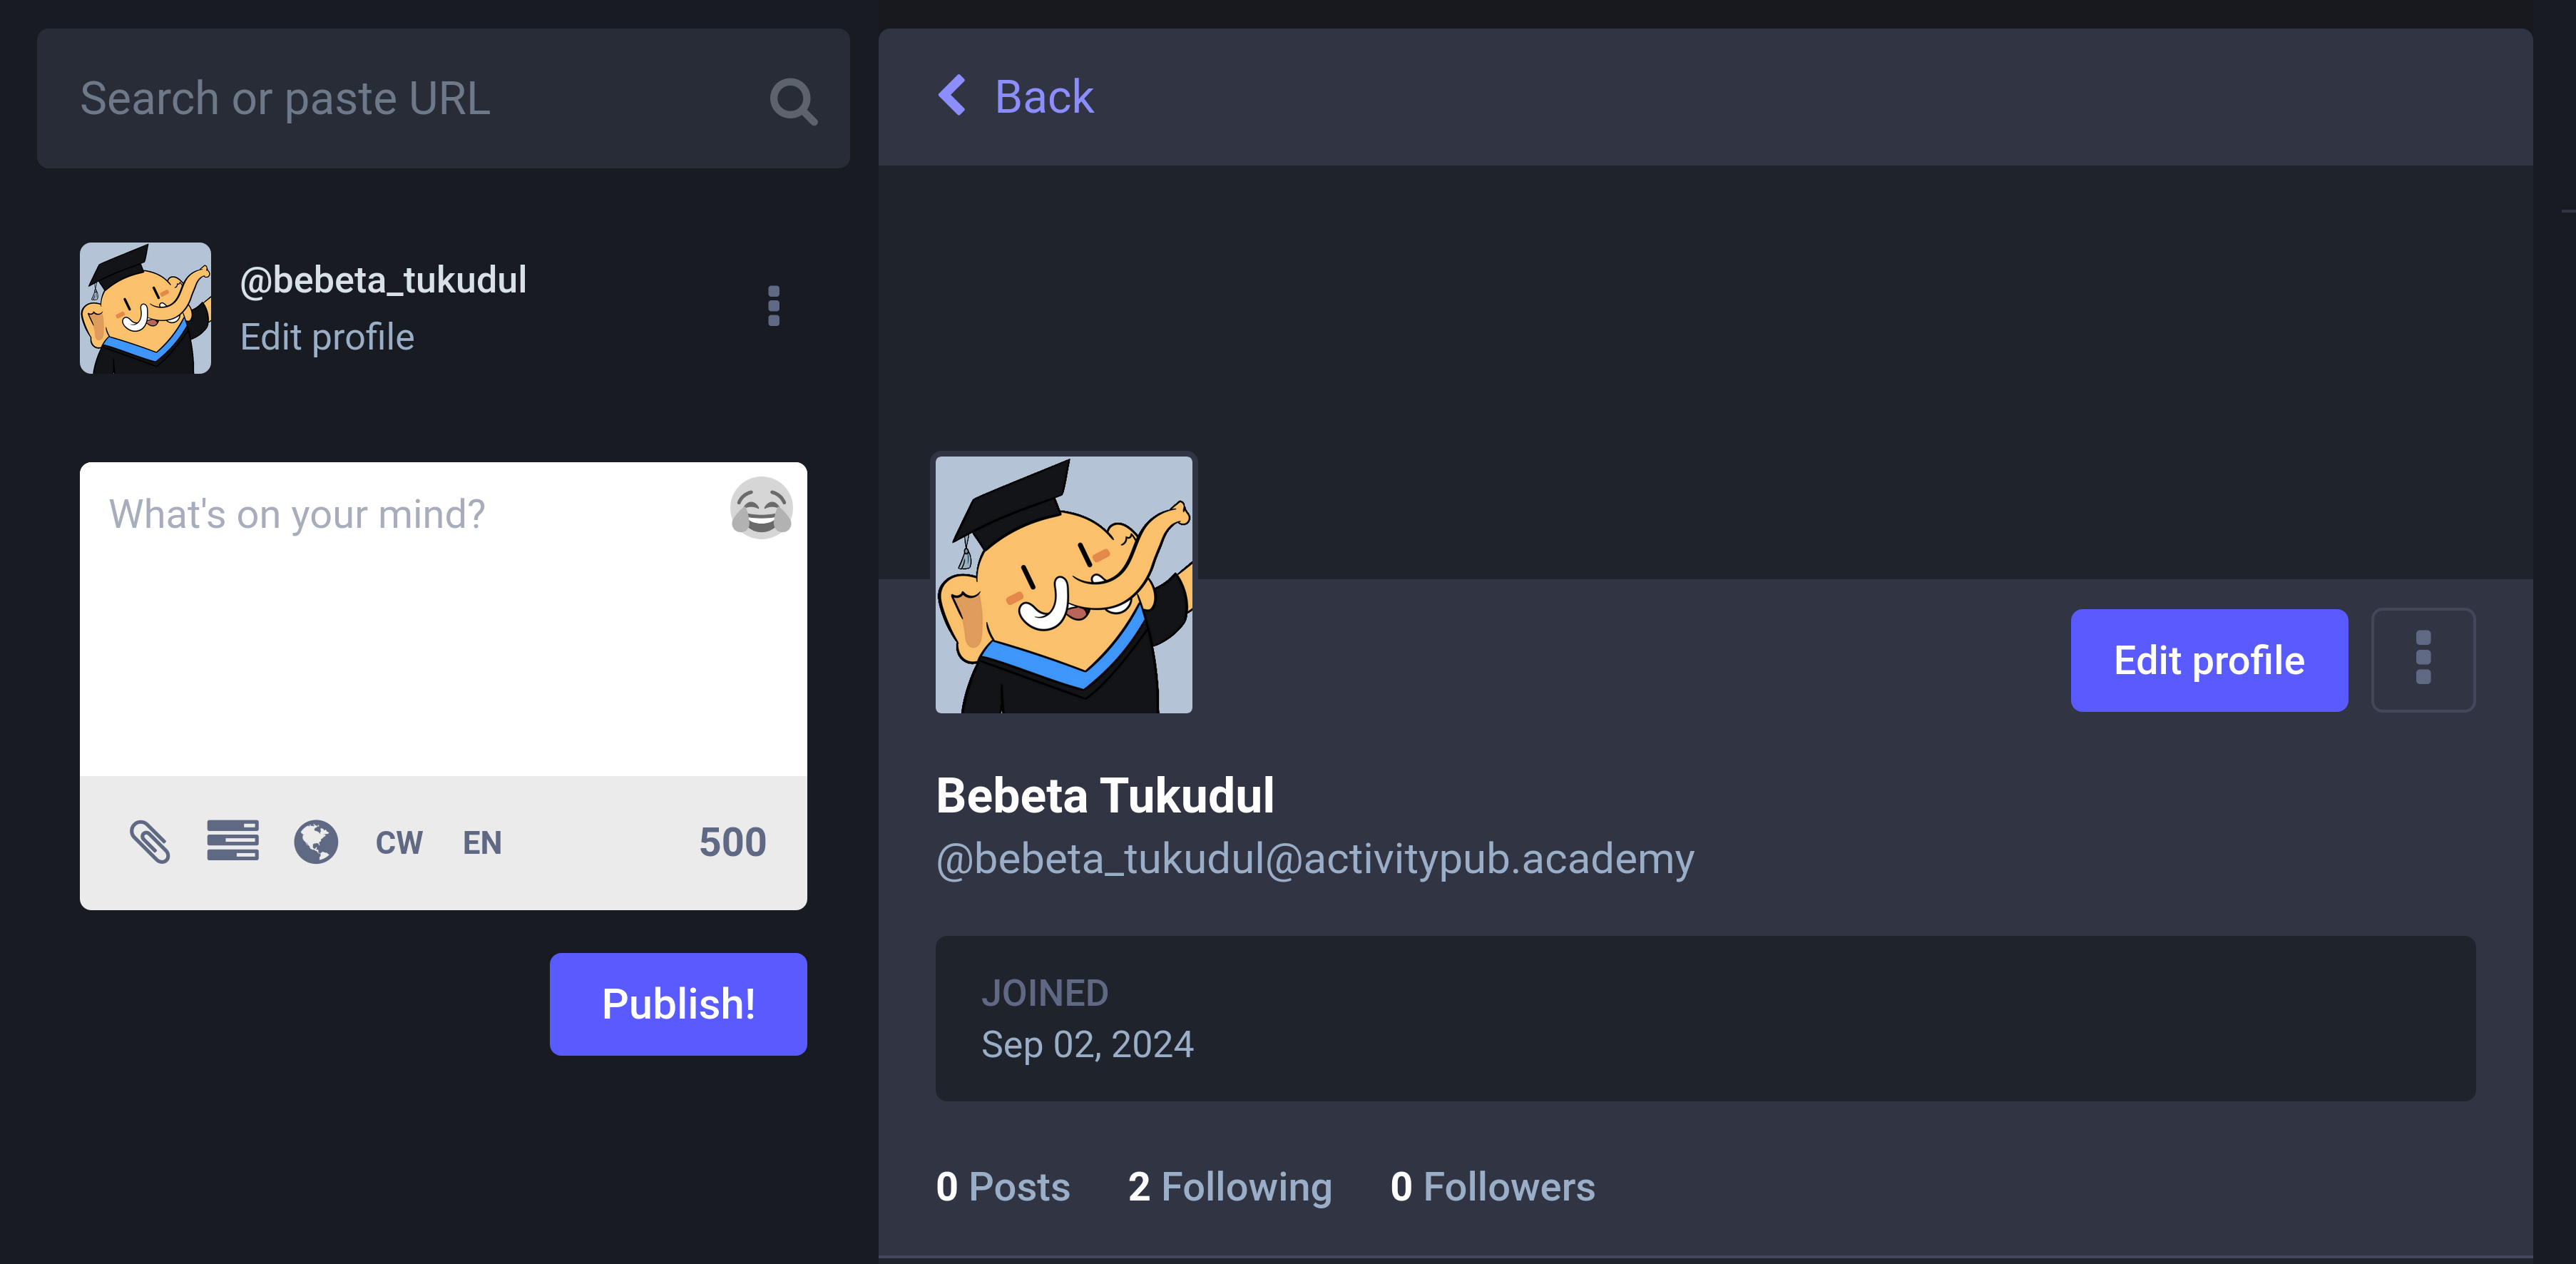
Enter the ActivityPub.Academy actor's handle as follows, then press the Follow button to send a follow request:
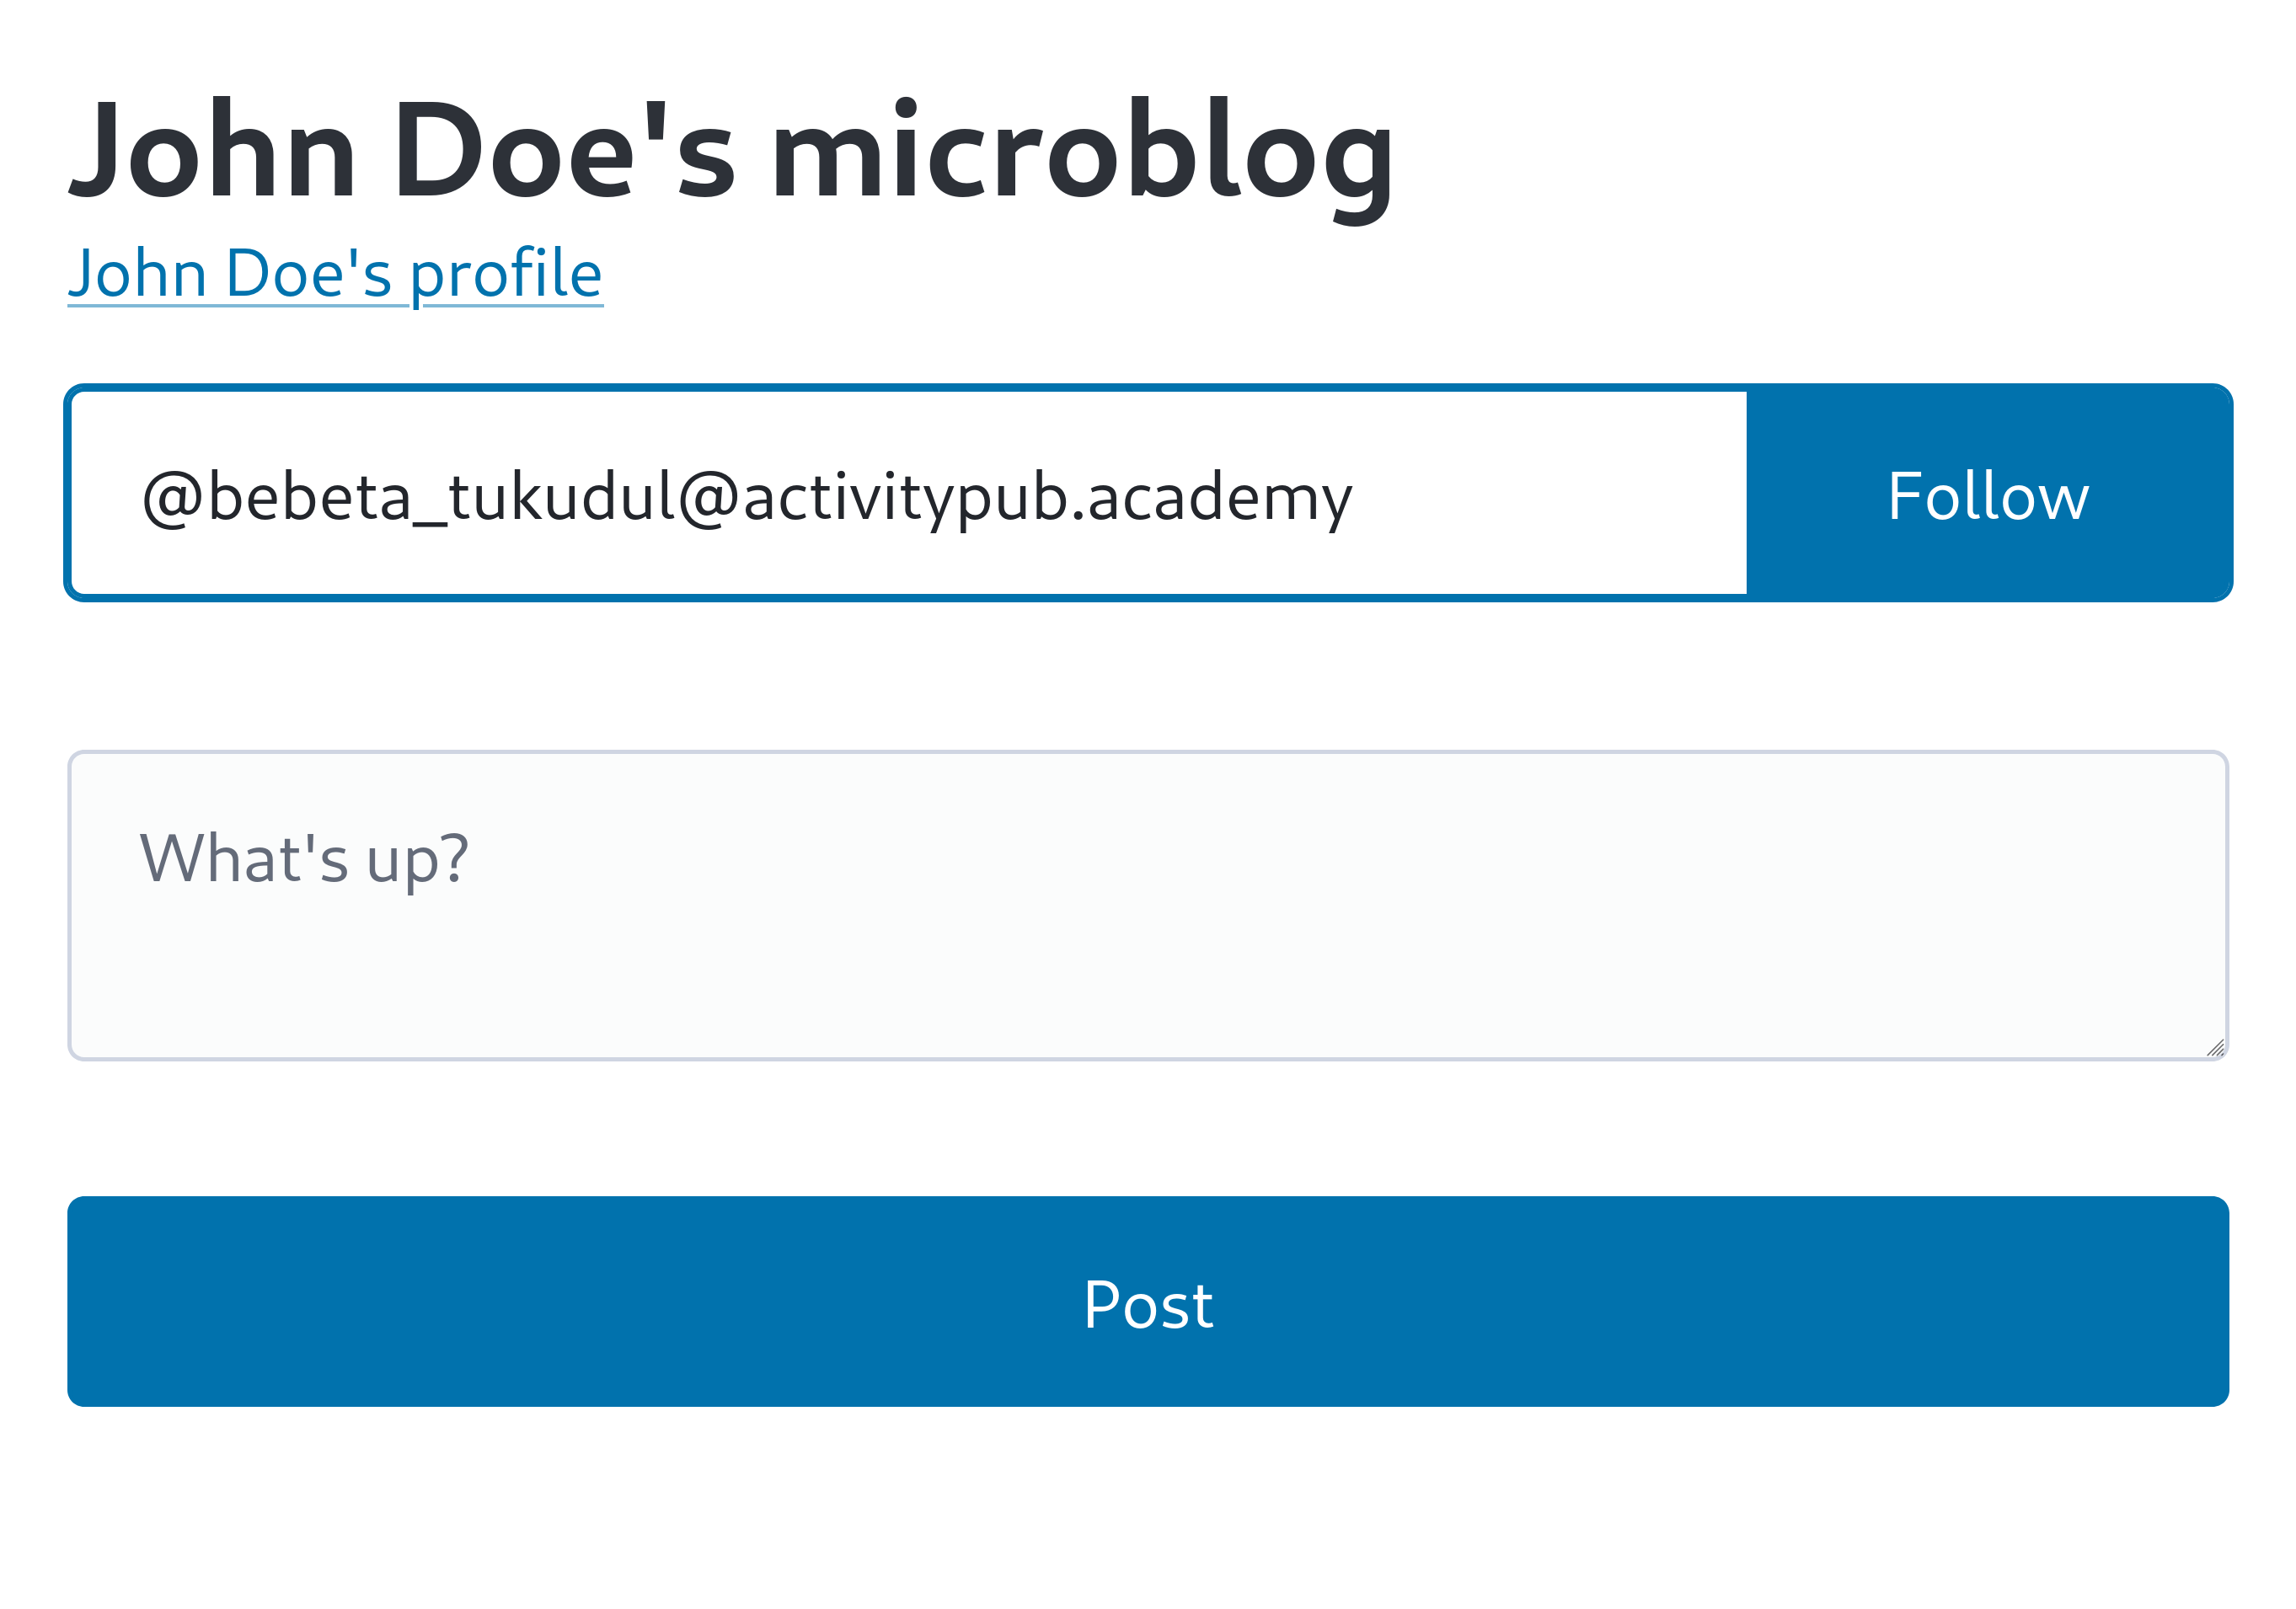
And check ActivityPub.Academy's Activity Log:
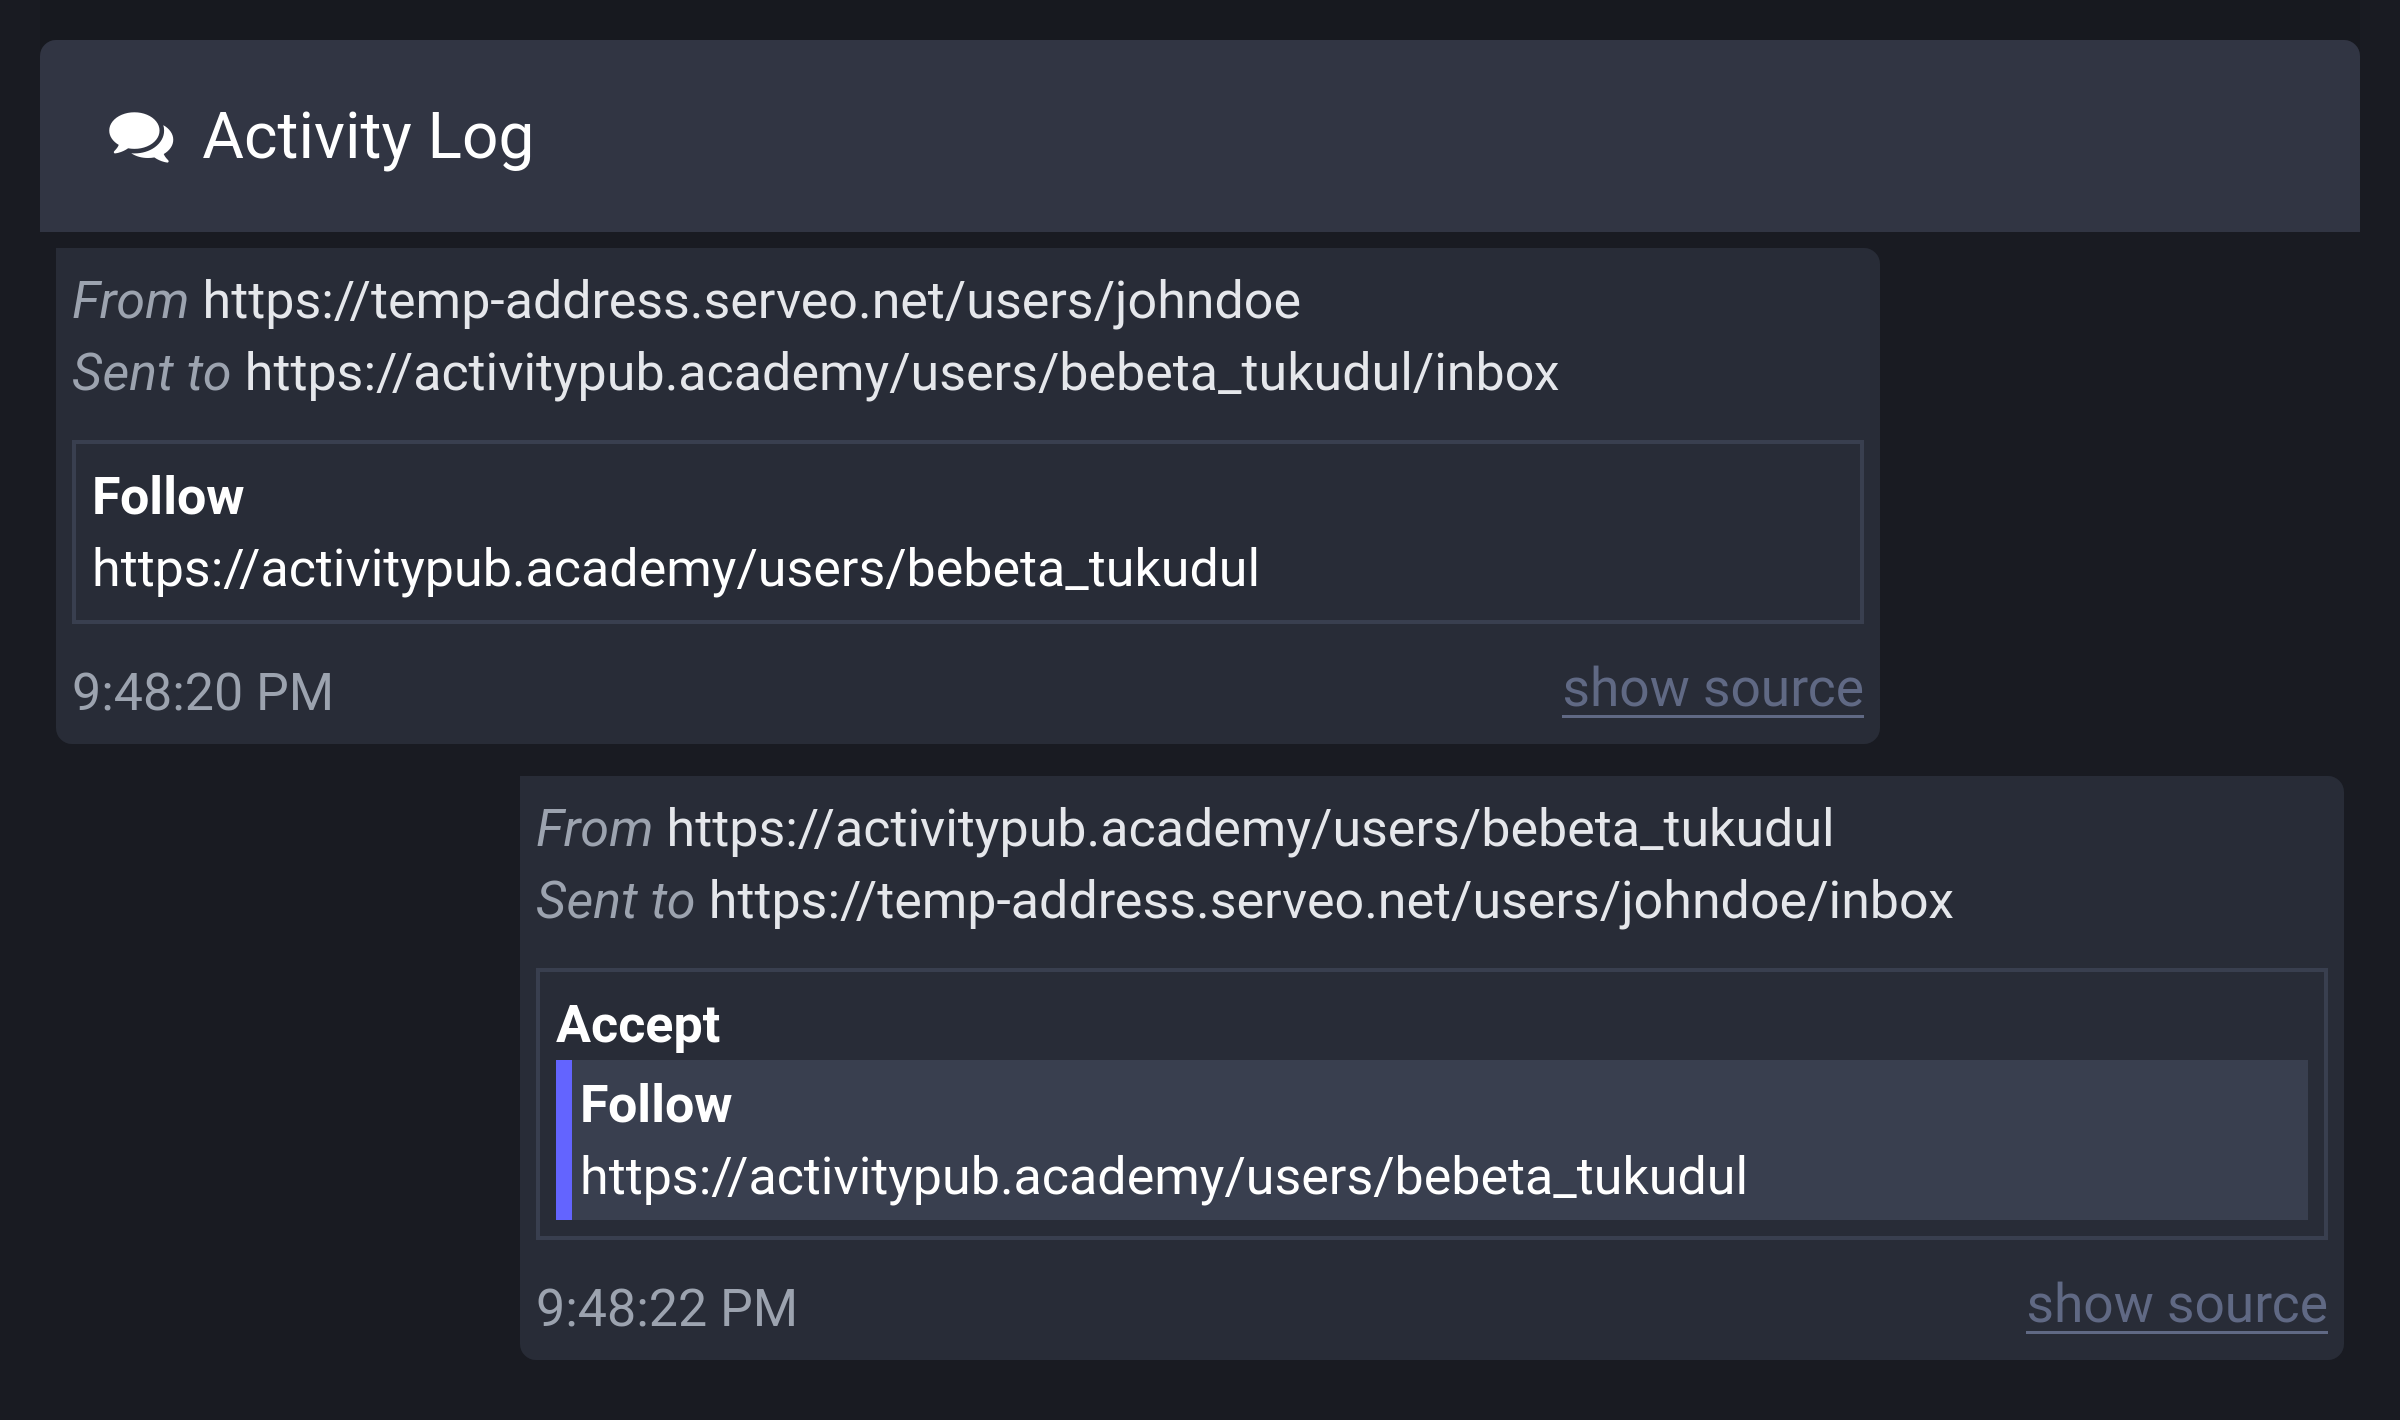
The Activity Log shows the Follow activity we sent and the Accept(Follow) activity sent in response from ActivityPub.Academy.
If you go to the notifications page in ActivityPub.Academy, you can see that the follow request has actually arrived:
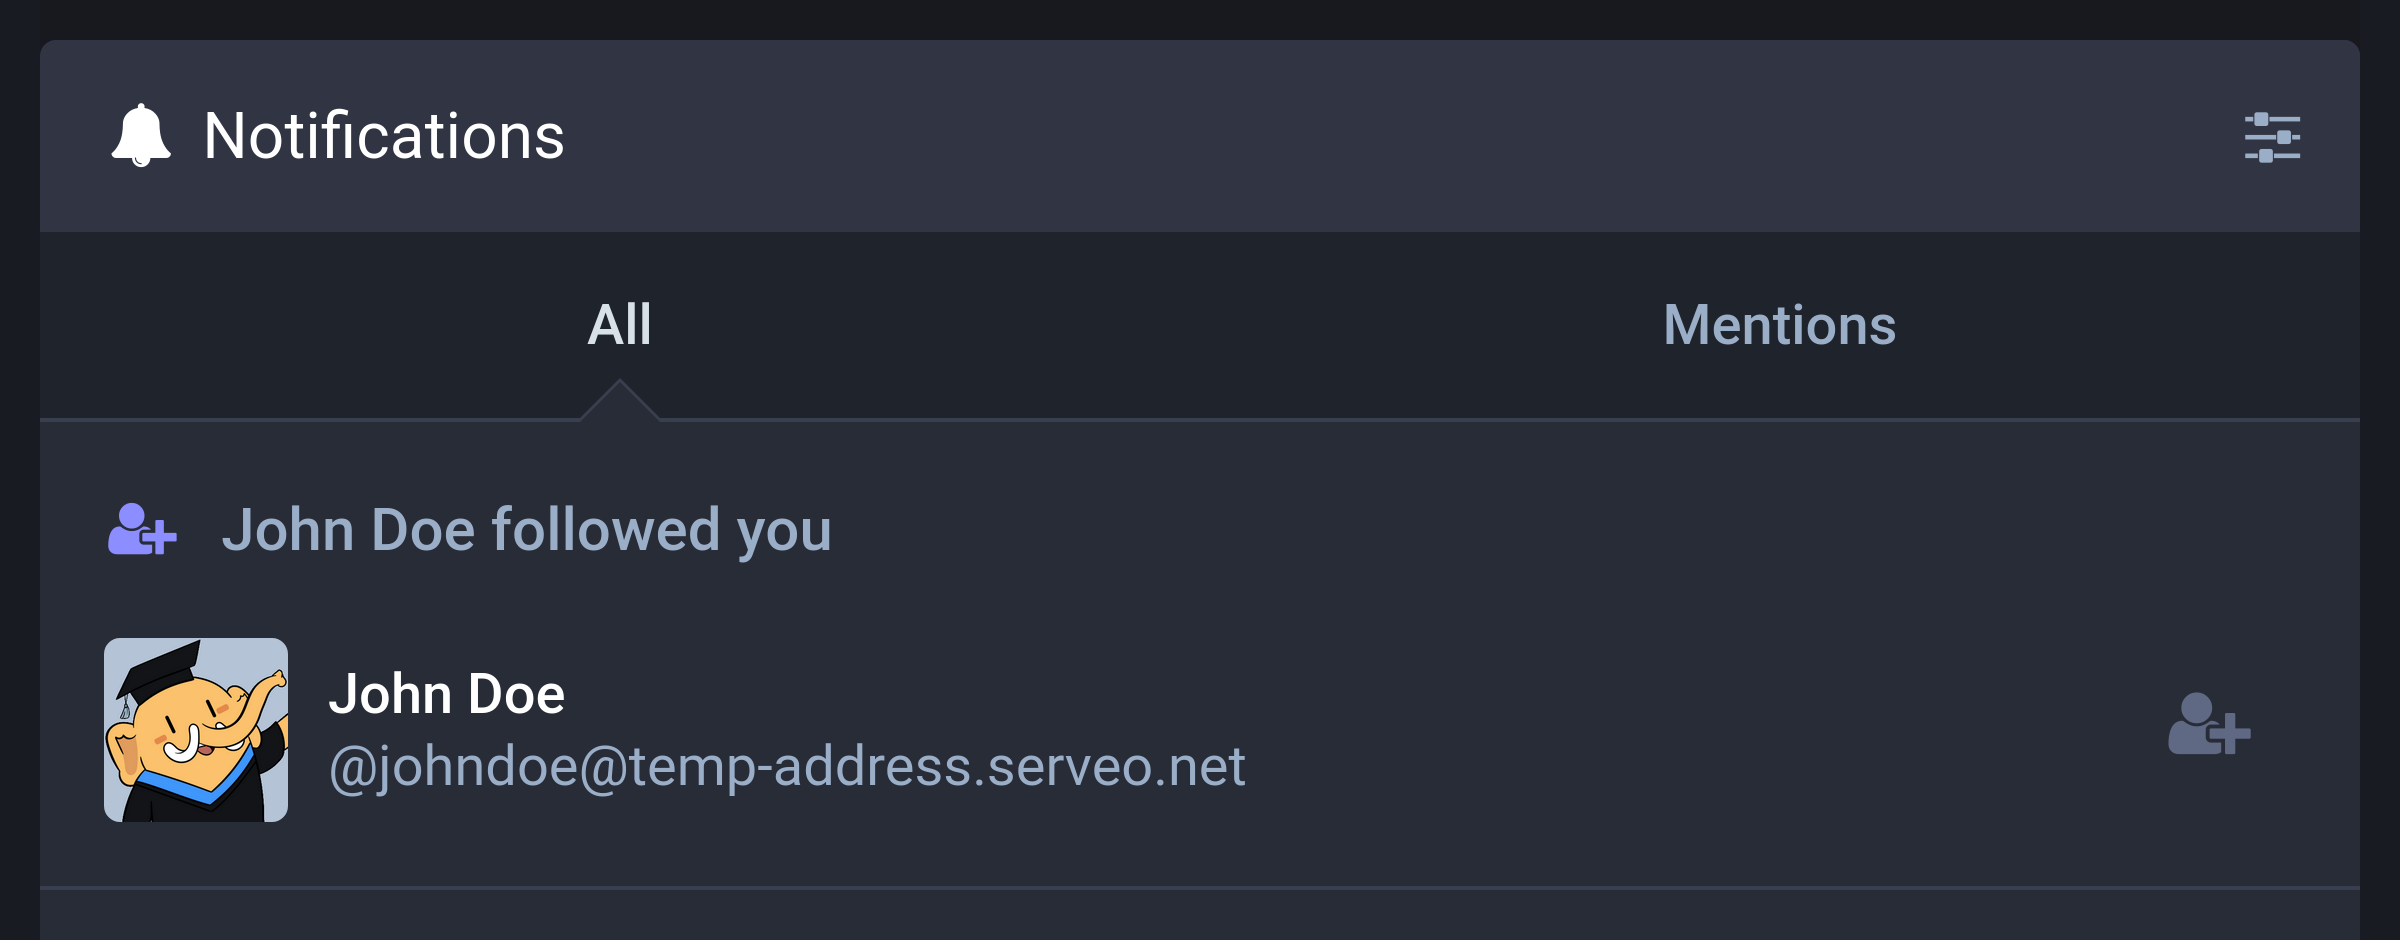
Receiving Accept(Follow) activity
However, we're not taking any action on the received Accept(Follow) activity yet, so we need to implement this part.
Open the src/federation.ts file and import the isActor() function and Actor type provided by Fedify:
import {
  createFederation,
  exportJwk,
  generateCryptoKeyPair,
  importJwk,
} from "@fedify/fedify";
import {
  Accept,
  Endpoints,
  Follow,
  Note,
  PUBLIC_COLLECTION,
  Person,
  Undo,
  getActorHandle,
  isActor,
  type Actor as APActor,
  type Recipient,
} from "@fedify/vocab";
We've given the alias APActor to the Actor type because the Actor type name is already used in this source file.
Before implementation, let's refactor the code that adds actor information to the actors table when first encountered to make it reusable. Add the following function:
async function persistActor(actor: APActor): Promise<Actor | null> {
  if (actor.id == null || actor.inboxId == null) {
    logger.debug("Actor is missing required fields: {actor}", { actor });
    return null;
  }
  return (
    db
      .prepare<unknown[], Actor>(
        `
        -- Add a new actor record or update if it already exists
        INSERT INTO actors (uri, handle, name, inbox_url, shared_inbox_url, url)
        VALUES (?, ?, ?, ?, ?, ?)
        ON CONFLICT (uri) DO UPDATE SET
          handle = excluded.handle,
          name = excluded.name,
          inbox_url = excluded.inbox_url,
          shared_inbox_url = excluded.shared_inbox_url,
          url = excluded.url
        WHERE
          actors.uri = excluded.uri
        RETURNING *
        `,
      )
      .get(
        actor.id.href,
        await getActorHandle(actor),
        actor.name?.toString(),
        actor.inboxId.href,
        actor.endpoints?.sharedInbox?.href,
        actor.url?.href,
      ) ?? null
  );
}
The defined persistActor() function adds a record corresponding to the actor object passed as an argument to the actors table. If there's already a corresponding record in the table, it updates the record.
Change the code doing the same role in the on(Follow, ...) part of the inbox to use the persistActor() function:
federation
  .setInboxListeners("/users/{identifier}/inbox", "/inbox")
  .on(Follow, async (ctx, follow) => {
    // ... omitted ...
    if (followingId == null) {
      logger.debug(
        "Failed to find the actor to follow in the database: {object}",
        { object },
      );
    }
    const followerId = (await persistActor(follower))?.id;
    db.prepare(
      "INSERT INTO follows (following_id, follower_id) VALUES (?, ?)",
    ).run(followingId, followerId);
    // ... omitted ...
  })
Now that we've finished refactoring, let's implement the behavior when receiving an Accept(Follow) activity in the inbox:
  .on(Accept, async (ctx, accept) => {
    const follow = await accept.getObject();
    if (!(follow instanceof Follow)) return;
    const following = await accept.getActor();
    if (!isActor(following)) return;
    const follower = follow.actorId;
    if (follower == null) return;
    const parsed = ctx.parseUri(follower);
    if (parsed == null || parsed.type !== "actor") return;
    const followingId = (await persistActor(following))?.id;
    if (followingId == null) return;
    db.prepare(
      `
      INSERT INTO follows (following_id, follower_id)
      VALUES (
        ?,
        (
          SELECT actors.id
          FROM actors
          JOIN users ON actors.user_id = users.id
          WHERE users.username = ?
        )
      )
      `,
    ).run(followingId, parsed.identifier);
  });
Although there's a lot of validity checking code, in summary, it gets the actor who sent the follow request (follower) and the actor who received the follow request (following) from the contents of the Accept(Follow) activity and adds a record to the follows table.
Testing
Now we need to check if it's working well, but there's a problem. When we sent a follow request earlier, ActivityPub.Academy already accepted the follow request and sent an Accept(Follow) activity, so even if we send another follow request, it will be ignored. Therefore, we need to log out of ActivityPub.Academy and create a new temporary account to test.
If you've created a new temporary account in ActivityPub.Academy, with the local server exposed to the public internet using the fedify tunnel command, go to the https://temp-address.serveo.net/ page (replace the domain name) in your web browser and send a follow request to the new temporary account on ActivityPub.Academy.
If the follow request was sent successfully, you should see the Follow activity arriving and the Accept(Follow) activity being sent in response in the Activity Log, just like before:
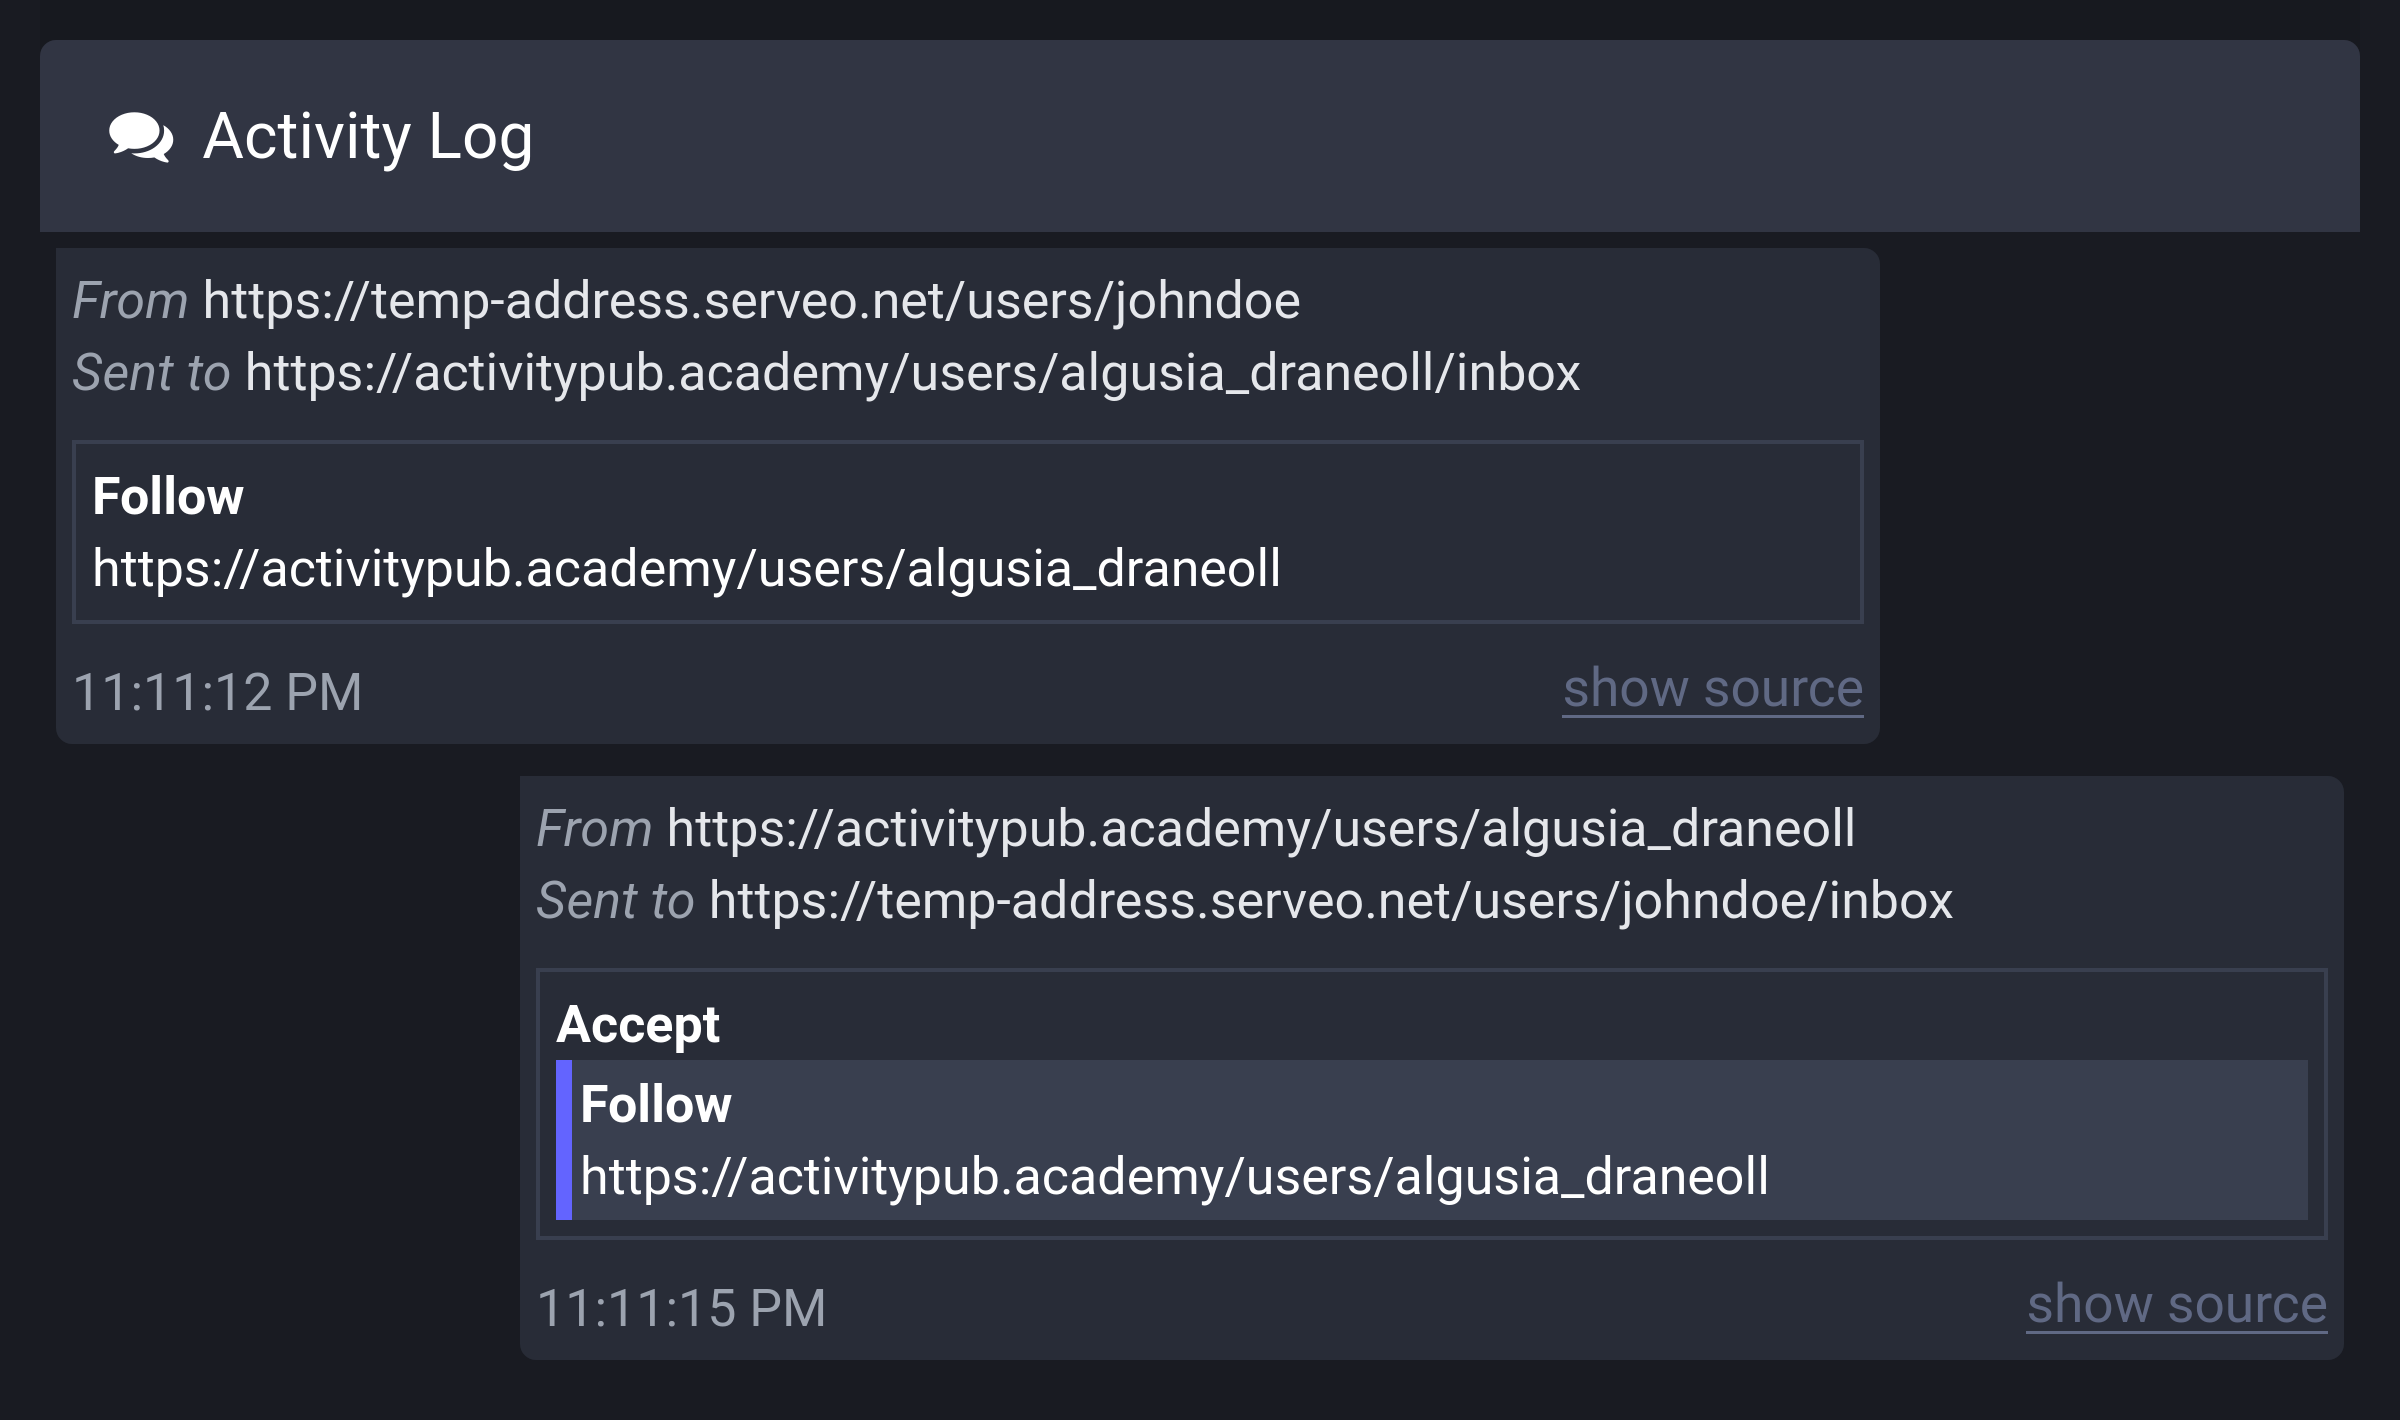
We haven't implemented the following list yet, so let's directly check if a record has been properly added to the follows table:
echo "SELECT * FROM follows WHERE follower_id = 1;" | sqlite3 -table microblog.sqlite3If successful, you should see a result like this (the value in the following_id column might be slightly different):
following_id | follower_id | created |
|---|---|---|
3 | 1 | 2024-09-02 14:11:17 |
Following list
Let's create a page that displays the list of actors our actor is following.
First, open the src/views.tsx file and add a <FollowingList> component:
export interface FollowingListProps {
  following: Actor[];
}

export const FollowingList: FC<FollowingListProps> = ({ following }) => (
  <>
    <h2>Following</h2>
    <ul>
      {following.map((actor) => (
        <li key={actor.id}>
          <ActorLink actor={actor} />
        </li>
      ))}
    </ul>
  </>
);
Then, open the src/app.tsx file and import the <FollowingList> component we just defined:
import {
  FollowerList,
  FollowingList,
  Home,
  Layout,
  PostList,
  PostPage,
  Profile,
  SetupForm,
} from "./views.tsx";
And add a handler for the GET /users/{username}/following request:
app.get("/users/:username/following", async (c) => {
  const following = db
    .prepare<unknown[], Actor>(
      `
      SELECT following.*
      FROM follows
      JOIN actors AS followers ON follows.follower_id = followers.id
      JOIN actors AS following ON follows.following_id = following.id
      JOIN users ON users.id = followers.user_id
      WHERE users.username = ?
      ORDER BY follows.created DESC
      `,
    )
    .all(c.req.param("username"));
  return c.html(
    <Layout>
      <FollowingList following={following} />
    </Layout>,
  );
});
To check if it's been implemented correctly, open the http://localhost:8000/users/johndoe/following page in your web browser:
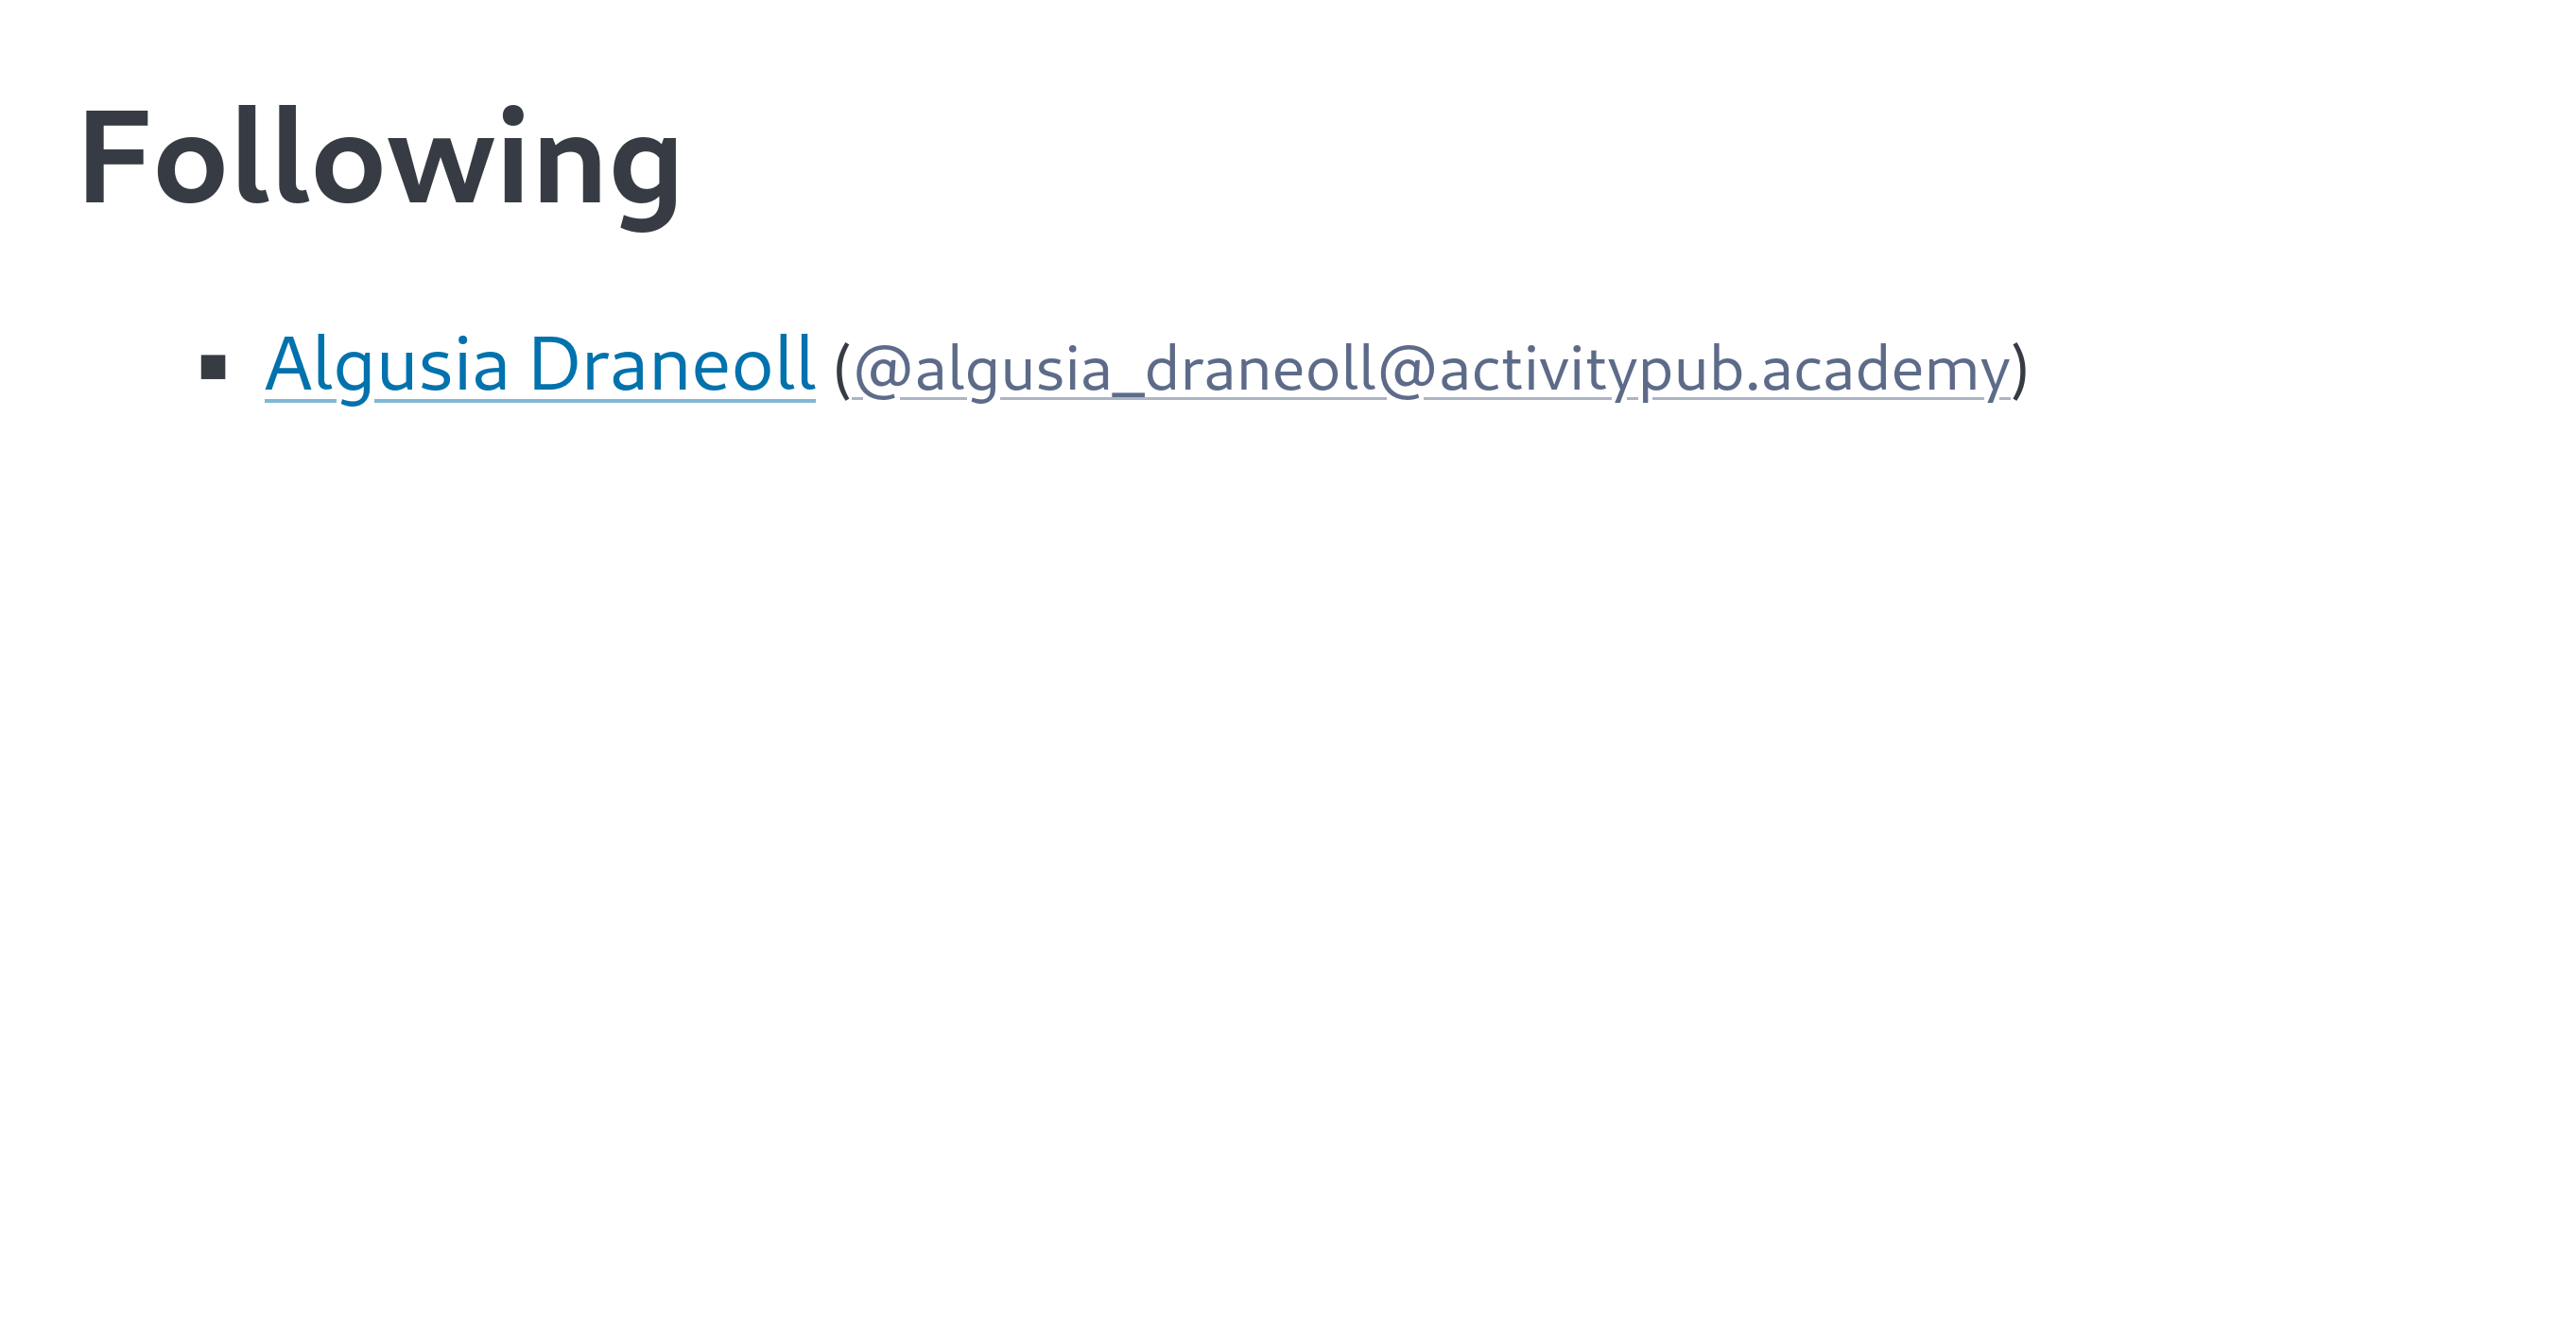
Following count
Just as we're showing the number of followers, we should also display the number of accounts the user is following.
Open the src/views.tsx file and modify the <Profile> component as follows:
export interface ProfileProps {
name: string;
username: string;
handle: string;
following: number;
followers: number;
}
export const Profile: FC<ProfileProps> = ({
name,
username,
handle,
following,
followers,
}) => (
<>
<hgroup>
<h1>
<a href={`/users/${username}`}>{name}</a>
</h1>
<p>
<span style="user-select: all;">{handle}</span> ·{" "}
<a href={`/users/${username}/following`}>{following} following</a>{" "}
·{" "}
<a href={`/users/${username}/followers`}>
{followers === 1 ? "1 follower" : `${followers} followers`}
</a>
</p>
</hgroup>
</>
);Also modify the <PostPage> component as follows:
export interface PostPageProps extends ProfileProps, PostViewProps {}

export const PostPage: FC<PostPageProps> = (props) => (
  <>
    <Profile
      name={props.name}
      username={props.username}
      handle={props.handle}
      following={props.following}
      followers={props.followers}
    />
    <PostView post={props.post} />
  </>
);
Now we need to write code to actually query the database and get the number of following accounts.
Open the src/app.tsx file and modify the GET /users/{username} request handler as follows:
app.get("/users/:username", async (c) => {
  // ... omitted ...
  if (user == null) return c.notFound();

  // oxlint-disable-next-line typescript/no-non-null-assertion -- Always returns a single record
  const { following } = db
    .prepare<unknown[], { following: number }>(
      `
      SELECT count(*) AS following
      FROM follows
      JOIN actors ON follows.follower_id = actors.id
      WHERE actors.user_id = ?
      `,
    )
    .get(user.id)!;
  // ... omitted ...
  return c.html(
    <Layout>
      <Profile
        name={user.name ?? user.username}
        username={user.username}
        handle={handle}
        following={following}
        followers={followers}
      />
      <PostList posts={posts} />
    </Layout>,
  );
});
Also modify the GET /users/{username}/posts/{id} request handler:
app.get("/users/:username/posts/:id", (c) => {
  // ... omitted ...
  if (post == null) return c.notFound();

  // oxlint-disable-next-line typescript/no-non-null-assertion -- Always returns a single record
  const { following, followers } = db
    .prepare<unknown[], { following: number; followers: number }>(
      `
      SELECT sum(follows.follower_id = ?) AS following,
             sum(follows.following_id = ?) AS followers
      FROM follows
      `,
    )
    .get(post.actor_id, post.actor_id)!;
  return c.html(
    <Layout>
      <PostPage
        name={post.name ?? post.username}
        username={post.username}
        handle={post.handle}
        following={following}
        followers={followers}
        post={post}
      />
    </Layout>,
  );
});
If you've made all these modifications, open the http://localhost:8000/users/johndoe page in your web browser:
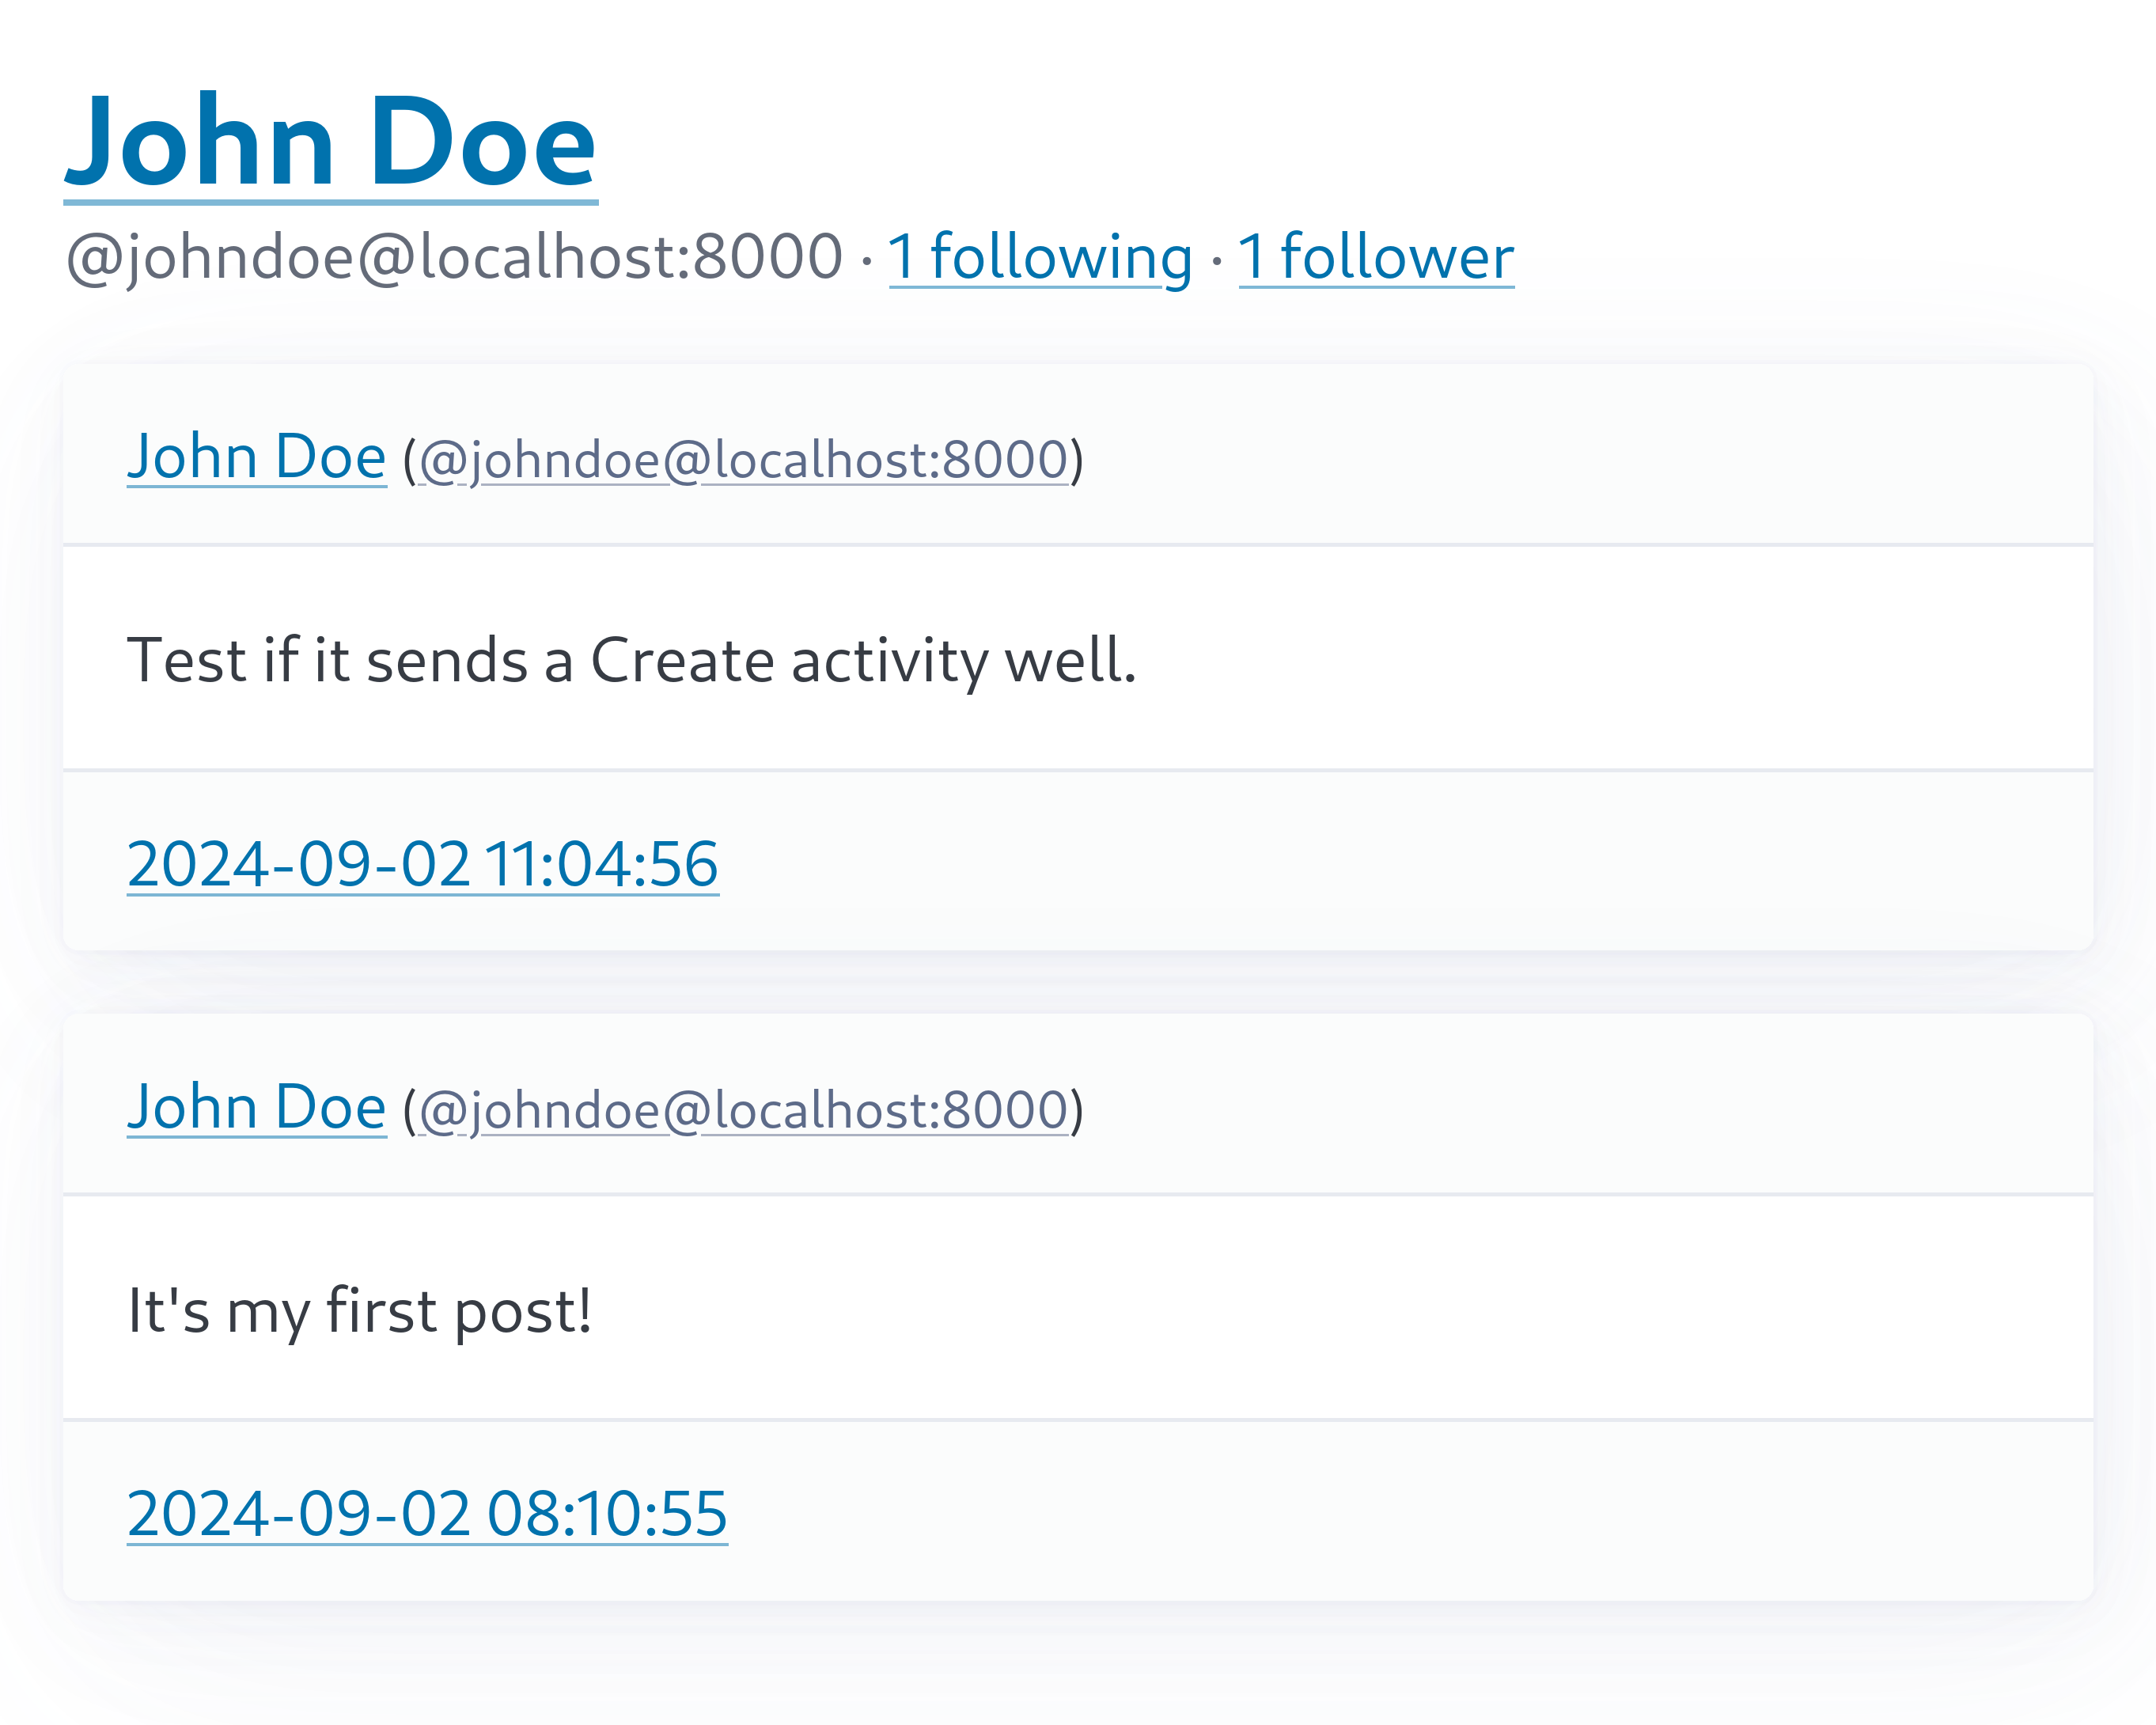
Timeline
We've implemented many things, but posts written on other Mastodon servers are still not visible. As you might have guessed from the process so far, just as we sent a Create(Note) activity when we wrote a post, we need to receive a Create(Note) activity from other servers to see posts written on other Mastodon servers.
To see exactly what happens when a post is written on another Mastodon server, let's create a new post on ActivityPub.Academy:

After pressing the Publish! button to save the post, go to the Activity Log page and check if the Create(Note) activity was indeed sent:
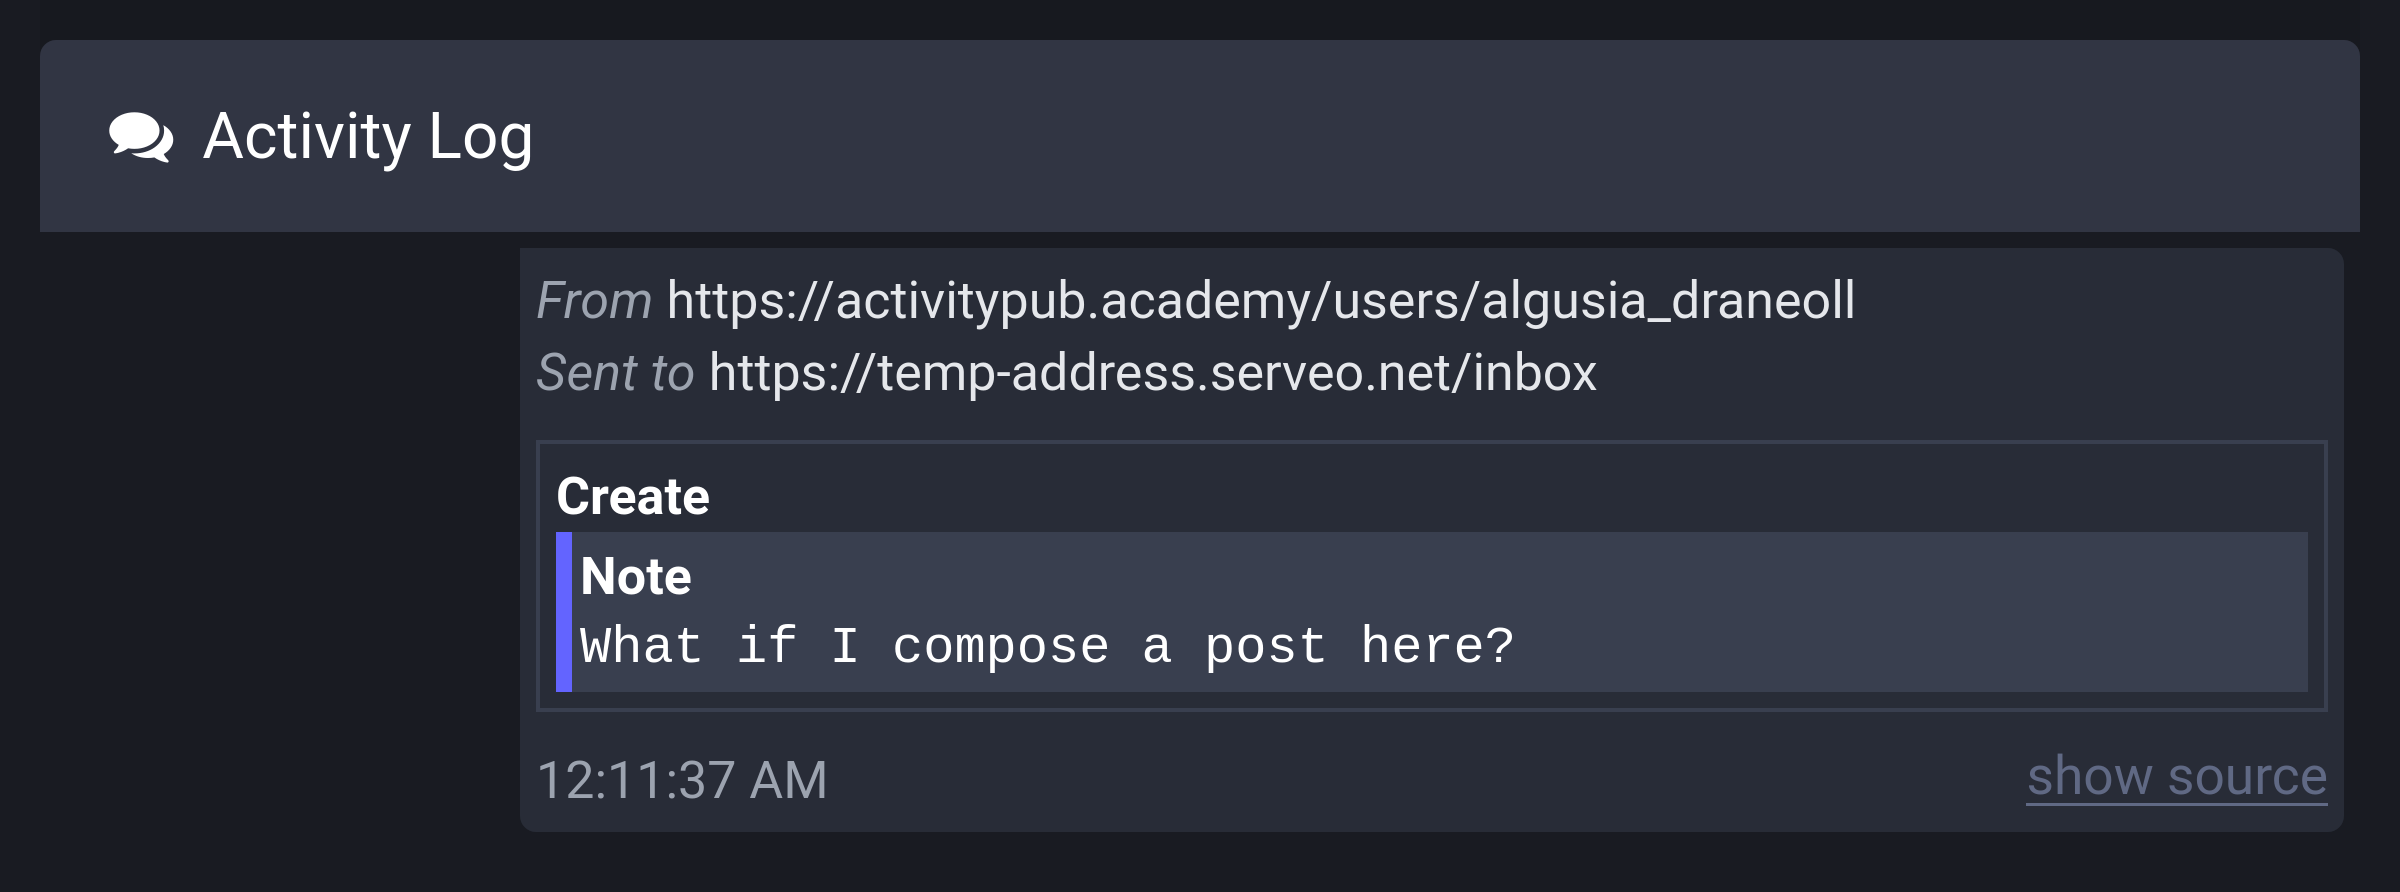
Now we need to write code to receive this sent Create(Note) activity.
Receiving Create(Note) activity
Open the src/federation.ts file and import the Create class provided by Fedify:
import {
  createFederation,
  exportJwk,
  generateCryptoKeyPair,
  importJwk,
} from "@fedify/fedify";
import {
  Accept,
  Create,
  Endpoints,
  Follow,
  Note,
  PUBLIC_COLLECTION,
  Person,
  Undo,
  getActorHandle,
  isActor,
  type Actor as APActor,
  type Recipient,
} from "@fedify/vocab";
And add on(Create, ...) to the inbox code:
  .on(Create, async (ctx, create) => {
    const object = await create.getObject();
    if (!(object instanceof Note)) return;
    const actor = create.actorId;
    if (actor == null) return;
    const author = await object.getAttribution();
    if (!isActor(author) || author.id?.href !== actor.href) return;
    const actorId = (await persistActor(author))?.id;
    if (actorId == null) return;
    if (object.id == null) return;
    const content = object.content?.toString();
    db.prepare(
      "INSERT INTO posts (uri, actor_id, content, url) VALUES (?, ?, ?, ?)",
    ).run(object.id.href, actorId, content, object.url?.href);
  });
We use the getAttribution() method to get the author, then add the actor to the actors table if it's not already there using the persistActor() function. Then we add a new record to the posts table.
To check if the code is working well, let's go back to ActivityPub.Academy and create a post. Open the Activity Log to check if the Create(Note) activity was sent, then use the following command to check if a record was indeed added to the posts table:
echo "SELECT * FROM posts WHERE actor_id != 1" | sqlite3 -table microblog.sqlite3If a record was indeed added, you should see a result like this:
id | uri | actor_id | content | url | created |
|---|---|---|---|---|---|
3 | https://activitypub.academy/users/algusia_draneoll/statuses/113068684551948316 | 3 | <p>Would it send a Create(Note) activity?</p> | https://activitypub.academy/@algusia_draneoll/113068684551948316 | 2024-09-02 15:33:32 |
Displaying remote posts
Now that we've added remote posts as records in the posts table, all that's left is to display these records well. This is often called a timeline
feature.
First, open the src/views.tsx file and modify the <Home> component:
export interface HomeProps extends PostListProps {
  user: User & Actor;
}

export const Home: FC<HomeProps> = ({ user, posts }) => (
  <>
    {/* ... omitted ... */}
    <PostList posts={posts} />
  </>
);
Then, open the src/app.tsx file and modify the GET / request handler:
app.get("/", (c) => {
  // ... omitted ...
  if (user == null) return c.redirect("/setup");

  const posts = db
    .prepare<unknown[], Post & Actor>(
      `
      SELECT actors.*, posts.*
      FROM posts
      JOIN actors ON posts.actor_id = actors.id
      WHERE posts.actor_id = ? OR posts.actor_id IN (
        SELECT following_id
        FROM follows
        WHERE follower_id = ?
      )
      ORDER BY posts.created DESC
      `,
    )
    .all(user.id, user.id);
  return c.html(
    <Layout>
      <Home user={user} posts={posts} />
    </Layout>,
  );
});
Now that we've implemented everything, let's open the http://localhost:8000/ page in your web browser to admire the timeline:
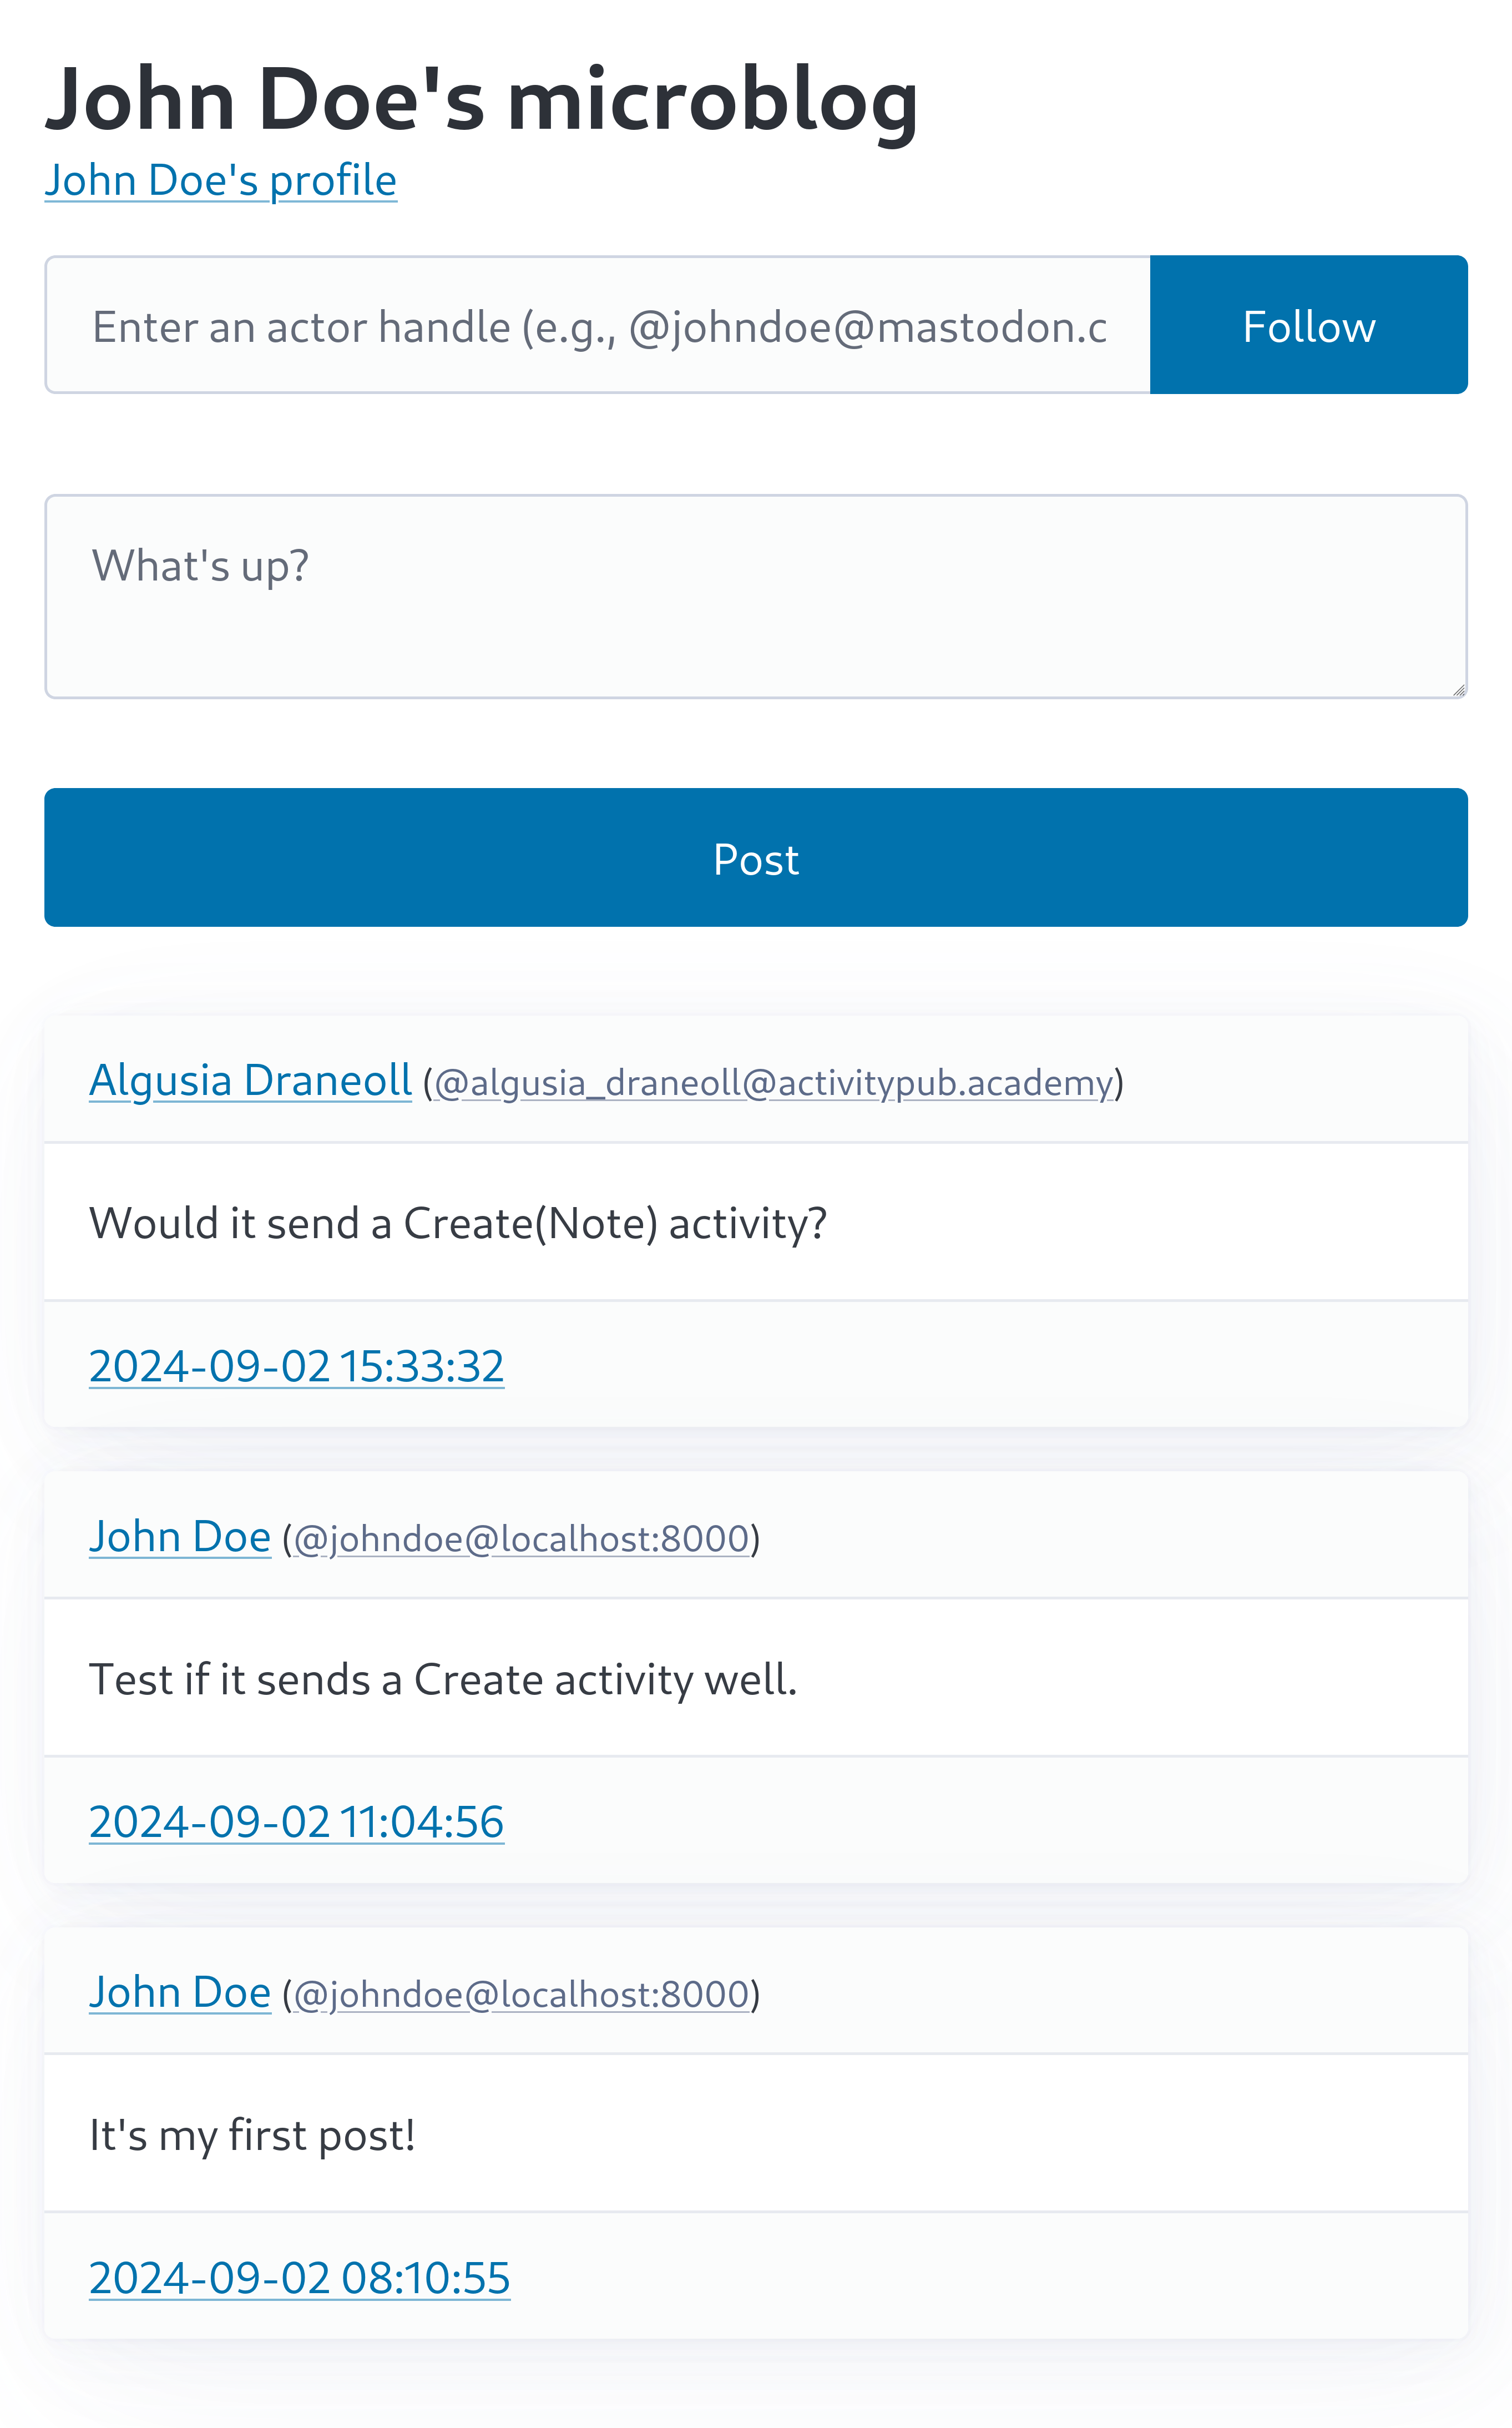
As you can see above, posts created remotely and posts created locally are displayed in chronological order. How do you like it?
This is all we're going to implement in this tutorial. Based on this, you should be able to complete your own microblog.
Areas for improvement
Unfortunately, the microblog you've completed through this tutorial is not yet suitable for real use. In particular, there are many vulnerabilities in terms of security, so it could be dangerous to actually use it.
For those who want to further develop the microblog you've created, you might want to try solving the following challenges:
Currently, there's no authentication, so anyone can post if they know the URL. How about adding a login process to prevent this?
The current implementation directly outputs the HTML contained in the
Noteobject received via ActivityPub. Therefore, a malicious ActivityPub server could send aCreate(Note)activity containing HTML like<script>while (true) alert('Gotcha!');</script>. This is called an XSS vulnerability. How can we prevent such vulnerabilities?Let's try changing the name of the actor we created by executing the following SQL in the SQLite database:
UPDATE actors SET name = 'Renamed' WHERE id = 1;When we change the actor's name like this, will the changed name be applied on other Mastodon servers? If not, what kind of activity should we send to apply the change?
Let's try adding a profile picture to the actor. If you're wondering how to add a profile picture, try using the
fedify lookupcommand to look up an actor that already has a profile picture.Try creating a post with an image attached on another Mastodon server. In the timeline we created, the image attached to the post isn't visible. How can we display the attached image?
Let's make it possible to mention other actors within a post. What should we do to send a notification to the mentioned party? Use the Activity Log of ActivityPub.Academy to find a way.